From your first coloured territory to the finished print. Real panels, numbered pointers and plain-English help for the things you can click, drag and change.
Use Import Excel directly below START HERE for a postcode list, or start with territory names and colour the map by hand. The topic list also covers the other menus, saving and your file manager. Open a topic and match the numbered circles to the explanations beside the picture.
Pictures use example maps and expanded menus. Your available layers, access options and prices can differ. This handbook describes the classic editor; maps marked pro open in VectorMaps.
Find your answer
Search the handbook
Start here
Your first coloured map
A good territory map begins with a few clear names. Give each team, branch or service area its own zone in the legend (also called the key). Click a zone name in the legend to select it, then click inside the shapes on the map that you want to colour for that zone. You can tidy the labels and page layout afterwards.
1. Select the zone, then click the map. Click North team’s name in the legend first. Then click inside YO17 on the map itself. The pointer shows the sort of place to click: inside the boundary shape, rather than on a legend colour square or a menu control. 2. See the shape change colour. After that click, YO17 belongs to North team and turns green. Continue clicking the map shapes you want in this zone. You only need to select a new legend name when you want to work on a different zone. 3. Choose the next zone. Select York team in the legend, then click its shapes on the map. They turn blue; the existing North team shapes remain green. If you click a shape already owned by another zone, you move it into the zone you have selected.
New maps start with three editable names. You can also edit them directly on the legend in Design.
A new map starts with Name 1, Name 2 and Name 3 in the legend. In Design, click a name on the legend and type a useful label such as North team. Press Enter or click away to finish. Choose Add Name below the legend for another territory. You can do this without opening START HERE; its Add New Name and name boxes remain available and stay in sync. Existing saved maps keep their own entries. A territory name is a label, not a search for a place.
Click a territory name in the legend to select it. In Design this also opens its inline name box: keep or edit the name, then press Enter or click the map. Click inside each postcode or county shape that belongs to that territory to colour it. Select another legend name before colouring the next territory. The name box in START HERE also selects the same territory.
Click its colour square to open the palette. Choosing a colour changes that entry and the polygons already assigned to it. Pick colours that remain easy to tell apart when the map is printed.
Use Map details to reduce clutter, Map Titles to describe the job and Key Settings to arrange the key. Check Print View before exporting. Save the editable map as well as downloading the finished image; the editable copy is what you will reopen to change the territories.
Blue question marks open the illustrated guide for a control. Map assistant can answer a question, show a control or propose supported edits. You can speak or attach a reference file. On a phone, start with Tools or Speak; the same features are available in a compact layout.
Use Import Excel, directly below START HERE in the desktop menu, to paste postcodes and matching territory names. On a phone or tablet, open Tools → Import Excel. You can then refine the imported names and colours in START HERE. The two panels keep their entered values when you switch between them.
While the Unlock this map card is present, trial users can click or tap to colour only inside the dotted artboard. The lighter workspace outside it is for moving and arranging the map. Drag an area back inside the dotted line, then click it to colour. You can still drag and scroll to zoom outside the artboard. An unlocked map does not have this trial colouring restriction.
What this looks like
Current GBMaps controls with example maps and account details. Choose View larger to see the details.
Which postcode map do you need? Start with one familiar postcode, see how its boundaries divide on the map, then choose the smallest shapes you need to colour separately.
Read a postcode from left to right and each level narrows the location. YO is the postcode area; YO18 is the district; YO18 7 is the sector; YO18 7TG is the full postcode, also called a postcode unit. Each longer code includes the part before it. The district is YO18, not just 18, and the sector is YO18 7, not just 7.
Area
YO18 7TG
The broadest of these map boundaries.
District
YO18 7TG
One smaller part of the YO area.
Sector
YO18 7TG
One smaller part of the YO18 district.
Full postcode / unit
YO18 7TG
The complete code used for an address.
Keep the beginning each time: YO → YO18 → YO18 7 → YO18 7TG. The bold part is the complete code for that level.
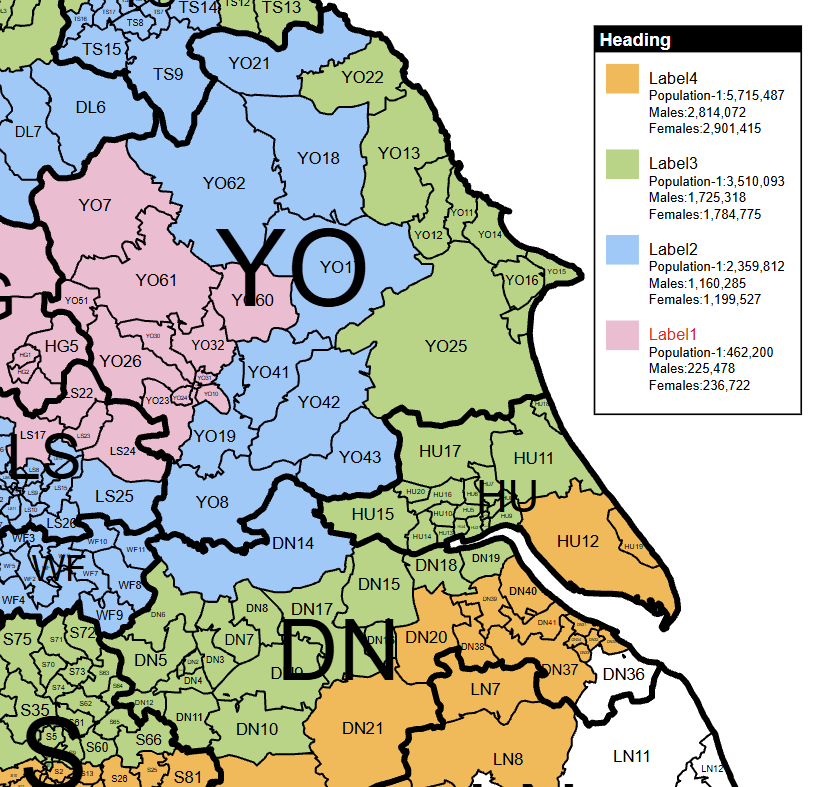
The coloured pieces below are the shapes you can click to build territories. On an area map, one click can colour the whole YO area. On a district map, YO18 can have a different colour from neighbouring YO17 or YO62. On a sector map, YO18 7 and YO18 8 can be coloured separately. The district and sector pictures use the same view and zoom: the extra boundaries come from the map detail, not from zooming in.
An area: the whole YO shape
The green shape is the YO postcode area. It is one colourable piece at area level, surrounded by other areas such as TS, HG and HU. This first picture shows a wider stretch of the map so you can see the whole area.
A district: YO18 on its own
Now zoom into part of YO. The blue shape is YO18. Nearby YO17, YO22 and YO62 are separate districts, so they can belong to different territories.
Sectors: divide YO18 further
At the same zoom, YO18 7 is gold and YO18 8 is pink. You can put these two pieces in different territories, or give them the same colour to group them together.
Same place, more choices. The two lower pictures cover exactly the same extent. Sectors add smaller colourable pieces inside the district.
Think of a real boundary between two of your territories. Would one person look after all of YO, or would different people cover parts of it? If a boundary needs to run between two districts, choose district detail. If it needs to run inside a district, choose sectors. You can always combine several shapes into one territory; you cannot divide a single postcode polygon into finer postcode shapes on a coarser map.
Choose areas
YO · LS · HG
“Each sales region covers one or more whole postcode areas.”
A clear national overview with fewer shapes and labels.
Choose districts
YO17 · YO18 · YO62
“Our teams need different parts of the YO area.”
Useful for regional sales territories, delivery patches and account allocation.
Choose sectors
YO18 7 · YO18 8
“Two teams share YO18 and need their own smaller patches.”
Choose this when a district is still too broad for your boundaries.
The part before the space is the outward code: it identifies the district. The three characters after the space are the inward code. Its first character is a number, which adds the sector; its final two letters complete the full postcode. The area starts with one or two letters, while a district can have one or two numbers and sometimes an extra letter. SW1A is a district, for example: the A belongs with SW1A. Do not split every postcode after a fixed number of characters.
YO18Outward codeThe district
space
7TGInward code7 gives the sector; TG completes the postcode
YO18 is a district. YO1 8 is a sector in the different district YO1. They are not the same place. Write sectors with a space before the final digit, and full postcodes with a space before the final three characters. Some compact map labels omit the space: YO187 on a sector map means YO18 7. These illustrations put it back to make the levels easier to recognise. Use clearly spaced codes in your own spreadsheets.
Zooming enlarges the shapes already on your map; it does not turn an area map into a district or sector map. A detailed map can show broader boundaries for reference as well as its smaller shapes. Use the Colour selector at the top of the editor to check which level a click will colour. In START HERE, select the zone in the legend first, then click the map shapes you want to give that zone’s colour. If you have already coloured smaller shapes, colouring their whole parent area can replace that work; read the warning before continuing.
A full postcode usually refers to a group of delivery addresses; some large users have a postcode of their own. It is not a precise building boundary. The three polygon map choices discussed here are areas, districts and sectors, with sectors giving the finest of those boundaries. A postcode dot or marker is a location placed on the map, rather than another colourable polygon. If you want to show customers or branches, you may be able to use dots on a simpler map without needing sector boundaries.
Postal geography is a different system from counties, councils and wards. A postcode area may cross administrative boundaries, and its name does not mean it covers only the town or county you associate with it. Choose postcode maps when postcodes are how you allocate work or record customers. If your report genuinely needs county boundaries, look at the county map instead. Also, a large rural polygon is not necessarily a bigger market than a small urban one: size on the page does not tell you its population or sales.
Choose the map detail for the territories you want to see and edit, rather than the length of the postcodes in your file. For example, a sales dataset recorded by sector can be added together for its parent districts or areas. Full-postcode values can also contribute to those totals. In My datasets, upload the CSV, check the postcode and value columns, then name and save it. Data must match the supported postcode geography; check the import results and any partial-total warning. Going the other way is different: a total for YO18 does not tell us how much belongs in YO18 7 or YO18 8, so the tool cannot invent that split.
A territory is the collection of shapes you give the same zone colour. On a district map you might group several YO districts with neighbouring districts in another postcode area. They remain separate postcode shapes, but their colour and legend entry show that they belong to the same team. Add your own zone names in the legend, and use Hide unassigned areas when you want the finished map to focus on the places you have coloured. More detail is useful only when you need those extra divisions; it can also mean more labels to fit on a printed page.
Find a place you know and try colouring the territories you actually need. Check the Colour selector, the available boundaries and how the labels look in Print View. If your job depends on an import, try a small representative sample too. An area map is often enough for a broad national overview; districts suit many regional territory plans; sectors let you make finer local divisions. Check the selected map’s current unlock options for what the licence includes before buying. The map links in the public handbook open a preview of the editor, not a payment.
Already working on a map? Use Back to my map or Back to saved maps at the top of this guide to continue where you left off. Save your work before switching to a different map type.
Postcodes can be introduced, changed or retired, so an old customer list may contain codes that do not match a current map. Check questionable entries before treating an unmatched row as zero sales or no customers. The pictures here use the tool’s real map artwork with example colours and larger labels for explanation. They explain the levels; they are not a postcode lookup or a statement that a particular address is current.
These tabs show the map in different contexts. Print View and Design work on the same artwork. On Google opens a geographic preview of the territory information.
Shows the page background, title and border, with the map clipped to the page. Use it to judge what will fit on a PDF or image: check the key, markers and any circles near the edges. It is still possible to work on the map here.
Gives you room to arrange artwork beyond the page edge. The clearer dotted rectangle is the artboard (the printable page), with a lighter workspace outside. While the Unlock this map card is present, trial users can click or tap to colour only inside the dotted artboard. The lighter workspace outside it is for moving and arranging the map. Drag an area back inside the dotted line, then click it to colour. You can still drag and scroll to zoom outside the artboard. An unlocked map does not have this trial colouring restriction. Move the key and annotations inside the rectangle to include them in the final page. Print View shows the page without the dotted guide. The guide, workspace grid and direct-legend editing buttons are absent from finished exports.
Builds a preview of the current territories over a geographic background. The editing sidebar is hidden and cannot be reopened in this view; it returns to its previous state when you go back to Print View or Design. Undo and Redo are unavailable here. Return to the editor to change the design, then reopen On Google to refresh the preview.
On desktop, Log in and Buy Unlock (or your account controls) are at the top of the sidebar, then Map Types, Save / Open / New and the editing menus. Colour and Detail sit above the map, orientation is on the right, and zoom and Fit map are near the bottom. Use the slim left handle to hide or reopen the sidebar. On a phone or tablet, use Tools and the compact top bar. Closing a panel makes room without removing map content.
Starts the guided introduction. Follow its steps or close it to return to your map. Blue question marks beside menus open the relevant illustrated help; the guide links to a video where one is available.
Undo reverses a recent colouring operation; Redo restores it. A greyed-out button has no available step, or you are in a view where editing is unavailable. Read any import or delete confirmation rather than assuming the whole tool has unlimited undo.
Enter a postcode or place and use the magnifying-glass button. The search locates it for you; it does not assign it to a territory. The red clear button removes the search indication. Search availability and wording depend on the selected map. The same top search is used in On Google once that preview is ready.
Opens this handbook in a large overlay. Search for an answer or browse the menus, then use the close cross, Back to my map or Escape to resume your work. It is also available in On Google. Help does not save or change the map.
What this looks like
Current GBMaps controls with example maps and account details. Choose View larger to see the details.
Map movement changes the composition of the artwork on the page. Place the pointer over the map itself when you want to move or zoom the map; the key has its own gestures.
Roll the wheel or use your trackpad’s scroll gesture over the map to change its scale. Zoom in for small districts or sectors, then zoom out to check the overall composition. Double-click also zooms the SVG map, but use the wheel or +/− while colouring to avoid combining quick colouring clicks with a zoom. If the key changes size, move the pointer off the key first.
Drag the map or the empty workspace outside the dotted artboard to reposition it. Use a deliberate drag for panning. A quick click with a tiny involuntary movement can still colour a polygon. In a trial, that colouring click must be inside the artboard; dragging and scroll zoom still work outside. Moving an already coloured area outside does not erase its colour. To move only the key, use its own drag handle.
Use − to zoom out and + to zoom in. They are useful if your mouse has no wheel or you want an obvious control on a touch screen. Zooming can also change which boundary level is selected for colouring, so keep an eye on Colour:.
Restores the map’s starting scale and position. Use it if you have zoomed too far in, moved the map out of sight, or want to start framing the page again. It does not clear your territory colours. The key has its own Reset position button.
Opens the directional controls. Use the arrows to move the artwork up, down, left or right; holding an arrow continues the movement. The centre button fits the map. Click away or press Escape to close the pad.
Tap a territory name and then a polygon to colour it. Use a deliberate drag to move the map and a two-finger pinch to zoom. The visible +, − and Move map controls are useful when a small polygon or a crowded key makes touch gestures awkward. A placement mode takes priority over ordinary colouring.
Click an editing-menu heading to open its controls; another editing menu closes the previous one. Long panels scroll while keeping their heading accessible. Map Types is different: it opens a catalogue card over the sidebar rather than a map-editing panel. The sidebar handle tucks the tools away. In On Google the editing sidebar is unavailable; return to Design or Print View to use it.
On supported district, sector and parish maps, Design hides lettering that is too small to read and reveals it progressively as you zoom in. This keeps the overview clearer. It does not untick your label choices or remove labels from the map. Print View and exports include labels whose visibility switches are on. See Labels while zooming for exceptions and missing-label checks.
Gives you a tall page. This often suits a map of Great Britain or a north–south territory. After switching, check the map framing, title and key in Print View.
Gives you a wide page. It can work well for an east–west region or a presentation slide. Move and resize the map and key to make good use of the width.
Uses a square page for a more balanced local map or a square graphic. Check the edges before exporting; changing the page shape does not decide the best composition for you.
A map can contain a broad boundary layer and a more detailed one. The Colour: control tells you which level a click will affect. The Detail: control describes the map product itself.
2. See the shape change colour. After that click, YO17 belongs to North team and turns green. Continue clicking the map shapes you want in this zone. You only need to select a new legend name when you want to work on a different zone.
Click Colour: to choose which boundary level a click will affect. On UK postcode district or sector maps, zooming also changes the automatic mode between broad and detailed boundaries. On US state maps, your choice stays fixed while you zoom: choose States for a whole state, or Counties / ZIP codes for individual areas. Always read this label before coloring.
If smaller areas already have individual territory colours and you try to colour their whole parent area or state, the tool can warn before replacing that work. On UK postcode maps this includes a partly coloured area, even if its coloured shapes already use your selected colour. Choose Keep existing colours to cancel, or Colour whole area / Colour whole state to replace the assignments. On UK maps zooming can also change the automatic mode: check Colour before clicking.
If you confirmed a replacement by mistake, use Undo straight away to restore the previous colors. To build a mixed territory, switch back to the smaller boundary level and color the individual districts, sectors, ZIP areas or counties instead.
Opens a short explanation of the current boundary detail and a suggested more detailed map, where one exists. The preview/browse link opens another map choice; it is not a switch that adds new geometry to your current saved artwork. Save your current work before leaving.
On maps with district or sector artwork, hold Ctrl on Windows or ⌘ Command on Mac while clicking. In Districts/Sectors mode this colours the whole postcode area; in Areas mode it colours just the clicked smaller unit. The selected Colour mode stays unchanged. See Colour postcode areas faster for examples and replacement warnings.
While the Unlock this map card is present, trial users can click or tap to colour only inside the dotted artboard. The lighter workspace outside it is for moving and arranging the map. Drag an area back inside the dotted line, then click it to colour. You can still drag and scroll to zoom outside the artboard. An unlocked map does not have this trial colouring restriction.
What this looks like
Current GBMaps controls with example maps and account details. Choose View larger to see the details.
Each zone in the legend represents a territory, such as a sales team, depot or service area. To build it, click the zone name in the legend, then click the shapes you want to colour on the map itself. Those boundary shapes are sometimes called polygons. You can change the zone’s name or colour later without selecting all its shapes again.
1. Select the zone, then click the map. Click North team’s name in the legend first. Then click inside YO17 on the map itself. The pointer shows the sort of place to click: inside the boundary shape, rather than on a legend colour square or a menu control. 2. See the shape change colour. After that click, YO17 belongs to North team and turns green. Continue clicking the map shapes you want in this zone. You only need to select a new legend name when you want to work on a different zone. 3. Choose the next zone. Select York team in the legend, then click its shapes on the map. They turn blue; the existing North team shapes remain green. If you click a shape already owned by another zone, you move it into the zone you have selected.
In Design, choose Add Name just below the actual legend and type into the new entry on the legend itself. Press Enter or click away to finish; Escape cancels a new draft. Each name allows up to 29 characters. START HERE → Add New Name remains an alternative and stays in sync. New maps start with Name 1, Name 2 and Name 3; saved maps keep their existing entries.
In Design, click an existing name on the actual legend to select that territory and edit its wording in place. Press Enter or click away to finish. Escape restores its previous name. Renaming keeps its assigned map shapes. You can also edit the matching name box in START HERE; both places stay in sync.
Click the square beside the name, or the matching square in the map key. Choose a new swatch in the palette. All polygons belonging to that entry follow the change. Two territories can use the same colour, but different colours usually make them easier to read.
First click the zone name you want in the legend. Then click once inside a postcode or county shape on the map itself, away from its boundary line. That shape fills with the selected zone’s colour. Repeat for every shape in that territory; you do not have to select the zone again between clicks. To work on another territory, click its name in the legend first. Clicking a shape already assigned to the selected zone clears it; clicking one belonging to a different zone moves it into the selected zone. Check the Colour: control on maps with two boundary levels, so a click affects the district or whole area you intend.
In Design, click the red cross beside an entry on the actual legend, or beside its name in START HERE. This deletes the territory and clears the map shapes assigned to it; it does more than remove a line of text. To keep the territory, rename it instead. The legend keeps its position as it shrinks. Save a copy before a substantial reorganisation.
Use Undo on the top toolbar to step back through colouring changes; Redo reapplies a change you have just undone. Do not rely on these buttons to reverse every kind of edit, import, deletion or account action. A separately saved copy is the safer way to keep a previous version.
While the Unlock this map card is present, trial users can click or tap to colour only inside the dotted artboard. The lighter workspace outside it is for moving and arranging the map. Drag an area back inside the dotted line, then click it to colour. You can still drag and scroll to zoom outside the artboard. An unlocked map does not have this trial colouring restriction.
What this looks like
Current GBMaps controls with example maps and account details. Choose View larger to see the details.
Build your territories directly on the map in Design. Add names, rename entries, change colours and edit the heading without opening START HERE. The menu controls still work and stay in sync.
Choose Design, then click the green Add Name button beneath the legend. Type into the new name box on the legend itself. Press Enter or click away to finish. Escape cancels a new draft. Names allow up to 29 characters. A new map starts with Name 1, Name 2 and Name 3 ready to rename; saved maps keep their own entries.
Click an existing legend name to select that territory and edit its text. Press Enter or click away to finish; Escape restores the previous name. Renaming keeps its assigned shapes. Clicking a shape on the map then colours it with the selected territory. Moving the pointer over an entry highlights that row to make it easier to follow.
In Design, click the heading text or its black bar to edit it in place. Type up to 35 characters, then press Enter or click away to finish. Escape restores the old heading. This is the legend heading, not the page title or saved file name. Map Titles → Key heading stays in sync.
Click the coloured square beside a legend name and choose a colour from the palette. The corresponding territory shapes and the square in START HERE update too. START HERE remains an alternative for adding, naming, colouring and deleting territories.
Click the red cross alongside that legend entry in Design. It removes the entry and clears the map shapes assigned to that territory. Rename the entry instead if you only want different wording. The remaining legend stays in place as its size changes. Save a copy before a major reorganisation.
Drag the blank background, frame or heading bar to move the whole legend. The editing buttons follow it, including after adding or deleting names through START HERE. Scroll over a portrait legend to scale it and its controls together. Key Settings still provides layout, visibility and Reset position.
Add Name, the red crosses, inline input boxes and the hover highlight are editing controls shown only in Design. They are hidden in Print View and On Google and are not included in saved map artwork or exported PDF, PNG, JPG or SVG files. Your actual legend, names, colours and heading remain part of the map when the key is shown. Reopening a saved map in Design brings its editing controls back; it does not add the three starter names again.
What this looks like
Current GBMaps controls with example maps and account details. Choose View larger to see the details.
The key explains the territory colours. Keep it large enough to read, but small enough to leave useful space for the map. To change the order of its entries, simply drag a name up or down in the key; the others rearrange automatically.
Untick to hide the key without deleting its names, colours or territory assignments. Tick it again to bring it back. This is useful when the map will sit beside a separate explanation in a report.
Arranges the entries vertically. It is usually the clearest option for long names, extra text or statistics. This changes the key layout, not the page orientation.
Arranges entries across the key. Use the rows selector that appears to choose between one and six rows. More rows make the key less wide; fewer rows make it shallower. Check longer names and any extra details after changing the layout.
Opens the editor for extra lines beneath each territory name. Use these for a contact name, telephone number, depot address or a short note. The entry names and territory assignments stay as they are.
Restores the key’s default position and size. It is the quickest way to recover a key that has been dragged off the page or made too small to find. Move and resize it again once it is back in view.
What this looks like
Current GBMaps controls with example maps and account details. Choose View larger to see the details.
You can change the order simply by dragging an entry up or down in the key. The other entries rearrange themselves when you let go. Drag the background instead if you want to move the whole key.
3. Choose the next zone. Select York team in the legend, then click its shapes on the map. They turn blue; the existing North team shapes remain green. If you click a shape already owned by another zone, you move it into the zone you have selected.
In Design, click a name in the legend to select its territory and open an inline name box. Keep the name or edit it, then press Enter or click away to finish. Move onto the map and click inside shapes to give them that territory’s colour. Selecting a name alone does not colour anything. Choose another name when you want to use its colour.
Opens the colour palette for that entry. Choosing a swatch updates the key square and the polygons assigned to the entry. Use the name beside it when you only want to select the territory.
Hold a blank part of the key background, frame or heading bar, drag to the new position and release. All entries and their editing buttons move together. A click without dragging on the heading opens its text editor in Design. Keep the legend inside the page in Print View so it is included in the download.
In the vertical key, hold the name and drag it above or below another entry. Let go and all the entries automatically rearrange to make room. The colour square and any extra text stay with their name. This only changes the order in the key, not the coloured map areas. Drag from the name, not the blank background.
With the pointer over a portrait key, scroll down to make it smaller and up to make it larger. Its Add Name button, red crosses and inline text box scale with it. Move back over the map to zoom the map instead. If the key is awkward to handle, use Key Settings → Reset position.
Add useful contact details or notes without squeezing everything into the territory name. Changes in this dialog are held until you choose Apply to legend.
Click the colour square to choose a font colour for the extra detail lines beneath every legend name. The preview shows your choice straight away. Territory names and statistical totals keep their existing colours. Choose Apply to legend to use the new colour, then save your map to keep it. Cancel or the close button leaves the previous colour in place.
Select a territory in the entry list, or use the previous and next buttons to work through the key. The text box and preview show the selected entry. This is handy when adding a telephone number for every team.
Type or paste the lines to appear below that name. Use short, readable lines; up to 20 nonblank lines and 4,000 characters are accepted per entry. A postcode here is printed as text only. It does not colour or locate that postcode.
Put the existing territory name in the first column, then one detail per following column. Paste the table into the import box. Names must match entries already in the key; check the import feedback for any unmatched names.
Use this option when the spreadsheet should become the new set of notes, rather than retaining previous text. Blank values can clear existing notes when replacement is selected, so check your pasted rows first. Then use Add to these details to load the table into the dialog.
Review the selected name and its notes before applying. Long lines can make a key wide; splitting an address over a few short lines is often easier to read. Statistics selected in Additional Data are separate from these manually entered notes.
Apply to legend commits the dialog’s changes to the current map. Cancel or the close button leaves the map’s existing notes unchanged. Save the map afterwards if you want the new notes to be there when you reopen it.
Edit this box to change the title across the top of the page. It updates on the artwork as you type. The field allows up to 55 characters. The title is easiest to judge in Print View, where the title bar is visible.
In Design, click the heading text or black bar on the actual legend to edit it in place, for example “Sales territories”. Press Enter or click away to finish; Escape restores the previous heading. The Key heading field in Map Titles stays in sync and remains an alternative. Both allow up to 35 characters. The heading itself is saved and exported; its editing box is not.
The name entered under Save identifies the editable map in your file list. Changing the map title or key heading does not automatically rename that file. Use meaningful wording in both places so the artwork and saved copy are easy to recognise.
What this looks like
Current GBMaps controls with example maps and account details. Choose View larger to see the details.
Changes the page/map background behind the polygons. A pale background keeps the territories prominent; a white background often suits a printed report. Click the swatch row to open the palette.
Change the lettering for the main map labels and the more detailed postcode labels separately. Mixed-boundary maps can also offer County Names, ICB Names or a similar extra layer. Only controls relevant to your map are shown.
Changes line colours for each available boundary layer. A darker outer area line and a lighter district line can make a busy map easier to understand. Change line thickness or hide a layer in Map details.
Returns the page background, title, border, map label and boundary colours controlled here to their defaults. It is a reset of the supporting map styling, not a command to delete all your territory names and assignments. Save a copy first if you may want to return to your previous styling.
What this looks like
Current GBMaps controls with example maps and account details. Choose View larger to see the details.
Applies that swatch to the item whose colour control you opened. For a territory, all its assigned polygons follow the new colour. For a line or title control, only that part of the artwork changes.
Use the arranged shades to choose related colours, or a strong contrasting colour for something that needs to stand out. Pale fills with darker borders usually keep small labels more legible than very dark fills.
Use its close control when you have finished or opened it by mistake. Opening a colour control is not itself a colour change. On smaller screens, move or scroll the palette as needed to reach the swatches.
The advanced import dialogs accept colour names or hex values where their column guide says so. A hex value such as #E8AC25 is useful when the same brand colour must be repeated. The Excel territory import has its own colour-name catalogue; use names from that catalogue for predictable results.
Before hiding. The green and blue shapes belong to our zones. With Hide unassigned areas off, the surrounding postcode shapes and place labels are still visible. Compare this with After hiding: the map position, scale, zone colours and selected detail layers are the same. After hiding. Hide unassigned areas keeps the assigned territory and the useful detail within it, including relevant place labels and parts of wider boundaries. It hides the surrounding artwork rather than deleting it. Use the same control again to restore the full map.
Tick Borders for Areas, Districts, Sectors, Counties or the other layers offered by your map. Untick to hide those lines without removing the polygons or territory assignments. Showing an area border and hiding the district borders can make an overview much cleaner.
Choose a line width for each boundary layer. Use heavier lines for the broad divisions and finer lines for small districts. Review the result at the scale you intend to print; a line that looks fine when zoomed in may dominate a small graphic.
Tick Labels for a layer to show its names or codes independently of its Borders switch. On supported district, sector and parish maps, Design temporarily hides labels that are too small to read at the current scale. Zoom in to reveal them. Print View and saved/exported artwork retain labels selected as visible; labels you explicitly switch off stay off. Some maps, including the current district-and-roads artwork, use fixed labels instead. See Labels while zooming.
Focuses the map on the polygons assigned to territories and the relevant surrounding map detail. It hides unwanted artwork rather than deleting it. See the dedicated topic for how labels, broad boundaries and the Google preview are treated.
The Names column controls settlement names separately for each available class. Start with cities and add towns or villages if the local detail helps the reader. These labels are part of the map artwork; they are not marker boxes you created. On a New Zealand district map, open Map details > Places. Cities and Towns have separate Names and Dots tickboxes, so you can show either or both. Names stay close to their dots; crowded town names and their dots are omitted together to keep the map readable. Cities take priority. Save the map to remember these choices.
The Dots column controls the point symbols independently of their names. You can keep names while hiding dots or use dots without names. These are built-in place dots, separate from the postcode dots created in Create Dots.
Click a section heading such as Borders & labels or Places to fold its controls away. Folding a group only tidies the panel; it does not switch off its map layers. Extra rows such as Outer labels appear only on maps that contain that detail.
What this looks like
Current GBMaps controls with example maps and account details. Choose View larger to see the details.
Use Hide unassigned areas when you have coloured the part of the country that matters and want everything else out of the way. It is especially useful for a regional sales or service map.
Before hiding. The green and blue shapes belong to our zones. With Hide unassigned areas off, the surrounding postcode shapes and place labels are still visible. Compare this with After hiding: the map position, scale, zone colours and selected detail layers are the same. After hiding. Hide unassigned areas keeps the assigned territory and the useful detail within it, including relevant place labels and parts of wider boundaries. It hides the surrounding artwork rather than deleting it. Use the same control again to restore the full map.
Create your zone names in START HERE. Select a zone by clicking its name in the legend, then click the shapes on the map that you want to keep in that territory. Repeat for any other zones before hiding unassigned areas. The tool checks which shapes belong to a zone, rather than simply which ones look coloured: a shape deliberately assigned a white fill still belongs to its territory.
The tool keeps the assigned polygons and limits other map detail to the useful territory footprint. It considers the broader boundaries and place labels/dots as well as the small polygons, so an area boundary is not discarded just because you coloured districts within it.
The normal Map details switches still matter. If town names were already hidden, this setting does not turn them on. Start with the details you want, then use Hide unassigned areas to restrict their geographic extent.
Use the same button to restore unassigned artwork. Your territory colours remain. If everything disappears, check that you have actually assigned polygons to a territory, and that the relevant regions and layers are enabled.
Save the map after changing the setting. Reopening retains the setting with the rest of the map. Older saved maps that never used it retain their normal full-map behaviour until you choose to enable it.
The polygon overlay shows only assigned polygons when this setting is on. The geographic background remains available, so roads and places on that background can still be seen outside your territories. Return to Design or Print View to change the setting, then reopen On Google.
Tick the countries or regions you want included. UK maps can offer England, Scotland, Wales, Northern Ireland, the Republic of Ireland, the Isle of Man and the Channel Islands. The list reflects what is present in that map; a switch cannot add a region that the map does not contain.
Shows or hides the separate London view. When it is available, choose Top right or Bottom left for its position. Check that the inset does not clash with your key or other annotations.
Shows the boxes around the inset maps, helping readers distinguish them from the main geography. Untick for a cleaner composition if the separation is already obvious.
Adds the ULEZ boundary layer where supplied by the map. Its width control adjusts the line. This is a reference layer in the artwork, not a live vehicle eligibility or charging check.
NHS maps can offer named health regions and a London inset. Northern Ireland maps can offer separate top-left and top-right views. Other country maps show their own region switches, such as Australia and Tasmania. Each switch shows or hides that supplied group; the rest of the controls work in the same way.
Advanced dots and marker imports have their own choices for putting London locations on the inset or main map. If a location seems missing or appears twice, check both the inset visibility here and the placement option in the import dialog.
What this looks like
Current GBMaps controls with example maps and account details. Choose View larger to see the details.
Show a busy part of your map in more detail, or bring in another map from your account. Each inset has its own position, size, view and background colour. It can follow the map you are editing immediately, or follow the latest saved version of a different map.
See it on the map
Real map artwork · example settings
The whole map and a closer look. Both views show the same gold territories. The main map gives their national position; the inset makes the local boundaries easier to read. Colouring or changing map details on the main map updates both views. The inset has its own warm cream background; the main map keeps its blue background. Choose another saved map. Search your own saved maps, select one and choose Use this map. Its latest saved artwork becomes the inset. Cancel leaves your current map as it is. An area overview with a district inset. The main map shows postcode areas; the inset shows finer district boundaries from another saved map. Its cream background, close-up view and frame belong to this page. Edit and save the source map to update its colours.
Open Regions & Insets and choose Add inset map. A small second view appears near the bottom-left of the page. It starts at the centre and zoom of your main map. Use it for a city close-up, an island or an overview of your territories. You can add one custom inset to each map.
Choose another saved map opens a small map picker. Search by name, region or map type, select a row, then choose Use this map. The list shows each saved map’s name, type, page orientation and saved date when available. Only maps in your own account are listed; a map type needs an active licence before you can use it. For example, put a detailed postcode district map inside a postcode area overview. The source map itself is not changed. You can use one custom inset on the page, so choosing a different source replaces its artwork but keeps its frame and background.
Open source map opens the original in a separate tab. Make your changes there and save it, then return to this map. The inset checks for updates when you return, when you reopen the host map, and once a minute while its tab is visible. Refresh checks straight away. Your inset keeps its position, size, zoom, background and caption. Unsaved edits in the source tab do not appear in the inset. The link works for normal map features, including saved drive-time shapes; it does not request a new drive-time calculation.
Untick Show inset to hide it from the page and from PDF, PNG, JPG, SVG and PowerPoint downloads. Its position, zoom, size, caption and colours are kept. Tick the box again to bring it back in the same place, showing the latest source artwork. Save your map to remember whether the inset is shown or hidden next time you open it. This also works when its position is locked. Use Remove inset only when you want to remove its settings as well.
Type a caption such as Leeds in detail or National overview, then press Tab or click outside the box. Leave it empty for a frame without a heading. The title belongs to the inset; it does not change your main map title.
Choose Position inset to show its blue strip and handles. Drag the blue strip to move the whole frame around the page. Drag inside the picture to pan the map within the frame. Drag a corner or side handle to change its size and shape. Click Finish positioning, press Escape or click elsewhere when you are happy. Clicking inside an unlocked inset also shows its handles.
With the pointer over the inset, roll the mouse wheel to zoom towards the pointer. On a touch screen, pinch with two fingers. The minus and plus buttons in the sidebar zoom around the centre. The main map stays where it is. Enlarging an area map does not add district or sector boundaries that are not present in that map.
For an inset of this map, Use main view centres it on the main view. For a linked map, Use saved view fits the source map’s saved page view inside the inset. You can then pan and zoom independently. Fit whole map in inset fits the whole source artwork, including any supplied regional insets. Hidden unassigned areas stay hidden; fit uses the source map’s full extent.
Frame colour changes the outline. Keep frame proportions holds its current width-to-height ratio while you resize. Without that option you can make a tall, wide or square frame. Changing the frame shape reveals a different amount of geography; it never stretches the map.
Tick Lock inset position & zoom to prevent accidental panning, zooming or resizing. Untick it to adjust the frame again. You can still change its caption, frame and background colours. A linked inset still receives saved artwork updates while locked.
For an inset of this map, colouring shapes on the main map immediately changes the inset too. Territory colours, labels, boundaries, markers, dots, rings and other geographical artwork follow the main map. For another saved map, these details come from that map’s latest saved version instead. The source’s page title, legend and custom inset are not included. Your inset has its own optional title. Neither kind adds extra postcodes or values to the main map’s legend.
Save the editable map to keep its inset, caption, frame and background colours, size, position, zoom, visibility and lock settings. These are stored with the map in your account and restored when you reopen it. When Show inset is ticked, the inset also appears in PDF, PNG, JPG, SVG and PowerPoint downloads; blue editing handles are left out. Your usual map access is required for downloads. This is a page-layout feature for Design and Print View; it is not added to the separate On Google map. A linked inset stores a reference to its source map, so reopening it picks up that source’s latest saved artwork. Previously downloaded files remain unchanged. Keep the source map in your account if you want the link to continue working.
Use the existing Undo and Redo buttons at the top of the map for inset moves, pans, zooms, resizing, title or colour changes, showing or hiding, and removal. A continuous drag counts as one change. Remove inset removes this extra view from the page, leaving the main map and its colouring intact. Undo can bring it back during the current editing session.
Choose Position inset to focus the frame. Arrow keys pan the map inside it; Shift with an arrow moves the frame. Plus and minus zoom. Escape hides the editing handles. You can also reach the sidebar controls with Tab. Keyboard movement is disabled while the inset is locked.
Click the Background colour swatch and choose a colour for the space around the inset map. A new inset starts with the same background as the main map; after that, each keeps its own colour. For example, keep a blue background on the main map and choose white for a close-up. This does not recolour your territories or change the white title strip. You can change the background while the inset is locked. It is saved with the editable map and included in your downloads.
Use this map switches the inset back to the map you are editing. The frame, caption and background are retained, and the view starts from the main map again. Undo can restore the previous source. The supplied London and regional inset switches below these controls still work separately. Older saved maps keep their existing behaviour.
A message in the inset controls explains the problem. The source may have been deleted or transferred, its licence may need renewal, or your connection or sign-in may have ended. If a preview was already loaded in this editing session it stays visible, but saving or downloading a visible incomplete or unverified inset is stopped. Refresh after fixing the problem, choose another saved map, switch to Use this map, or untick Show inset to save or download the main map without it. Hiding keeps the link and frame settings for later.
Shapes & Text: draw, highlight and explain your map
Show a planned visit, outline a patch that crosses postcode boundaries, mark a meeting point with a star, or add a note for the person reading your map. Shapes & Text lets you do all of this without changing your territories or their totals. You can try every drawing tool before buying or signing in.
See it on the map
Real map artwork · example settings
A visit plan with your own finishing touches. Draw a line between stops, mark an extra patch, frame a place or copy a boundary. Add a note to explain the plan. This example uses the actual drawing tools, including Star, Rectangle, Draw line, Draw polygon and Copy outline. The blue line is a hand-drawn plan, not a calculated road route. For smaller text, choose View larger.
Drag the green heading to move the panel out of your way. Select a numbered circle to read about that control. You can pan and zoom the map while these tools are open.
Open Shapes & Text in the left-hand menu. Choose a shape symbol, or Add a text box. Hover over a symbol to see its name: Circle, Square, Rectangle, Star, Triangle or Hexagon. Your item appears with blue handles and a green tool panel. The panel stays open as you work; drag its green heading to move it out of your way. Rectangle starts wider than it is tall. Untick Keep proportions to turn a circle into an oval or stretch another shape. For a measured radius in miles, use Radial Circles instead.
Drag an empty part of the map to pan it, and scroll your mouse wheel over the map to zoom in or out. On a touch screen, drag empty map space with one finger. This works while you are adding points, choosing a map area to copy, or adjusting a finished shape. A drag moves the map; a click adds a point or picks an area. Panning keeps your selected item selected. Territory colouring is paused until you finish editing, so moving around will not recolour your map.
If a shape covers the bit of map you want to grab, hold the Space bar, drag with the left mouse button, then let go of Space. The map moves behind your artwork instead of dragging the shape. Dragging with the middle mouse button does the same thing. Without Space, dragging a shape moves that shape; dragging empty map space pans the map. The Space shortcut works when you are not typing in a text field. Scrolling still zooms when your pointer is over a shape.
Choose Draw line for an open line, or Draw polygon for an enclosed patch. Click once at each bend or corner on the map page; a blue preview shows where the next section will go. A line can mark a connection, a dividing line or a rough visit plan. It is drawn by you, not calculated along roads. A polygon is useful for a proposed service patch that does not follow existing boundaries. Drag to pan or scroll to zoom whenever you need a closer look: earlier points stay with their map locations, and dragging does not add a point.
Choose Finish or press Enter after your last point. You can also double-click the last point; for a polygon, clicking its first point closes the shape. A line needs at least two points. A polygon needs at least three that enclose an area. While drawing, Undo point, Backspace or Delete removes the latest point. Cancel or Escape discards the unfinished drawing. You can place up to 200 points in one line or polygon. Finish the drawing before moving to another menu or view.
Select your finished line or polygon. Drag a blue round point to move that individual bend or corner, or drag the item itself to move the whole drawing. The blue square corner handles resize the whole item. Change its line colour and thickness in the panel; a filled polygon also has fill colour and opacity controls. New lines and polygons move and zoom with the map by default. Choose Fixed to the page under Position & size if you want a diagram or decoration that stays in one place on the paper.
Choose Copy outline, then click inside the map area you want to highlight. The tool copies its boundary into a separate shape, including detached pieces such as islands and any holes. It starts as an unfilled outline attached to the map. Choose its line colour and thickness, or increase Fill opacity to shade it. The original territory and its assignment stay as they were. This is a copy of the boundary at the time you click, not a live link to the original polygon: changing a territory colour later will not change the copied shape. You can move and resize the copy, but it does not have individual point handles. For exceptionally detailed boundaries, the tool may ask you to use Box around area instead of saving an incomplete outline. You can drag to pan or scroll to zoom while choosing an area; only a click copies it.
Choose Box around area, then click inside the area you want to frame. A clear rectangle is fitted around the whole area, including any separate pieces, with a small gap around its edges. It starts attached to the map so it follows the same location when you pan or zoom. Change its line colour and thickness, add a translucent fill if useful, or drag its handles to adjust the frame. Use this for a simple highlight when the exact boundary would be too busy.
While editing, click an item on the page or choose it from Your shapes & text. The list is useful when items overlap. It shows a short extract of each text box and whether the item belongs to the page or the map. The controls beneath it apply only to that selected item. Click an empty part of the page to clear the selection.
Choose Fixed to the page for a heading, contact details or a note that should stay put while you adjust the map behind it. Choose Moves and zooms with the map for a highlight over a location: it follows that location as you pan and grows as you zoom in. Ready-made shapes and text start fixed to the page; drawn lines, polygons, copied outlines and boxes around areas start attached to the map. Switching this setting keeps the item in the same visible place and at the same visible size. It changes what happens when you next pan or zoom.
Choose Add a text box, replace Your text here with your own words, and press Enter wherever you want a new paragraph or list line. Paste plain text from another document if that is easier. The text wraps automatically inside the box, including long references. A narrower box produces more lines; it grows downwards when necessary so those lines are not cut off. This is a plain text box with formatting for the whole box, not a word processor with different styles within one paragraph.
Choose Sans serif, Serif or Typewriter and adjust Size until the text is comfortable to read on your page. Dragging a text box corner changes its space and wrapping, not its font size. A box attached to the map will also grow or shrink with the map zoom. Saving and reopening retains your wording, font and size.
Use B, I and U to switch bold, italic and underline on or off. A green button indicates an active style. Text colour changes the letters independently of the box fill and outline, so you can have dark text over a pale, partly transparent background. The text stays opaque when you reduce the background fill opacity.
Choose Left for ordinary notes and lists, Centre for a heading or short notice, or Right when the box needs to line up with the right edge of the page. The alignment applies to every wrapped line in the selected box.
Fill colour paints the inside of the selected shape or the background of a text box. Line colour changes its outline. Click a colour square to use your browser’s colour picker. Changing these colours leaves your territory colours, map background and legend alone. An open line has no inside to paint, so its fill controls are disabled; use Line colour and Line thickness instead.
Move Fill opacity towards 0% for a lighter highlight. At 100% the fill is solid; at 0% it disappears completely. The outline and any text remain opaque, making it possible to draw a clear ring around an area without covering its labels. Overlapping translucent shapes naturally blend where they overlap. The same opacity is included in your exported artwork.
Increase Line thickness for a stronger outline, or set it to 0 for no outline. For an unboxed note, set both the line thickness and fill opacity to 0. When an item is attached to the map, its outline scales with it as you zoom.
Click an item to select it, then drag inside it to move it. Pull a blue square corner to resize it. Keep proportions retains the width-to-height ratio; untick it to stretch the shape. Holding Shift while resizing also keeps a shape in proportion. Text boxes resize freely so their text can wrap. When you are not typing in a field, the arrow keys nudge the selected item; Shift with an arrow makes a larger nudge. A small movement while clicking is ignored, so selecting an item does not accidentally shift it.
Bring forward moves the selected item one place above another drawing item. Send back moves it one place behind. The order applies within the same attachment type: page-fixed artwork sits above map-attached artwork. Use the item list to pick a shape hidden behind another. This does not reorder the map’s boundaries, legend or regional inset layers.
Duplicate makes another copy with the same appearance, slightly offset so you can see it. Move the copy and change its words or colours as needed. Delete item removes the selected shape or text box only. The main Undo and Redo buttons also work with drawings, including moves, resizes, formatting and deletion. A map can hold up to 60 drawing items, with up to 2,500 characters in one text box. If the combined drawing detail and text become too large to save, the tool asks you to simplify them or remove an unused item instead of silently cutting anything off.
Choose Done in the floating panel, or Finish editing in the sidebar, to return to your territories. The blue handles disappear and your artwork stops responding to clicks, so you can colour and move the map normally. Edit shapes & text lets you change it again. Escape also leaves editing mode when you are not typing or drawing. Another menu or view closes the tools: finish any line or polygon first, as an unfinished drawing is discarded when you leave this way. Your finished additions appear in Print View and Design, but not in the separate On Google preview.
Finish your drawing, then use the normal Save button to store it with your map. Every point in a line or polygon, copied boundary, position, page or map attachment, size, order, opacity and text setting is retained. Saving a copy includes its own independent copy of the artwork. The drawings are included in PDF, SVG, PNG, JPG and PowerPoint output; editing handles and the floating panel are left out. Text remains editable when you reopen your saved map in GBMaps. In downloads, the letters are vector outlines so wrapping and appearance do not depend on fonts installed on another computer; they are not directly editable text in a PDF or SVG editor. Trial users can try the editing controls, while the usual map licence is still needed for saving and downloads.
A custom inset includes drawings that move with its source map. Page-fixed notes stay on the main page, keeping the inset clear of the original page’s headings and instructions. This works for an inset of the map you are editing and for a linked inset from another saved map in your account. Save changes to the source map and refresh the linked inset to show them. Hide unassigned areas does not erase your own drawing items.
What this looks like
Current GBMaps controls with example maps and account details. Choose View larger to see the details.
Add a recognisable logo, a depot photograph or an illustration. Keep it fixed to the printed page, or attach it to the map so it moves with that location. Try it without signing in; an active map licence is needed to save it in your account.
Open Images in the left menu. Drop a PNG, JPEG or WebP file into the marked box, or use Choose images. You can add several files together, up to five images on a map. Each file must be no larger than 3 MB. If a very large or heavily compressed picture cannot be prepared within that limit, resize it before trying again.
Click a picture directly on the map to select it. Its dotted blue frame and four corner handles appear, and the Images controls open automatically. You can start dragging it straight away. You can also choose its name or thumbnail in the list, which is handy if pictures overlap. New images are selected as soon as you add them.
Drag a picture to move it. Drag a blue corner to resize its frame. Hold Shift to keep its proportions; a circular frame does this automatically. Resizing crops the picture rather than stretching it. Scroll over the map to zoom; a map-fixed image follows the map and a page-fixed image stays put.
Choose Page for a company logo or photograph that should stay in the same place and at the same size while you pan and zoom. Choose Map for artwork that belongs to a particular location: it then moves and scales with the map. Switching between the two preserves the image’s current position and size. Each image has its own setting, saved with the map.
Increase Crop zoom to bring the subject closer. Crop left / right and Crop up / down move the picture inside its frame. These sliders change the crop, not the frame position. Reset crop returns to the centred, fitted picture without moving or resizing the frame.
Choose Rectangle or Circle. Frame colour and Thickness control the outline. A thickness of 0 removes it. Transparent parts of a PNG or WebP let the map show through; the tool does not add a white box behind them.
Untick Show to hide a picture without losing its crop or position. Tick it again to bring it back. Finish editing images removes the handles. Remove takes that image off this map; it does not delete the picture from another saved copy. Undo can restore an item you removed.
Save stores the image privately in your account together with the map’s position, page/map setting, crop, visibility and frame. A saved copy can reuse the same image with a different layout. PDF, SVG, PNG, JPG and PowerPoint downloads include the image itself, so the recipient does not need to sign in to see it. Wait for images to finish loading before exporting.
What this looks like
Current GBMaps controls with example maps and account details. Choose View larger to see the details.
You can try roads without signing in. In Map details choose Add roads to my map, then Try roads on my map. The main road network appears on your current postcode area, district or sector map. Your colours, territory names, labels, images and other artwork stay in place. Choose Without roads to compare. The assistant can also offer a Try roads on my map button. The extra Add main roads promotion in the purchase box is currently hidden; this does not remove existing roads access or the Map details controls.
Open Map details and choose Add roads to my map. Sign in to check your access. With an active plain postcode licence, the one-off upgrade is £10 plus VAT for areas, £15 plus VAT for districts or £20 plus VAT for sectors. The fee is the same throughout the licence year; your renewal date stays unchanged. Your saved colouring, names and other artwork are retained. The upgrade covers that postcode map type, not just one saved file. If roads are already included, use the road controls without buying again. If your plain-map licence has expired, renew the roads package instead.
Preview my map with roads saves your current work and opens a separate preview. Choose card, PayPal or bank transfer to upgrade. Your map stays open while you pay. Access starts only after payment is confirmed; bank transfers use the reference supplied at checkout. You receive an email when roads are ready. Reopen your saved map to see the road controls. The full roads package is priced at the equivalent plain map plus the same upgrade amount. Renewals use the full roads package price.
This upgrade adds the supplied main road network to the map artwork and its exports. It is not a live street map or a drive-time calculation. The On Google preview has its own background map. A request to add roads to a postcode map is different from using Distance/Time. Road visibility is editable; the assistant currently cannot apply an arbitrary custom colour to the road lines.
A Roads, Main A Roads / Primary A Roads, Other A Roads and Motorways control the corresponding road line groups. Turning off minor roads while retaining the main routes often makes territory colours easier to see. A road layer here is artwork, not a route calculation.
Road Numbers, Main A Rd. Nums, A Road Numbers, Primary Road Numbers and Motorway Numbers control the text labels for the relevant routes. Junction Numbers shows junction identifiers; Junction Number Circles and Road Num. Borders control their surrounding symbols where present. Labels and road lines can be switched separately.
Land, Parks & Forests and Urban Areas show their respective background fills. If these compete with the colours of your territories, hide one layer at a time and compare the result. Park Names has a separate switch on maps that include it.
Water & Lakes controls water features; Water Names controls their labels. Coastline draws the coast outline, and Railways draws the railway layer. Retain them when they help someone recognise the region; hide them when they add unnecessary clutter.
Other Names, Other Town Names, Primary Town Names and Urban Town Names are separate name groups supplied with road maps. Outer labels on some health maps are names placed outside crowded boundaries. Their visibility does not change which polygons belong to a territory.
A mixed map can show postcode polygons with another administrative boundary over them. Use that layer’s Borders, Width and Labels controls independently. Colouring a postcode district and showing an ICB outline are different operations; the outline supplies context for your territory.
On the district-and-roads map, supplied town, city and village names sit beside their dots and postcode labels have fixed positions. These fixed labels do not use the automatic zoom hiding of the plain district map. Use Map details to choose which available labels and road groups are shown. Selected text remains vector artwork in SVG and PDF exports; a roads map is still a main-road map, not a detailed street-map service.
Distance rings on the map. A set of three rings with a 5-mile interval gives radii of 5, 10 and 15 miles from the same centre. The labels and line colours make the distances easy to distinguish. These are straight-line distances, so they are useful for a radius-based service area; use Distance/Time for a journey-based view.
Shows or hides all the circle sets without deleting them. A hidden set retains its centre, colours and labels. Placing a centre makes the circles visible so you can see what you are positioning.
Selects the set you are editing. Each set has its own centre. Use + to add another set, or the … menu for rename, duplicate and other set options. A separate topic explains linked settings.
Tick it, then click the map where the centre should sit. Another click moves the same selected set; it does not add another set. Turn placement off when the centre is correct, so subsequent clicks can be used for normal map editing.
Enter a postcode and click Find to position the selected set. Supported UK and NHS variants use the selected map’s layout; a full postcode is more precise than a broad district. Check that the location is covered and that the centre is correct. Lookup support depends on the map: do not treat a US ZIP or an Irish Eircode as a UK postcode. See Place postcodes on UK and NHS maps if an older saved item needs repositioning.
Sets how many rings are drawn, from 1 to 20. Four circles at a 10-mile interval produce radii of 10, 20, 30 and 40 miles. Reducing the count hides the extra rings; increasing it again can bring their settings back.
Sets the gap in radius between rings, from 1 to 100 miles. The outer-circle readout is the number of circles multiplied by this interval. These distances do not account for roads, rivers, traffic or travel time.
Adjust the line width and the lettering on the circles. Use modest values when many rings overlap. The controls affect the selected set, or every set if linked settings are enabled.
Each row shows its radius, a colour square and an editable label. Click the square to recolour that ring and type wording such as “Local delivery” or “20 miles”. Labels explain the rings; they do not change the distance calculation.
Turn the coverage into postcode territories with one click. Choose Add to existing to keep current colouring, or Replace colouring to start again from this coverage. The matching uses polygon centres; read the separate postcode-colouring guide for edge cases and overlaps.
What this looks like
Current GBMaps controls with example maps and account details. Choose View larger to see the details.
Distance rings on the map. A set of three rings with a 5-mile interval gives radii of 5, 10 and 15 miles from the same centre. The labels and line colours make the distances easy to distinguish. These are straight-line distances, so they are useful for a radius-based service area; use Distance/Time for a journey-based view.
The Circle set list tells you which centre and rings the panel is editing. Select a set before moving its centre or changing its appearance. Use recognisable names so you do not move the wrong depot.
Creates another circle set and selects it. Give it a centre using the map or postcode lookup. Adding a new set is different from clicking the map again in placement mode, which moves the existing selected set.
Open it to rename the selected set, duplicate it or delete all sets. Renaming is for your own organisation. Duplicating is useful when a second depot needs similar circles: move the new set to its own centre afterwards.
Open Set options (the three-dot button), choose Rename set, enter a useful name, then choose OK. The cross cancels the rename. This changes the set name in the controls; edit individual ring labels separately.
Links the ring settings across sets. The selected set’s settings are used as the common starting point; subsequent linked changes affect all sets. Centres remain independent. Leave linking off if the depots need different ring counts, distances or styling.
The panel’s delete button removes the selected set. Delete all sets in the options menu removes every set. Use Show all circles if you only want to hide them temporarily.
Turn your circles into coloured postcode territories with one button. The matching areas appear in your normal map key, using your coverage colours or automatically chosen colours for black outlines. There is no list to find, copy or import first.
All placed circle sets are used. The Circle set selector only chooses which set you are editing. Check the position, sizes, colours and labels before colouring. Hiding the coverage does not remove it from this calculation.
Click Colour postcodes. On an uncoloured map the result appears straight away. On a map with existing territory colours you choose what to keep. This uses the shapes already on your map; it does not make another travel-service request.
Keeps every postcode that already belongs to a coloured territory, even where the new coverage overlaps it. Only uncoloured matching postcodes receive the new colours. Your existing key entries and notes stay in place.
Clears all existing territory colouring and its key entries, then colours only the matching postcodes. Areas outside the coverage become unassigned. Your circles, dots, travel areas, images, text and other map artwork stay in place. Cancel or the close button leaves everything unchanged.
The tool tests the representative centre of each polygon at your map’s postcode level. It colours the whole area, district or sector when that centre falls inside the coverage. A polygon may extend beyond the edge, or partly overlap the coverage without being selected. This is not a list of individual addresses or an exact clipped boundary.
Ring labels become the territory names, prefixed by the set name. Coloured rings keep their colours. Default black rings receive different colours from a shuffled palette, so they do not turn your map black. You can change any zone colour in the map key, including choosing black yourself. Existing generated colours are reused when the same named coverage is coloured again. When circles overlap, the smallest matching radius wins; equal radii use the first set in the list.
Undo reverses the whole colouring operation in one step; Redo restores it. Save keeps the new territory colours and key. Colouring is a snapshot: moving coverage or changing its labels later does not recolour the territories automatically. Click Colour postcodes again and choose Replace colouring to rebuild just this coverage, or Add to existing to fill only uncoloured gaps.
The Advanced import window also has Colour postcodes under Manage circle sets. It uses the circle sets already on the map, not unimported spreadsheet rows.
Open Advanced import in Radial Circles to work in this overlay. Each row describes one centre and its distance rings. Start with the sample CSV, review the columns, then import when they are ready. The map stays in place behind the window.
Distance rings on the map. A set of three rings with a 5-mile interval gives radii of 5, 10 and 15 miles from the same centre. The labels and line colours make the distances easy to distinguish. These are straight-line distances, so they are useful for a radius-based service area; use Distance/Time for a journey-based view.
Choose a file in the supplied sample format. Loading fills the columns for review; it does not place circles yet. The CSV needs its heading row, including ring_id, ring_postcode, num_circles, ring_interval, ring_stroke_thick and ring_label_size, followed by the individual ring labels and colours.
Give each row a unique ID using letters, numbers, underscores or hyphens, plus a full UK postcode for its centre. An ID matching a set on the map updates that set. A new ID adds a set, and other set IDs are kept. Duplicate IDs within the import or a missing postcode stop it before any circles change.
Use a whole-number count from 1 to 20 and an interval from 1 to 100 miles. The outer radius is their product. Each row needs its own values; a single value does not automatically apply to every centre. On a small screen, scroll across the columns to reach the settings on the right.
Enter a whole-number line width from 1 to 5 and a label size from 1 to 10 for each set. These use the same ranges as the Radial Circles panel. Keep each row aligned with its postcode when pasting values from a spreadsheet.
Enter a comma-separated list on each row, from the innermost to the outermost ring. Put a label containing a comma in double quotes, for example "North, depot",Outer ring. Blank labels are allowed. The CSV file uses separate ring_label_1, ring_label_2 and subsequent columns; loading converts them into the lists shown here.
Enter colours in the same inner-to-outer order. The existing importer supports red, blue, green, yellow and black. Supply a colour for each visible ring; a blank colour leaves that ring’s outline hidden. The sample CSV uses separate ring_colour_1, ring_colour_2 and subsequent columns.
Checks the settings and locates every postcode before drawing any sets. Progress and errors appear below the columns. A failed lookup leaves the existing circles unchanged. After a successful import, matching IDs are updated, new IDs are added and the rings are shown. Close the window to inspect them; the normal Radial Circles controls can then edit them.
Empties the draft fields and file selection. Circle sets already on the map remain. Use this when preparing another import; use Delete all circle sets from map only when you want to remove the artwork.
Expand this section for Show / hide on map and Delete all circle sets from map. Hiding retains the sets for later; deletion removes all circle sets, including ones created outside this import. Neither action deletes independent dots or marker boxes.
Colour postcodes uses all circle sets already placed on the map. There is no results list to copy first. On a coloured map, choose Add to existing to keep current assignments or Replace colouring to use only the circles. Unimported rows are not used. Undo reverses the colouring in one step.
Downloads the current columns as circles-data.csv in a format this importer can load again, including IDs, labels and colours. This is the draft in the window, which may differ from the sets currently on the map. Keep the editable map saved as well if you need all its current settings.
Expand Column guide for the field rules or use Watch tutorial. Close, the cross, Escape or a click on the shaded background dismisses the overlay and keeps your draft. Closing during postcode lookup cancels that import and leaves existing sets intact. Once an import has completed, closing does not undo it.
A circle set has one centre and can contain 1–20 concentric rings. Twenty is the ring count per set, not a maximum of 20 centres or sets across the map. On supported Eircode maps the circle-centre importer uses the 500-location / 200-Eircode limits above. Other circle-import routes do not have a verified published maximum number of centres or CSV size in this guide; do not assume the dots CSV limit applies to them or that they are unlimited. For a large circle-set import, contact GBMaps with the number of centres and rings you need.
Use marker boxes for an office, customer, depot or meeting point that needs a visible label and callout. They sit on top of the map rather than replacing territory colours.
Marker boxes on the map. These are placed marker boxes: each label is connected to a location on the map. One uses an arrow with the text above the point; the other uses a line with the text below it. You can change the wording, text size, colours and call-out, and move a selected marker using Place on map.
Shows or hides the marker layer. Existing marker text, styling and positions are retained. Use this to compare a clean territory map with the annotated version.
Adds a marker row and selects it, with the text field ready to type into. Give it a useful label. The count in the panel shows how many markers are present.
Use the selection control beside a marker row to make it the active marker. Edit its text in that row. The row’s delete control removes that marker alone. Selecting a single marker returns you from “all markers” styling to that individual marker.
With a marker selected, tick Place on map and click its location. Click again to move that selected marker. Untick when you are finished. This is the reliable way to reposition a marker; dragging the underlying map moves the map composition.
Tick before changing appearance if every marker should use the same settings. It affects the styling of all markers, not their individual label text or locations. Leave it off to give one important location a different treatment.
Open the palette from the appropriate colour control. Give text enough contrast against its box and the map beneath it. The advanced importer also supplies a per-row box colour.
Changes the selected marker’s lettering, or every marker when Apply style to all markers is on. The slider runs from 0.5 to 20. Check the final page view, not just a close-up of the map.
Open Call-out settings and adjust Length to move the label farther from or closer to its anchor. A longer callout can keep text clear of a crowded area. This changes the annotation, not the geographic location being marked.
Choose a plain line or arrow for the callout. Invert marker puts the box on the other side of the anchor, useful when a label would cover another feature or fall off the page.
Removes the whole marker collection. It does not delete territory colours or built-in place dots. Hide markers instead if you want to bring them back later.
On supported UK and NHS maps, expand Import from postcodes and enter matching Postcodes and Marker text rows, then choose Import markers. Advanced import lets you supply more styling per row. To move an existing marker, select it and use Place on map, or ask the assistant to move that named marker to a postcode. New marker and imports create markers; they are not the manual repositioning control.
Dots and shapes support up to 2,500 locations per import. Marker boxes remain limited to 500 locations per import. On supported Eircode maps, no more than 200 of those locations can be full Eircodes. These are import limits, not a promised total number of objects per map. If you need more, choose Contact GBMaps and tell us the map, the type of import and approximately how many locations or rows you need, so we can discuss options. See Import limits for the other tools.
What this looks like
Current GBMaps controls with example maps and account details. Choose View larger to see the details.
For a list of branches or customers, import the postcodes and matching labels together rather than placing each marker by hand. Import up to 500 locations at a time; contact GBMaps if your job needs more.
Marker boxes on the map. These are placed marker boxes: each label is connected to a location on the map. One uses an arrow with the text above the point; the other uses a line with the text below it. You can change the wording, text size, colours and call-out, and move a selected marker using Place on map.
Paste one full postcode per line, without a heading row. Keep the order exactly the same as the labels in the neighbouring box. The count helps you spot a missing row.
Paste one matching label per line. For example, the first postcode and first label must describe the same branch. Avoid sorting just one column in your spreadsheet.
Looks up the postcode locations and creates the marker collection from the paired columns. Check the resulting markers and any failure message. Use a saved copy before replacing an existing set of annotations.
Opens the modal importer with extra columns for size, colours, callout, position and London inset handling. Use it when individual rows need different styling or you want a reusable CSV file.
Dots and shapes support up to 2,500 locations per import. Marker boxes remain limited to 500 locations per import. On supported Eircode maps, no more than 200 of those locations can be full Eircodes. These are import limits, not a promised total number of objects per map. If you need more, choose Contact GBMaps and tell us the map, the type of import and approximately how many locations or rows you need, so we can discuss options. See Import limits for the other tools.
Choose a CSV file or paste an Excel table into the Postcodes box. You can also paste the columns individually. Up to 500 rows are supported; CSV files must be smaller than 2 MB.
Marker boxes on the map. These are placed marker boxes: each label is connected to a location on the map. One uses an arrow with the text above the point; the other uses a line with the text below it. You can change the wording, text size, colours and call-out, and move a selected marker using Place on map.
The sample provides the expected column order. CSV files may have a recognised heading row; paste separate columns without headings. Loading a file fills the dialog for review before Import to map. Multi-line spreadsheet cells are joined with spaces.
Use a full UK postcode on each row and its matching label beside it. Postcodes are required; labels can be blank. A whole tab-separated Excel table pasted into Postcodes is spread across the columns.
Sets the size for each marker, from 0.1 to 100. A blank setting uses 5. Enter one value on its own to use it for all postcodes, or supply one value per row for different sizes.
Use a colour name, a supported palette name such as teal400, or a hex value such as #E8AC25. Blank settings use black text and a white box. One colour value can apply to all rows.
Position accepts above or below. Callout accepts line or arrow. Defaults are above and line. These control the marker’s annotation, not the postcode coordinates.
Use auto to detect London postcodes, true to use the inset, or false to use the main map. The legacy numeric forms 1 and 0 are also accepted. Make sure the London inset is visible if you choose to put markers there.
An optional column can contain one shared value or one value for every postcode row. Other column lengths are rejected so rows do not silently shift. Blank optional cells use the defaults. Read the status message if a value or row needs correcting.
Open Manage marker boxes on this map. Show/hide changes visibility and Delete all markers from map removes the collection. Download your marker data exports the current column contents, which can include edits you have not imported yet. Clear columns only empties the draft fields.
Import to map validates and replaces the current markers with the imported collection. Check any unavailable postcode results. Close leaves the current artwork alone if you have not imported; it also stops an in-progress import. Clear columns clears the draft fields, not the markers already on the map.
On Australia or New Zealand district maps use four-digit postcodes from the selected country, preserving leading zeros. Paste spreadsheet values as text. Check any missing-postcode feedback; a postcode on a different country’s map will not locate correctly. UK London-inset settings do not apply to these maps.
Dots and shapes support up to 2,500 locations per import. Marker boxes remain limited to 500 locations per import. On supported Eircode maps, no more than 200 of those locations can be full Eircodes. These are import limits, not a promised total number of objects per map. If you need more, choose Contact GBMaps and tell us the map, the type of import and approximately how many locations or rows you need, so we can discuss options. Advanced CSV files must be smaller than 2 MB. See Import limits for the other tools.
Plot customers, sites or depots from a list of postcodes. A dot can be a small location symbol or a large circle with a radius in miles. Import up to 2,500 postcode locations at a time; contact GBMaps if your job needs more.
Different dots and shapes. Advanced dots can use circles, squares, triangles, hexagons and stars. Different shapes and colours help distinguish depots, customers or other location types. The larger hollow circle demonstrates a coverage-style outline; the basic dot controls also let you adjust fill, transparency and line appearance. These are example positions.
Paste full postcodes, one on each line. The entry count helps you check the list. This panel is intended for the supported UK postcode maps; do not assume an overseas postal code can be geocoded simply because another map is open.
Empties the postcode entry box. It does not mean “delete the dots already on the map”. Use the delete button for that, or the visibility checkbox to hide them temporarily.
Sets the size of the circles around the postcode locations, from 0.2 to 20 miles in this panel. It is a radius, not a diameter. Use a small radius for location points and a larger one to suggest straight-line coverage.
Sets the inside colour of the dots. Use More appearance options to make that fill translucent, allowing the territory map beneath it to remain visible.
Looks up the supplied postcodes and draws the dots using the chosen appearance. Check the map and any lookup feedback before considering the import finished. Keep a copy of your postcode list if you will need to repeat the import.
Removes the dot collection from the map. It does not clear built-in settlement dots or marker boxes. Use Show dots if you only want them temporarily out of sight.
Turn the coverage into postcode territories with one click. Choose Add to existing to keep current colouring, or Replace colouring to start again from this coverage. The matching uses polygon centres; read the separate postcode-colouring guide for edge cases and overlaps.
Dots and shapes support up to 2,500 locations per import. Marker boxes remain limited to 500 locations per import. On supported Eircode maps, no more than 200 of those locations can be full Eircodes. These are import limits, not a promised total number of objects per map. If you need more, choose Contact GBMaps and tell us the map, the type of import and approximately how many locations or rows you need, so we can discuss options. See Import limits for the other tools.
What this looks like
Current GBMaps controls with example maps and account details. Choose View larger to see the details.
Different dots and shapes. Advanced dots can use circles, squares, triangles, hexagons and stars. Different shapes and colours help distinguish depots, customers or other location types. The larger hollow circle demonstrates a coverage-style outline; the basic dot controls also let you adjust fill, transparency and line appearance. These are example positions.
Sets the outline opacity for all imported dots and shapes, including stars. It does not change their fill colour or fill opacity. Move to 100% for a solid outline, or lower it to soften overlapping shapes. You do not need to reimport.
Sets the transparency of every imported circle and shape, including stars, squares, triangles and hexagons. Open Create Dots → More appearance options and move Fill opacity to 100% for a solid fill, or lower it to see the map underneath. Line opacity is separate. You do not need to reimport the spreadsheet. The change applies to the whole collection, including its main-map and London-inset copies; individual shapes keep their colours. Save the map to keep the new appearance.
Choose Solid or Dashed. The dash-length control appears for a dashed line and changes the spacing pattern. A reopened map may show Saved pattern for an existing custom dash arrangement; selecting a standard pattern replaces that arrangement.
Changing transparency or dash pattern changes appearance only. Changing the radius changes the size of the coverage circle and can therefore change which postcode centres are found inside it. Regenerate a postcode list after a radius change.
Turn your dots into coloured postcode territories with one button. The matching areas appear in your normal map key, using your coverage colours or automatically chosen colours for black outlines. There is no list to find, copy or import first.
All dots and shapes already placed on the map are used, including those added through Advanced import. Check the position, sizes, colours and labels before colouring. Hiding the coverage does not remove it from this calculation.
Click Colour postcodes. On an uncoloured map the result appears straight away. On a map with existing territory colours you choose what to keep. This uses the shapes already on your map; it does not make another travel-service request.
Keeps every postcode that already belongs to a coloured territory, even where the new coverage overlaps it. Only uncoloured matching postcodes receive the new colours. Your existing key entries and notes stay in place.
Clears all existing territory colouring and its key entries, then colours only the matching postcodes. Areas outside the coverage become unassigned. Your circles, dots, travel areas, images, text and other map artwork stay in place. Cancel or the close button leaves everything unchanged.
The tool tests the representative centre of each polygon at your map’s postcode level. It colours the whole area, district or sector when that centre falls inside the coverage. A polygon may extend beyond the edge, or partly overlap the coverage without being selected. This is not a list of individual addresses or an exact clipped boundary.
Dot labels become the territory names; a dot without a label uses its postcode. Coloured fills are kept, and an unfilled shape uses its line colour. Black dots or outlines receive automatically chosen zone colours instead of black fills. You can change any zone colour in the map key, including choosing black yourself. Existing generated colours are reused when the same named coverage is coloured again. If shapes overlap, the first matching dot or shape takes precedence.
Undo reverses the whole colouring operation in one step; Redo restores it. Save keeps the new territory colours and key. Colouring is a snapshot: moving coverage or changing its labels later does not recolour the territories automatically. Click Colour postcodes again and choose Replace colouring to rebuild just this coverage, or Add to existing to fill only uncoloured gaps.
This importer adds labels and per-location styling, including squares, triangles, hexagons and stars. Review the columns before importing: the new collection replaces the existing dots and shapes.
Different dots and shapes. Advanced dots can use circles, squares, triangles, hexagons and stars. Different shapes and colours help distinguish depots, customers or other location types. The larger hollow circle demonstrates a coverage-style outline; the basic dot controls also let you adjust fill, transparency and line appearance. These are example positions.
Load a CSV smaller than 2 MB, with up to 2,500 rows. Download sample CSV for the expected order. A recognised heading row is allowed in a file; paste separate columns without headings. A whole Excel table can be pasted into the Postcodes box.
Use full UK postcodes, one per row. Labels are optional, so a location can be a plain shape. Keep each postcode and its settings on the same row. Multi-line spreadsheet cells are joined with spaces.
A distance in miles, from 0.1 to 500; blank cells use 10. This controls shape size around the location. It is not the line thickness or a screen-pixel measurement.
Use circle, square, triangle, hexagon or star. Blank settings use circle. Keep the spelling from the column guide so the importer can recognise the shape.
Use top, bottom, left, right or middle, with top as the default. Choose a position that keeps text away from a neighbouring shape or important map label.
One setting on its own applies to every postcode. Otherwise supply one row per postcode. Blank optional cells use the defaults. The status line identifies invalid rows or values before import; fix them rather than shifting a column to make the counts match.
In Manage dots & shapes, choose Main map, Inset map, Inset & main map, or Hide London dots. If London points seem missing, check this choice as well as the London inset under Regions & Insets. Imported shapes are placed in the appropriate main-map/inset position. Changing this placement does not require importing the spreadsheet again.
Show/hide changes map visibility; Delete all dots from map removes the collection. Download your dot data exports the values currently in the dialog’s columns, including draft edits: keep a copy before clearing or replacing them. Colour postcodes turns the placed shapes into territories using polygon centres. Choose Add to existing to preserve current colouring, or Replace colouring to replace it; Undo restores the previous result.
Import to map validates and replaces the map’s dots and shapes. Check the final lookup feedback for missing locations. Close leaves unimported drafts unapplied and stops an in-progress import. Clear columns empties the draft input fields, not the current map layer.
After importing, close this dialog and open Create Dots → More appearance options. Set Fill opacity to 100% for solid circles, stars and the other shapes together. Adjust Line opacity separately. These are collection-wide settings, not extra spreadsheet columns. Save afterwards; see Dot transparency for the controls.
Dots and shapes support up to 2,500 locations per import. Marker boxes remain limited to 500 locations per import. On supported Eircode maps, no more than 200 of those locations can be full Eircodes. These are import limits, not a promised total number of objects per map. If you need more, choose Contact GBMaps and tell us the map, the type of import and approximately how many locations or rows you need, so we can discuss options. Advanced CSV files must be smaller than 2 MB. See Import limits for the other tools.
Choose a starting point, set how far to travel, then pick your legend colours and labels. Press Create to draw the travel areas. Add more starting points to compare depots, shops or service bases. These are road-network estimates, not straight-line circles or guaranteed journey times.
Travel areas on the map. Isochrones are travel-area shapes. Their irregular edges show why a time-based catchment can look very different from a circle: the available network affects how far you can travel. This is an illustrative display made with the tool’s renderer, not a calculated route or journey-time estimate. Use Create areas with your own starting location and settings to calculate your map.
Each starting point has a name box in the list. Type a useful name such as “York depot”; this also becomes its legend heading. Click a name, flag or legend to choose that analysis. The checkbox beside the name hides or shows the whole analysis. You can keep up to five starting points on a map.
Choose Or click on the map. The postcode box changes to Click map to set. Click your starting location and the button changes to Pinned. Drag the flag to adjust it. Or search by postcode brings the search box back. Press Escape to cancel placement. Positioning a flag makes no route request: press Create when ready. Use the main map rather than an enlarged London inset.
Type a full postcode or a place name under Start from. Click the magnifying glass or press Enter. Check where the flag lands and drag it if needed. Searching only positions the flag; Create creates the travel areas from that position.
Try up to 50 minutes or 50 miles without signing in or buying an unlock. These are separate time and distance limits, not a promise that 50 miles takes 50 minutes. An unlocked map supports up to 360 minutes or 310 miles. The tool automatically uses a less detailed boundary for journeys beyond 60 minutes or 55 miles; there is no separate setting to choose. Each band is calculated from the road network, rather than made by shrinking the outer shape.
Under How far, choose Distance for miles travelled or Drive time for minutes. The Up to field shows the units. A 20-minute area is different from a 20-mile area or a 20-mile radial circle.
Enter the outer travel limit you want to explore. Travel areas are calculated estimates from the routing service and road network, not a promise that every journey will take exactly that time.
Choose 1, 2, 3, 4, 5 or 10 equal bands within the total. For example, a 30-minute limit with three bands represents 10, 20 and 30 minutes. More bands show detail but add visual complexity.
When the flag, range and legend are ready, press Create. This calculates the road-travel areas. Once they exist, the button says Update on map. Move the flag or change the range, then press it to update that starting point. Other starting points stay as they were. Location searches and trial calculations work without an account. The trial limit is 50 minutes or 50 miles for the whole analysis, including its outer band. An active licence for this map removes that trial limit. Normal service request limits still apply.
Choose Add another starting point below the green button. Your distance or drive time, limit, bands, colours and custom labels are kept. Search for the new starting point or click the map to place its flag, then press Create. Your earlier travel areas stay on the map.
Untick Show flag to hide the selected starting marker. Tick it again to show it. Flags appear above the travel areas and remain draggable. Showing or hiding them makes no route request.
Cancel remaining calculations stops the queue after any calculation already in progress finishes. A request already sent to the routing service may still be processed. Your earlier result is kept; retry can continue from completed bands.
In Legend, click a colour square to change it and type beside it to change the label. Automatic labels use the band limits: 30 miles split into four gives 7.5, 15, 22.5 and 30 miles. You can replace them with your own wording, such as Local deliveries. Clear a label or click its small reset arrow to return to automatic wording. Each starting point keeps its own colours and labels; editing them uses no route calculations.
The checkbox beside a starting-point name shows or hides that analysis as a whole. For separate controls, use Show areas, Show flag or Show legend. Hidden items remain saved and can be shown again.
Click a travel legend to select its starting point and show its settings. Drag the legend to move it, or drag a blue corner handle to resize it without stretching it. Scrolling over the key also changes its size. Click the map or press Escape to remove the handles. Choose Reset legend position to return it to its original position and size.
Click the small bin button beside Create or Update on map to remove the selected starting point and its result. Other analyses stay on the map. Undo brings it back. To hide it temporarily instead, untick its name in Your starting points.
Saving keeps the flags and their visibility, starting-point names, custom band labels, calculated shapes, colours and key positions and sizes. Reopening restores all of these without requesting calculations again. Downloads include the finished keys, with no editing handles. Moving a flag stores its new position but leaves the previous boundaries until you press Update on map.
Click Colour postcodes below the visibility controls to turn this starting point’s calculated bands into postcode territories. If your map already has coloured areas, choose Add to existing or Replace colouring. This reuses the calculated shapes without another routing request. See Colour postcodes inside travel areas for a full explanation.
You can have up to five travel starting points on a map. The starting-point CSV importer accepts 1–5 data rows in a file smaller than 1 MB, and new points must fit within the five-point map total. An existing imported ID updates that starting point instead of adding another. Rings or time bands around a starting point are not extra starting points. The trial travel-range limits are separate from this count. Contact GBMaps to discuss a job needing more than five starting points.
What this looks like
Current GBMaps controls with example maps and account details. Choose View larger to see the details.
Turn your travel areas into coloured postcode territories with one button. The matching areas take the coverage colours and appear in your normal map key. There is no list to find, copy or import first.
Travel areas on the map. Isochrones are travel-area shapes. Their irregular edges show why a time-based catchment can look very different from a circle: the available network affects how far you can travel. This is an illustrative display made with the tool’s renderer, not a calculated route or journey-time estimate. Use Create areas with your own starting location and settings to calculate your map.
Choose the starting point you want to use and press Create or Update on map first. Only that starting point’s calculated travel bands are used. Check the position, sizes, colours and labels before colouring. Hiding the coverage does not remove it from this calculation.
Click Colour postcodes. On an uncoloured map the result appears straight away. On a map with existing territory colours you choose what to keep. This uses the shapes already on your map; it does not make another travel-service request.
Keeps every postcode that already belongs to a coloured territory, even where the new coverage overlaps it. Only uncoloured matching postcodes receive the new colours. Your existing key entries and notes stay in place.
Clears all existing territory colouring and its key entries, then colours only the matching postcodes. Areas outside the coverage become unassigned. Your circles, dots, travel areas, images, text and other map artwork stay in place. Cancel or the close button leaves everything unchanged.
The tool tests the representative centre of each polygon at your map’s postcode level. It colours the whole area, district or sector when that centre falls inside the coverage. A polygon may extend beyond the edge, or partly overlap the coverage without being selected. This is not a list of individual addresses or an exact clipped boundary.
Travel band colours and labels become the territory colours and key names, prefixed by the starting-point name. Where bands overlap, the inner band wins.
Undo reverses the whole colouring operation in one step; Redo restores it. Save keeps the new territory colours and key. Colouring is a snapshot: moving coverage or changing its labels later does not recolour the territories automatically. Click Colour postcodes again and choose Replace colouring to rebuild just this coverage, or Add to existing to fill only uncoloured gaps.
Import Excel is directly below START HERE in the desktop controls. Paste matching postcode and territory-name columns to colour a whole list at once; on a phone or tablet find it through Tools. Use Import with colours when you already have a colour for each row.
Copy the postcode column from Excel and paste it here, one postcode per row and without a heading. Use codes that exist at the selected map’s level. Keep codes such as leading-zero ZIP codes as text in your spreadsheet.
Paste the matching territory names in the same row order. Repeated names put several postcodes into the same territory. Leaving the entire column blank uses Zone 1. For a meaningful multi-territory map, supply a name for every postcode.
The Clear button below a column empties that input. It does not act as a general “clear my map” command. Clear and replace both columns together when importing a different table.
Reverses both columns together and updates the map from the reversed data. It is useful for changing the order in which names appear in the key. It is an action on the import, not just a cosmetic sort of one text box.
Choose the family of colours to use when the importer assigns colours to territories, or choose Random. Related shades can suggest a series, but clearly different colours are usually better for unrelated sales teams.
Processes the paired columns and colours the matching polygons. Check any feedback and inspect the result: a district code cannot create missing sector geometry. Save a separate version before importing over a map you may need again.
Opens the larger dialog with a third column for your chosen colours and an optional table for extra key text. Use it for a repeatable colour scheme across several maps.
Open the sample chooser to see prepared examples. Selecting a sample imports it immediately, so save your current work before experimenting. Samples are useful for learning the required data structure.
What this looks like
Current GBMaps controls with example maps and account details. Choose View larger to see the details.
Paste one code per row, without headings. Copy all related columns from the same table so a sort or filtered selection does not put the wrong name beside a postcode.
Supply the territory name for each row. Repeating a name groups those polygons together. Check spelling, spacing and punctuation if you expected one territory but see several similar names in the key.
Paste the matching supported colour names, or leave the colour column blank to use automatic colours. Use the colour-name catalogue in this dialog for predictable matches. If a colour column is supplied, keep its row count aligned with the other columns.
Use the quick colour choices or open Browse all colours. Search by name, then copy the chosen name into your spreadsheet or the Colours column. If automatic copying is unavailable, select the displayed text and copy it normally.
The optional extra-text table uses the territory name in its first column and further columns for lines of notes. This is separate from the postcode assignment table. Leaving this section blank keeps existing details. You can also edit these notes later in Key Settings → Legend details.
The sample list applies a sample to the map when selected. The copying-help section illustrates how to copy columns from Excel. Use it if pasted data has ended up on one line or in the wrong column.
Applies the import to the current map. Check the result and save it. The dialog’s Clear all command clears its draft fields; Cancel closes the dialog without running the import. Imported territory data can replace existing work, so keep a saved copy first.
Dots and shapes support up to 2,500 locations per import. Marker boxes remain limited to 500 locations per import. On supported Eircode maps, no more than 200 of those locations can be full Eircodes. These are import limits, not a promised total number of objects per map. If you need more, choose Contact GBMaps and tell us the map, the type of import and approximately how many locations or rows you need, so we can discuss options.
Create Dots accepts up to 2,500 postcode locations in one import. Advanced import has the same 2,500 data-row limit for circles, stars and other dot shapes, and its CSV must be smaller than 2 MB. Remove blank lines and do not paste headings into individual columns. A recognised CSV heading row is separate from the data rows. This is not a separate allowance for each shape or a stated 2,500-dot total per map. If you need more, choose Contact GBMaps and tell us the map, the type of import and approximately how many locations or rows you need, so we can discuss options.
Import from postcodes and Advanced import both accept up to 500 marker locations per import. Keep postcode and label rows aligned. An advanced marker CSV must be smaller than 2 MB. The 500-row import limit is not a documented maximum for all manually placed markers on a map; we do not promise unlimited markers. If you need more, choose Contact GBMaps and tell us the map, the type of import and approximately how many locations or rows you need, so we can discuss options.
Where the tool offers Postcodes & Eircodes on supported UK-and-Ireland or Ireland maps, a dots/shapes import can process up to 2,500 locations in total; markers and circle-centre imports remain limited to 500 locations. Each of these importers processes at most 200 full Eircodes within its own total; the remaining locations may be UK postcodes. Only the first 200 Eircodes are processed and extra Eircode rows are skipped, so read the import summary. Eircode lookup is not available on every UK, NHS or overseas map. BT postcodes are UK postcodes, not Eircodes. Contact GBMaps to discuss a larger Eircode job rather than relying on extra rows being imported.
Choose Contact GBMaps below the assistant, or use the contact link in the help. Describe the map you are using, whether you want dots, labelled markers, rings, travel areas or numerical figures, and your approximate row count. We can discuss the options for your particular job. Do not assume repeated batches accumulate safely: some imports replace the existing collection. Buying or upgrading an unlock does not promise higher dot, marker, Eircode or file-import limits. We do not promise a larger limit, a particular price or unlimited objects before discussing your requirements.
A circle set has one centre and can contain 1–20 concentric rings. Twenty is the ring count per set, not a maximum of 20 centres or sets across the map. On supported Eircode maps the circle-centre importer uses the 500-location / 200-Eircode limits above. Other circle-import routes do not have a verified published maximum number of centres or CSV size in this guide; do not assume the dots CSV limit applies to them or that they are unlimited. For a large circle-set import, contact GBMaps with the number of centres and rings you need.
You can have up to five travel starting points on a map. The starting-point CSV importer accepts 1–5 data rows in a file smaller than 1 MB, and new points must fit within the five-point map total. An existing imported ID updates that starting point instead of adding another. Rings or time bands around a starting point are not extra starting points. The trial travel-range limits are separate from this count. Contact GBMaps to discuss a job needing more than five starting points.
Additional Data → My datasets accepts a numerical CSV with up to 25,000 data rows and a file size up to 8 MB; include the column-heading row. This route totals figures against postcode areas and territories. It does not plot 25,000 dots or markers. Import Excel for colouring postcode territories is another route: do not apply the 2,500-dot limit or the My datasets limit to it without checking the particular job. Contact GBMaps for larger files or advice about which import suits your data.
Attach one reference file per message, up to 8 MB; CSV attachments have a smaller 1 MB limit. Tables must fit all the limits: 500 rows, 20 columns, 5,000 cells and three sheets. PDFs can have up to 10 pages, and images up to 16 megapixels. Attaching a file is not the same as importing dots, markers or a dataset. Use the appropriate import guide for that job. If your complete job needs more than the supported limit, contact GBMaps to discuss options. Never assume Advanced import supports an unlimited list.
Most import problems start with a shifted row, the wrong postcode level or a value formatted unexpectedly by a spreadsheet. A quick check before import saves a lot of tidying afterwards.
Import Excel colours postcode polygons into territories. Create Dots plots locations. Marker Boxes adds labelled locations. Radial Circles draws distance rings. A postcode in a legend note is just printed text. Choose by the result you want, not simply by the fact that your source is Excel.
The postcode, name and settings on row 12 must all describe the same location or polygon. Sort the whole spreadsheet table together. Do not sort the postcode column separately. Check blank rows, merged cells and accidental heading rows.
A UK postcode area such as YO, a district such as YO18, a sector such as YO18 7 and a full postcode such as YO18 7TG describe different levels. Territory import needs codes compatible with the selected boundary map; location tools need full postcodes for precise positioning.
“North team” and a differently spelt version can become separate key entries. Use a single spelling for each territory. Give each territory one consistent colour throughout the sheet.
Postal codes are identifiers, not quantities. Keep leading zeroes where relevant and avoid spreadsheet date conversion. In the advanced location importers, use plain numeric settings and the exact words listed in Column guide.
A loaded file is not always an applied import. Review the fields, choose Import to map, then check any errors or missing postcode results. Keep the original spreadsheet so you can correct and repeat the import without rebuilding it from the map.
Use Import Excel for postcode-to-territory columns; Advanced import under Create Dots, Marker Boxes or Radial Circles for each item’s settings; Additional Data → My datasets for reusable numerical CSV data; or the assistant’s paperclip for a small reference to discuss. Attaching a spreadsheet to the assistant does not import it into My datasets. Each route has its own limits and replace/add behaviour.
Dots and shapes support up to 2,500 locations per import. Marker boxes remain limited to 500 locations per import. On supported Eircode maps, no more than 200 of those locations can be full Eircodes. These are import limits, not a promised total number of objects per map. If you need more, choose Contact GBMaps and tell us the map, the type of import and approximately how many locations or rows you need, so we can discuss options. Advanced dots and markers CSVs must be smaller than 2 MB. My datasets has separate limits of 25,000 data rows and 8 MB. The assistant paperclip has its own reference-file limits. See Import limits for the full comparison.
Bring in sales, orders or other postcode figures and see totals for each territory in your legend. Upload a file once and keep it in your account for future maps.
Choose Additional Data → My datasets in the editor, or Open data library above your saved maps. Sign in if asked. Your own datasets appear here, ready to use. If this is your first upload, the file box opens straight away.
Choose Upload data, then drop your CSV into the file box or click to choose a file. Check the two selected columns, give the dataset a name and import it. The import guide explains this short process.
Click Use on this map beside a dataset. Its totals appear in the legend. Click the name of a zone in your legend, then click inside the map shapes you want to give to that zone. The figures update as you build it. You can have up to eight datasets on a map.
Removes this dataset’s figures from the current map only. It stays in your account for later use. To hide a figure temporarily instead, untick its name in the Additional Data sidebar. Save the map to keep either choice.
Open the other map, choose My datasets and click Use on this map. GBMaps works out the appropriate totals for you. You do not need to upload the file again or alter your spreadsheet. If the file does not contain enough detail for a particular map, it remains saved for your other postcode maps.
The name you gave the dataset is the label in the legend. A blank value is missing information, not zero. A star beside a total means some coloured locations have no value in this dataset. Open More options to download the source, or Download this map’s figures to check the postcode breakdown. Duplicate map shapes and insets are counted once.
Extra housekeeping is tucked away here. Download CSV saves the accepted postcode rows and values. Update this dataset imports a replacement file without changing your older saved maps. Archive puts a dataset out of the way; it does not erase its figures from existing maps.
If you have updated a dataset, More options includes Earlier uploads. Saved maps keep the figures originally used. Choose another upload and Use on this map only when you want to change this map. Datasets made with the earlier multi-column importer still work; their Figure to use list lets you choose a column.
In the editor, open Download this map’s figures below the dataset cards. Choose Territory totals or Postcode breakdown. On the saved-map page, use that map’s options menu to download its saved figures. Save recent colouring changes first when downloading from the saved-map page.
Load included statistics in the Additional Data sidebar opens the population, household and other built-in figures available to your map. These can be used alongside your own datasets. If no included figures are available, the message explains how to upload your own postcode figures privately. My datasets opens your library (or asks you to sign in); Buy a licence opens the usual payment choices for this map. The video shows the earlier statistics controls; the instructions here describe the current interface.
Open Additional Data in the sidebar. Use the up and down arrows beside a figure to move it above or below the others. Uploaded datasets and included statistics share one list, so you can mix them in any order. Every territory in the legend follows this order. Unticking a figure hides it but keeps its place ready for when you tick it again. Save your map to keep the order next time.
What this looks like
Current GBMaps controls with example maps and account details. Choose View larger to see the details.
Turn a column of figures into a map that is easy to compare. A light-to-dark colour range can show lower and higher sales, customer counts or population totals. These heat maps colour the boundary shapes themselves; they do not create a blurred cloud of points.
My postcode datasets opens your existing data library. Upload a postcode CSV or use a dataset already in your account, then choose Use on this map. Back in Heat Maps, select the figure to colour by. More detailed postcode totals are combined for the area or district map you are using.
Upload a CSV for this map works with the names of its boundary shapes, including county maps. Download this map’s area names gives you a ready-made list: add your values and save it as CSV. Drop the file into the box, check the area-name and values columns, and give the figures a name. The preview shows matches, repeated names and unmatched rows before you accept it. Repeated names are added together; empty values stay as No data. Correct any non-numerical entries before continuing. These figures stay with this saved map rather than being added to your account’s postcode dataset library. For Excel workbooks, use Save As CSV first.
Pick a colour strip and choose between three and nine shades. Blues, Greens and Teal are useful for low-to-high values. Heat runs from pale yellow towards red. Reverse the colours swaps which end represents the larger figures. A dataset with few distinct values may need fewer shades.
The preview shows the number range and area count for each colour. Changing these controls does not recolour the map yet. Areas with missing figures are listed separately and become grey No data areas; a genuine zero is included in the numerical ranges.
Create heat map applies those colours and adds editable zones to the normal legend. If the map already has coloured territories, a warning explains that their assignments will change. Choose Cancel if you want to keep them. Undo restores the previous colours, assignments and legend.
For an already saved map, Create in a saved copy lets you give the new version its own name. The original is kept as it was and you continue editing the copy. Save an unsaved map once first if you want to keep both versions.
More options offers similar numbers of areas per shade (quantiles), equal-sized number ranges, natural gaps in the values, or geometric intervals. Geometric intervals need every value to be above zero. Quantiles are a useful starting point; equal ranges make numerical comparisons more direct.
Choose normal numbers, pounds or percentages and the number of decimal places. The legend heading uses the dataset’s figure name unless you supply one. Only use percentage formatting for figures already calculated for the map areas: adding percentages from smaller places does not give a valid percentage.
The generated colours and labels are ordinary legend zones. Change their names or colours, or click on the map to adjust their assigned areas. Saving keeps the colours and the dataset version used to make them. Reopening does not automatically recolour the map when newer data is uploaded.
What this looks like
Current GBMaps controls with example maps and account details. Choose View larger to see the details.
Drop in a CSV, check the postcode and value columns, name the dataset and import. Your figures are saved in your account and, when possible, added straight to the map you are editing.
Choose Upload data. Drag one CSV file onto Drop your CSV here, or click the box to choose it. The first row should contain column headings. In Excel, use Save As → CSV UTF-8. You can also open Or paste cells from Excel and paste the headings and data together. Files can contain up to 25,000 rows and 8 MB.
GBMaps selects the column it thinks contains your postcodes. Check its blue heading in the small sample table. If the choice is wrong, pick the correct heading from Postcodes. Full postcodes and shorter postcode codes are recognised automatically.
Choose the column of numbers you want to add together, such as sales, orders or visits. Its sample heading is green. Keep one value column per dataset; import the file again with a different column if you want a second dataset. A zero remains zero; blank cells stay blank. Negative values, such as refunds, are allowed.
The table shows the first five rows of your file so you can check the choices. It is only a sample: all rows are checked when you import. Repeated postcodes are normal when several customers or orders share a postcode; their values are added together.
Use a short, clear name such as Sales 2026 or Customer visits. This is both the name in My datasets and the label beside each territory total in your legend. You do not need to name the figure separately.
Click once to check the whole file, save the dataset and add it to your map. If the file is ready, the box closes and your totals appear in the legend. From the saved-map page the button is Import dataset: it saves the figures to your account for use when you next open a map. Use the map’s Save button to keep the dataset choice with that map.
You will see how many rows are ready and examples of anything wrong. Nothing is silently discarded. Correct the file and use Change file to upload it again, or tick Leave out these rows and import the rest. The download link gives the list of problem row numbers and reasons. A file with no usable values cannot be imported.
A compact code such as YO18 can mean district YO18 or sector YO1 8. If the file does not make this clear, GBMaps shows both examples and asks which you intended. This question is only shown when needed. Writing sectors with a space, or using a heading such as Postcode sector, avoids the ambiguity. Keep one kind of postcode in each file.
Amounts and counts work well. Percentages and averages cannot simply be totalled: upload their underlying amounts or counts instead. Use a decimal point and up to four decimal places. Thousands commas and £ signs are accepted. A column with £ signs is displayed as pounds. Cells containing spreadsheet formulas need to be saved as their calculated values.
If you need more, choose Contact GBMaps and tell us the map, the type of import and approximately how many locations or rows you need, so we can discuss options. My datasets is for numerical totals, not a way to exceed the dot or marker import limits.
Map Types chooses the boundaries you will work with. On desktop it is directly below Log in or your account controls and above Save, Open and New. It opens a separate green-framed card over the sidebar and map; the tools below it edit your current map.
Map Types is above Save / Open / New. Choose a region tab and expand a category, or search for a map type.
Type a country, region or boundary type in Search map types. Results are map choices for this colouring tool, not saved files, street addresses or spreadsheet contents. Clear the search to browse the catalogue again.
On desktop, choose UK & Ireland, Europe, USA or Worldwide, then expand a category. The map links are arranged in text columns. Scroll inside the card to see more. Close it with × or the Map Types button to return to your map. On a phone or tablet, the catalogue opens in the compact tool panel.
Opens the selected map. Save your current work before leaving; the new map is a different starting point. Access can be specific to a map type, so owning one map does not automatically mean every catalogue item is unlocked.
Map Types now lists maps for this colouring tool. It no longer has the old Advanced Mapping, Explore or VectorMaps links. For a detailed street map of a town or village, ask the assistant for a street map and include the place and county or postcode; it can offer the appropriate separate map page. This does not add a street layer to your colouring map.
For finer postcode detail, open Detail above the map: an area map can suggest districts, and districts can suggest sectors. The small card shows the current and suggested levels. Choose Try districts before buying or Try sectors before buying to explore. When signed in the link says Upgrade to districts or Upgrade to sectors. Opening the link does not itself purchase access or convert your saved map. Save current work first; review any access quote separately.
Tap the current map name in the top bar, then Map Types →. You can also find Map Types in Tools. Use its search or expandable categories; close the tool with × to see more of the map.
What this looks like
Current GBMaps controls with example maps and account details. Choose View larger to see the details.
Choose one state to make a five-digit ZIP code territory map, or join neighboring states. You can color each ZIP separately or color a whole state in one click. The free downloadable three-digit ZIP maps are different: use the five-digit tool when you need individual ZIP areas.
Open Map Types → USA → USA 5-dig. ZIP-Codes. Combine Multiple States is a text choice above the individual states.
Open Map Types, choose USA, expand USA 5-dig. ZIP-Codes and choose a state. Every state has its own map. Or choose the Combine Multiple States choice in that same section. The Counties section is a separate map family.
The map opens centered below its title. Tall states usually use a portrait page; wide states use landscape. You can change the page orientation and use Fit map to return to the starting view. Alaska is fitted separately when combined with another state.
Add a team or territory name under START HERE and choose its color. Select that name in the legend. The button above the map says Colour: ZIP codes for individual ZIPs. Click the button to switch to Colour: States; then a click inside a state assigns all its ZIPs to the selected territory. Click the mode button again to work with individual ZIPs.
A ZIP such as 02108 must keep its leading zero. When preparing a spreadsheet, keep ZIP codes as text. The maps show ZIP areas, not individual delivery addresses. A radius or driving area selects whole polygons using their centers, not every street address.
Build a territory map using the counties of one US state, or a connected group of states. Each county can have its own color, and you can also color every county in a state at once. Alaska boroughs and census areas, Louisiana parishes and other county-equivalent areas are included as county-level boundaries.
Open Map Types → USA → USA County Maps. Use its own Combine Multiple States choice for county boundaries.
In Map Types, choose USA, expand USA County Maps and choose your state. Links from the free state county download pages open that same state in the coloring tool. The existing USA-wide counties map is a separate choice.
Create names and colors under START HERE. Select a legend name, check that the button above the map says Colour: Counties, then click counties to assign them. County names are fitted inside the shapes; Map details lets you hide them or show city names and dots.
Click the mode button until it says Colour: States, then click inside the state. All its counties receive the selected legend color. Switch back to Counties to make exceptions. Zooming does not silently change the mode.
Choose Combine Multiple States in the county section. Select a connected group of up to three states, with Alaska allowed separately. Load before purchase; edit the combined counties with one legend. ZIP and county maps cannot be mixed in the same combination.
One state is £25 plus VAT where applicable; the selected-state bundle totals the states you do not own; all 50 county states are £150 plus VAT where applicable. Access lasts 12 months. The corresponding ZIP products have the same prices but separate access.
What this looks like
Real US map controls and examples. Choose View larger to see the details.
On individual or combined US ZIP and county maps, the state is the larger area layer. You can fill all the detail areas in a state with one click, then change individual ZIPs or counties. State outlines and large state names have their own controls.
State boundaries and names are independent of the smaller boundaries. State appearance controls the line color and large state names.
Add a name and color under START HERE, then click that name in the map legend to select it. A state does not get its own special legend: it uses your normal team or territory name.
The button above the map shows what the next click will color. Click it to switch between Colour: States and Colour: ZIP codes or Colour: Counties. In States mode, click anywhere inside the state to assign all its ZIPs or counties. In a combined map, neighboring states are left alone. The choice stays the same when you zoom.
Switch back to ZIP codes or Counties, select another legend color and click the smaller areas you want to change. This is a quick way to make one broad territory with a few local exceptions.
If the state already contains a mixture of colored and uncolored areas, or different territory colors, the tool asks before replacing them. Choose Colour whole state to apply your selected color, or Keep existing colours to cancel. Undo restores the complete previous arrangement in one step. Clicking a uniformly colored state again with the same selected color clears it.
Open Map details, then Borders & labels. The States row has its own Borders switch and Width choice. The ZIP codes or Counties row below controls the finer boundaries independently. For example, use a stronger state line and finer county lines.
Use the States Labels checkbox for state names. In State appearance, change the name color, name size and state border color. These settings work on single-state and combined maps. They do not change the size or color of the smaller ZIP/county labels.
With active access, save the map to retain your state settings, chosen coloring mode and detailed territory assignments. The state lines and names are included in the normal printable output. On Google shows the colored ZIPs/counties geographically; its Polygon labels switch is separate from the printed state names. Older saved maps open with default state styling until you change and save it.
What this looks like
Real US map controls and examples. Choose View larger to see the details.
Start with a state or a small connected group. Give your sales teams, branches or service areas clear names, then make the map easy for someone else to read. The tool uses “colour” on its buttons; it means the same as “color”. The key is also called the legend.
In States mode, one click colored Kansas. Oklahoma and Missouri remain available for other territory colors.
Use five-digit ZIPs for postal territories or counties for county-level planning. Choose the state in Map Types or use the appropriate Combine Multiple States button. You can experiment with the trial map before purchasing.
Create your team names and colors. Use Colour: States to fill a state quickly, then return to ZIP codes or Counties to make local changes. The existing legend controls both levels.
Simply drag an entry in the on-map legend to where it should appear. The other entries automatically rearrange. Use Key Settings for the layout and title. Keep names short and clear, such as Central team or West service area.
Use Map details to show bold state boundaries and large state names, and finer ZIP/county boundaries. Add Cities names and dots for reference. Hide less useful small labels. Give the map a clear title and use Fit map when you need the overall view.
Radial Circles give approximate straight-line miles. Distance/Time uses roads to show driving time or driving distance and needs active access. Coverage coloring works with whole polygons, using their centers. It is not an exact list of addresses reached.
Save an editable copy with active access, then use the normal PDF, SVG or image download options. On Google provides a geographic preview. Share map makes a view-only link that lasts two hours; after expiry it shows information about the tool rather than your map. Sending from GBMaps requires sign-in. Do not share confidential information. For an ongoing website link or embed, use On Google beside the saved map in My maps where offered; see Share a saved map or embed it on your website. That saved viewer remains available while the corresponding licence is valid, rather than using the temporary snapshot’s two-hour expiry.
Try “Color Kansas blue and Oklahoma green”, “Make Johnson County, KS red”, or “Make the state borders thicker and the state names larger”. Include the state with a county name, because many counties share names. Read the proposed plan, then choose Make these changes. The assistant can open a chooser; you choose and load the states yourself. Undo this job restores an assistant edit.
Use the small US chooser map to join up to three states into one editable map. Start in the ZIP section for ZIP areas, or the Counties section for counties. You can load and customize the map before buying access.
See it on the map
Real map artwork · example settings
Change states from the Details dropdown. The dropdown names the states you are using. Choose Change selected states to reopen the chooser and amend them. Browse other maps opens the catalogue without closing it if it is already open.
Select adjoining states on the small map. Load selected states works before purchase; the right-hand buttons are optional purchase choices.
Open Map Types, choose USA, then expand USA 5-dig. ZIP-Codes or USA County Maps, then choose the Combine Multiple States choice. Both buttons work the same way; the section determines which boundaries the combined map will contain.
Click a state to select it. It turns gold and its name appears under Your selected states. Click it again, or click the × on its name, to remove it. Clear removes the current selection. The state abbreviations help you identify smaller states.
Choose up to three states that form one connected area. They do not all have to share a border with each other: a chain such as Kansas, Oklahoma and Texas is fine. States touching at a corner are allowed where shown by the chooser. Alaska may be included separately and appears as an inset. Hawaii cannot join a mainland group; you can use it on its own or with Alaska. The chooser explains why an invalid selection cannot load.
Choose Load selected states to start using the combined map in trial mode. You do not have to buy each state before trying it. The same legend works across the selected states. Use Colour: States for whole-state coloring, or Colour: ZIP codes / Counties for smaller areas.
The bundle button buys access to the selected states that you do not already own, in one payment. Each state is £25 plus VAT where applicable. Three unowned states therefore cost £75 plus VAT. This unlocks the states themselves, so you can use them separately or in other permitted combinations.
The individual-state buttons are still available. You can choose just one state now and buy another later. Check that you are buying the right map family: county access and five-digit ZIP access are separate.
The all-50 option costs £150 plus VAT where applicable and gives 12 months of access to that map family. It lets you choose states whenever you need them. It does not load all 50 as one combined page, and it does not include the other map family.
Open the Detail dropdown above the map and choose its state-chooser button, or return to Combine Multiple States in Map Types. Save work you want to keep before loading a different map. A trial combination is not a permanently saved map. With active access, save your map to retain the combination and your edits.
What this looks like
Real US map controls and examples. Choose View larger to see the details.
US map details: state names, ZIPs, counties and places
US ZIP and county maps have separate controls for state outlines, the smaller boundaries and place names. Open Map details to show just the information your reader needs. You do not need to change the map type to hide a label.
On a ZIP map, use the ZIP codes row for local detail and the States row for the larger state outline and name.
Under Borders & labels, the States row controls the outer state outlines, their width and the large state names. These controls are independent of the ZIP codes or Counties row below. Hiding state labels does not hide the smaller labels.
Use the Labels checkbox in the ZIP codes or Counties row. The Borders checkbox and Width selector affect only that smaller layer. County maps say Counties, not ZIP codes. Smaller labels keep their fitted sizes; zoom in when you need to inspect dense areas.
Open State appearance in Map details. Choose a State border colour, a State name colour and use the State name size slider. For ZIP/county label colors, open Map Colours. These settings change lines and text, not your colored territories.
In Places, choose Names and Dots for the levels you want. Names stay close to the correct dots; crowded place pairs are automatically thinned so they do not collide with other place names or dots. They may still overlap ZIP or county labels. Turn smaller place levels off for a cleaner overview.
Use the Place names and Place dots color controls. They affect built-in settlement labels and dots, not ZIP numbers, county names or dots you added yourself. Turn on both Names and Dots for a paired display.
Hide unassigned areas hides the uncolored detail polygons and clips supporting map detail to the colored areas. Show unassigned areas brings them back. If nothing is assigned, the map geography is hidden. Choose Show unassigned areas to bring it back and start colouring again. Hiding is not deleting.
What this looks like
Real US map controls and examples. Choose View larger to see the details.
Circles and driving areas on US ZIP and county maps
The Radial Circles and Distance/Time tools also work on individual and combined US five-digit ZIP and county maps. Choose straight-line circles for an approximate radius, or driving areas when roads and travel time matter.
Place a center, choose your rings and set the miles between them. This example uses a Kansas, Oklahoma and Missouri ZIP map.
Open Radial Circles, place the center on the map, then choose the number of rings and miles between them. US ZIP and county maps use a state-aware scale, including combinations; treat the circles as approximate distances, not exact driving routes. You can color whole ZIP or county areas within them if useful.
Open Distance/Time, search for a starting place or click the map to put down a flag. Choose miles or driving minutes, set the limit and bands, then press Create. This uses the road network and needs active access; it is different from drawing radial circles.
The coverage-colouring buttons can assign whole ZIP or county polygons using their centres. A polygon touching the edge is not automatically included if its centre is outside. Choose Add to existing to keep other territory colours, or Replace colouring only when you want to start over.
What this looks like
Real US map controls and examples. Choose View larger to see the details.
You can try a state or combined map before purchase. When you are ready, choose one state, your selected states together, or access to all 50 for 12 months. The checkout shows the full amount before you pay.
In the multi-state chooser, you can buy all selected states together, buy one of them individually, or buy access to all 50. A state is £25 plus VAT where applicable, so three selected states such as Kansas, Oklahoma and Missouri cost £75 plus VAT together. All 50 cost £150 plus VAT where applicable. States you already own are left out of a selected-state bundle price. You can load and try the combined map before buying. Buying all 50 lets you choose any permitted combination later; it does not load one giant 50-state editing map. ZIP and county access are separate: all 50 means all states in the chosen map family, not both families.
For US maps, use the UK or US flag in the Buy window. Select United States only if you live there and will use US billing details at checkout, then tick the confirmation. An eligible US purchase shows no UK VAT. If you are in the UK, leave United Kingdom selected.
The US dollar figure is an estimate to help you judge the cost. The actual card or PayPal charge is in pounds, shown directly underneath. Your bank or PayPal sets the conversion rate and may charge fees. The tool keeps a recent indicative rate so it does not need to ask another service every time you change the flag.
Use the payment methods offered for your selected product and billing country. Card and PayPal may be available through the current checkout. Confirm the displayed currency, total and billing country before completing payment; the UK checkout illustration is not a quote for US access.
Use a blue question mark for help with a control, the toolbar question mark for the handbook, or Map assistant for a question about your current map. Help & FAQs is also in the desktop footer.
Use Map Types below the account controls to choose another map for this editor. The old Advanced Mapping card and VectorMaps links are no longer in that menu. Ask the assistant for a specific street map when you need a separate town, village or city map; include its county or postcode to avoid similarly named places.
Choose Videos at the top of the handbook for the tutorial directory, or follow the Watch tutorial link in a relevant topic. Videos open separately, so your current map stays in place. Some show an older arrangement of the controls.
Choose the white, underlined Help & FAQs link in the bottom-left footer to open this illustrated handbook over the tool, with search, numbered panel pictures and tutorial links. The About GBMaps & the service section covers licences, renewals, accounts, refunds and the business. Close help or choose Back to my map to return to the same work.
Starts a guided introduction over the editor. Follow its steps or close it when you are ready to continue. A tour is useful for getting your bearings; the panel guides here go into the individual settings in more depth.
Use the Contact GBMaps link at the bottom of this guide. Say which map type you are using, the action you took and the exact message you received. A screenshot of the problem is useful. Keep an unsaved map open while you check what went wrong.
Use this button at the top of the handbook to move the topic you are reading into its own browser window. The overlay closes after the new window opens, leaving your work in place. If your browser blocks the window, the guide stays open and asks you to allow pop-ups. You can place the guide beside the map while you work.
The Help & FAQs link in the File Manager heading opens the same handbook, starting with saved maps and files. Back to saved maps or the close cross returns to the manager without submitting an order, renewing a licence or changing any files.
Close this guide to return to your existing work. To change map types, use Map Types below the account controls and above Save / Open / New, or the map access choices in your saved-map manager. On a phone or tablet, open the current map name and choose Map Types, or find it in Tools. Save work you want to keep before switching. Help opened from the tool does not contain links that start another map.
Choose Share topic beside Print topic at the top of any handbook article. Copy a link gives you a link to paste into a message or team chat. Send an email lets a signed-in customer enter one recipient and send a formatted GBMaps email; visitors can sign in there or use their own email app. The recipient opens a fresh map preview with that help topic already on top, then closes help to try the tool. Sharing a topic does not include your saved map, customer data or account details. If copying is blocked, select the link and use your usual copy command. If an email cannot be sent, the box explains the problem and the copy-link option remains available.
What this looks like
Current GBMaps controls with example maps and account details. Choose View larger to see the details.
When this choice is available on an unlocked map, it saves the current work before starting afresh. Wait for the save to finish. If saving fails, keep the current page open and deal with the error before leaving.
Starts afresh and leaves unsaved changes behind. The current map type is the starting choice. To choose a different boundary product, use Map Types or Create New Map beside the relevant product in your saved-map manager.
Open takes you straight to your saved-map manager when the current map has not changed. If it has changed, choose Open & Save to keep the changes before opening the manager, or Open without saving to continue immediately without saving them. Then find the required record and use EDIT. Starting a new map and opening a saved one are different jobs.
Use Save a Copy of this map in the Save menu where it is offered, and give the copy a distinct name. This is the useful route for next month’s territories, an alternative layout or a proposal that must not replace the original.
The Save menu opens in Print View. Enter a recognisable file name, up to 35 characters. Include a place, purpose or version, for example “North delivery zones Sep”. This name identifies the saved map; it is separate from the title printed on the artwork.
Stores the current editable map and all its settings. You stay in the editor and a saved confirmation appears in the Save menu. Saving an existing map updates that map; it does not create another file merely because its name changed. Wait for the confirmation before leaving.
Choose Save copy after the map has been saved once. A small box suggests a name ending in “copy”; change it to anything useful, then choose Save copy. The original is left untouched and you continue editing the new map. Cancel leaves the original name, identity and work unchanged.
After saving once, choose Rename to change its saved name. This leaves the printed map title, map identity and existing links alone. You can also use Rename beside a map’s name on the saved-map page. Two maps can have the same name without overwriting each other, although distinct names are easier to recognise.
The buttons under Download your map start PDF, PNG, JPG, SVG, CSV and PowerPoint exports, subject to access. The tool saves/prepares the map as part of the export process. Choose the file type for the job; see Download formats for the differences.
Open goes straight to your saved-map manager if the current map has not changed since it was opened or saved. Otherwise, its panel asks whether to save changes before opening another map: Open & Save keeps the changes and opens the manager after saving succeeds; Open without saving opens it immediately without saving. Open stays highlighted while this panel is visible; click Open again to close it. Recovery copies are available from the link at the bottom of your account menu. If Open is unavailable, check that you are logged into the account that owns the maps.
Starts a new map. If asked what to do with unsaved work, choose Save first if you need it, or cancel to carry on editing. Starting afresh is not a way to create a safe duplicate of the current map.
Use the On Google tab in the main toolbar to open the geographic preview. For current editing, return to Print View or Design; geographic background tiles are not part of the SVG artwork export.
Save the map, open the saved-map manager with Open, and choose On Google beside that saved map. Copy the viewer address for sharing or embedding on your website while your licence remains valid. The editor’s separate Share map button creates a two-hour snapshot instead.
How to download your map as PDF, PNG, SVG or PowerPoint
Check Print View before exporting: page edges, title, key, hidden layers and annotations all matter. Keep an editable copy by saving it in your account as well.
A good choice for printing or sending a finished map as a fixed page layout. Open the created PDF and check its page size, labels and key before printing. It is not the same as reopening the map for territory editing.
Useful in reports, documents and web pages when sharp lettering and flat colours matter. It is a raster image: enlarging it beyond its exported resolution can soften edges. Check the small labels at the size you intend to use it, and avoid enlarging the image beyond its original resolution.
Useful when you need a widely supported photographic-style image file. JPEG compression can soften small lettering and boundary lines, so PNG or PDF may be a better choice for a detail-heavy map.
Exports the vector artwork. It can remain sharp when scaled in compatible software and is useful for design workflows. The SVG is not a substitute for the tool’s saved account record and settings. Fonts and rendering can vary in other applications.
Exports map assignment data for a spreadsheet rather than a picture of the map. Use it to review or reuse postcode-to-territory information. It does not preserve the complete page design in the way an editable saved map does.
Creates a genuine presentation file containing the map on a slide. It is useful for dropping a finished territory map into a meeting deck. See the PowerPoint topic for what is editable and how the artwork is included.
When the file is ready, the result message shows its details. Download Now retrieves it to your computer; your browser controls where it is saved. Done closes the result message. Check the downloaded file before sending it on.
Follow the access/unlock message for the selected map. If an export fails, keep the editor open, save the map if possible and note the exact error. Do not keep repeatedly clicking a busy export button. The troubleshooting topic covers the common checks.
Set the page orientation and arrange the title, key and artwork. Check Print View, including anything close to an edge. The export captures the print-page artwork even if you were working in Design. It does not export the Google background.
Use the PowerPoint button in Save and wait for the file-created message. Choose Download Now, then open the .pptx in PowerPoint. It contains the finished map artwork on a slide.
The map is included as SVG vector artwork with a PNG fallback for applications that cannot display the SVG. It is a map graphic on the slide, not a slide made from thousands of native PowerPoint polygon objects. Recolour territories in GBMaps for the most reliable update.
Open the exported presentation and copy the map graphic or reuse the slide in your own deck. Keep the graphic in proportion when resizing. If the deck uses a different slide shape, check its placement and margins afterwards.
Reopen the saved map in GBMaps, make the changes, save and export again. Replace the previous graphic in your deck so it does not show outdated territory assignments.
See your territory polygons against a geographic background. This view helps you inspect locations and coverage, turn polygon labels on or off, and create a short-lived read-only link to share. The print artwork is still edited in Print View or Design.
The tool prepares the current map and loads the viewer. While it is loading, search and other dependent controls may be unavailable. If a load fails, use the displayed Retry action. A preview may show sample colouring when the map is not unlocked. New Zealand district maps are supported: your territory colours appear over a geographic background with roads and place names. Zoom in for more local detail; lower the Opacity slider if the colours obscure the background.
The sidebar is hidden because those controls edit the SVG artwork and would not immediately change the loaded geographic preview. It cannot be opened in this view. Return to Design or Print View; the sidebar’s earlier visible/hidden state is restored.
Hold and drag the geographic map to move around it. This changes the view of the background and overlay together. It does not drag the territory boundaries into a different geographic location.
Use the mouse wheel, a two-finger pinch or the viewer’s zoom buttons to change scale. Double-clicking the map zooms in. These are geographic-view gestures; they do not change the scale of the map artwork on the printed page.
Enter a postcode or place in the top search and run it. The viewer locates and pans/zooms to the result once ready. Clear removes the search marker/indication without erasing territory polygons. In the standalone viewer its own postcode box is available; the embedded tab uses the shared top search. New Zealand district maps search the four-digit postcodes on the loaded map, including leading zeroes such as 0283. Australian and New Zealand postcode searches do not look up UK place names.
Move the pointer over a polygon to see a small popup with its postcode and assigned territory name. The popup follows the pointer and disappears when you leave the polygon. This is an inspection aid; return to the editor to change the assignment.
Return to Print View or Design, edit the map, then select On Google again to prepare a fresh preview. The tab remembers its recent centre, zoom and opacity while you switch views. Do not expect an already loaded external viewer to update every keystroke in the editor.
Use On Google beside your saved map in the saved-map manager, rather than Share map inside this editor preview. The saved viewer can be shared or embedded while the corresponding licence remains valid. See Share a saved map or embed it on your website for the steps.
The preview has its own display controls. They help you read the geographic background without changing the colours or page composition of the SVG map.
Move the slider towards 0 to make the polygon fills more transparent, or towards 1 for stronger fills. A lower value lets background roads and labels show through. It changes the preview overlay’s fill opacity, not the saved print-map colours.
The target-style reset control returns to the viewer’s overview extent. It is separate from Fit map in the artwork editor. Use it when you have panned away from the area you meant to inspect.
Shows territory colours, names and enabled extra legend text. Hold and drag this key to move it clear of an important part of the geographic map. Its entries are for reference: they do not select a territory for painting or reorder the SVG key. Unlike the portrait SVG key, this viewer key has no dedicated wheel-resize control.
Hide unassigned areas carries through to this polygon overlay. The base map remains visible outside the coloured territories. If you see roads or place names there, those can be part of the background rather than unassigned postcode polygons.
Open the Google/view link for the saved map. New views are private to your account until you choose Share this view and confirm that anyone with the link may see the map and its labels. Copy public link gives you the viewing address; it does not let another person edit your map or open your account. Stop sharing switches off the public link and any embeds using it. Existing published links continue to work until their owner stops sharing them.
Drag the key with the mouse or a single finger to place it away from the geography you are inspecting. The movement belongs to this viewer. To place the key for a PDF, return to the editor and move the SVG key there.
The Polygon labels switch shows area names or 5-digit ZIP numbers on the geographic map. It starts off so the map is easier to view, and you can turn it on whenever you need the names.
Choose On Google above your map. Your current territory colours are prepared as a geographic overlay. On an individual or combined US ZIP map, it uses the corresponding real-world ZIP boundaries, including ZIPs with a leading zero.
Tick Polygon labels at the top-left of the geographic view to put ZIP numbers or county names inside the polygons. Untick it to hide them. Crowded labels are automatically thinned; zoom in to see more. This switch does not alter the lettering on your printable SVG map.
Use the target-shaped fit control below the zoom buttons to return to the map's overview. Drag to move around, or use the + and − buttons, wheel or pinch to zoom. The opacity slider makes the colour overlay lighter or stronger against the roads and places underneath.
The label choice stays with your On Google view while you switch between Design and On Google in the current page. It is not a permanent setting in the saved editable map. A short-lived shared snapshot does keep the on/off choice it had when its link was created.
Use Share map inside the editor’s On Google view for a two-hour snapshot. For a lasting link or website embed, use On Google beside a saved map in My maps instead; that viewer remains available while its map-tool licence is valid.
In On Google, press Share map below Polygon labels. Read the notice carefully: anyone who has the link may see the map, its key and markers. Do not share a map containing confidential or personal information.
Tick the confirmation that the map is suitable for anyone with the link, then press Create a share link. Choose Copy link to paste it into your own message. You can make and copy a link without signing in. The snapshot keeps the current view, colours, key, markers, opacity and polygon-label choice; later edits to your original map will not change it.
Type one recipient's email address and press Send map by email. Sending from the site needs a signed-in, verified account. If you are not signed in, use Copy link and send it yourself instead. Only send it to someone expecting your map.
For two hours from the moment the link was created, the recipient can view, pan, zoom and inspect the map without an account. They cannot colour or save your map. The page also shows how they can get access to create a map of their own.
The map disappears from that public link after two hours, even if the email was opened late. The same address then shows a GBMaps introduction page. You may use Stop this link early while the creating view remains open. A person who already copied or took a screenshot of the map cannot have that copy recalled.
Save the map and use its On Google button on the saved-map manager (savesamplecopy.php). Copy that viewer address for ongoing sharing or a website iframe. It remains available while the corresponding licence is valid. The two-hour limit applies only to this separate Share map snapshot; extending a licence does not extend an existing temporary snapshot.
On desktop, the blue Log in button with a white person icon sits beside the green Buy Unlock button, above Map Types. A trial map also has a small Unlock this map card over the map, including on phones and tablets. Signing in and buying access are separate actions.
The current trial card adapts to available map space. Use Log in or Buy Unlock in the sidebar; example prices are not a quote for every map.
Use the blue Log in button above Map Types, or Log in in the compact phone/tablet top bar. Enter the email associated with your purchase or account. There is no login link on the central trial card. Opening sign-in does not buy access.
Enter the email used for your purchase, then click Log in or press Enter. The password sign-in box opens over your map. Enter your password there, or choose Set or reset my password if this is your first password or you have forgotten it. The Signing in & passwords section shows every step and the messages you may see.
The fixed Unlock this map card shows a VAT-inclusive price and Unlock my map. It gets smaller as the available map space shrinks, including on short screens and phones, so you can keep trying the surrounding map. Some descriptive text is hidden in compact versions. Access is for 12 months with one payment and no automatic renewal. Use the current purchase quote rather than an example screenshot. Unlocking removes the trial card, trial watermarks and trial artboard colouring restriction. The card cannot be dragged away.
Choose Buy Unlock beside Log in on desktop, Unlock my map on the central card, or Unlock in the compact top bar. These open the normal purchase choices. Check the map, number of people, total including VAT and payment method before continuing. If you already purchased, use Log in with your purchase email to recognise your access before buying again.
What this looks like
Current GBMaps controls with example maps and account details. Choose View larger to see the details.
Already have a GBMaps account? Use the email address attached to your purchase and your password. Signing in does not buy another licence or change your map. If you used to enter just an email address and have never chosen a password, start with Your first password.
Use the address used for your map purchase. A personal address and a work address are different accounts, even when they belong to the same person. Check the spelling and the ending, such as .co.uk or .com. The example address in these pictures is not an account to use.
Enter the password you chose for GBMaps. It is case-sensitive: capital letters and lower-case letters are different. You can paste it or let your password manager fill it in. The same password covers the map types attached to this email address. It is not your email mailbox password.
Show reveals what you have typed so you can check it; Hide conceals it again. Use this only when nobody nearby can read your screen. This button does not change or submit your password.
Checks your details and continues with your map or the saved-map page you were opening. Wait for the check to finish rather than clicking repeatedly. If the password box is empty, Continue starts email verification instead; it does not sign you in using the email address alone.
Use this if you have forgotten your password or have never set one. It opens the code-request screen. You do not need the old password, but you must be able to receive email at the account address.
The cross closes the box without signing you in. When the box is over the editor, your map remains there, including unsaved changes. Closing the box is not a save. On a separate sign-in page, use its sign-in button to open the box again.
Sign-in proves which account is yours; a licence gives that account access to a particular map type. You can sign in and see saved maps even if a licence has expired. Use the renewal option for that map type. Do not buy again simply because you have forgotten a password.
What this looks like
Current GBMaps controls with example maps and account details. Choose View larger to see the details.
If you have used GBMaps for years by entering only your email address, you still have the same account. You do not need to register again or pay again to set a password. We first check that you can receive email at that address, so somebody else cannot claim your maps just by knowing it.
Choose Log in in the sidebar, enter your existing account email in the small email box, then press its Log in button. In the sign-in dialog, choose Set or reset my password and check the address. You can also begin from the first sign-in box by leaving the password blank and choosing Continue to my maps.
Click once to request a six-digit code. Keep this tab open and check that inbox, preferably in your email app or another tab. You do not need to enter a mobile number or wait for an SMS. If an error says no code was sent, stay here and follow that message.
Return to the Check your email box, enter the code and choose Check my code. It lasts 60 minutes and belongs to the browser where you requested it. The Email verification codes topic explains resending, incorrect codes and expired codes.
After the code is accepted, the heading changes to Make this account yours. Choose a password of 8–50 characters; several words can make it easier to remember. Click Save my password. Your saved maps, colours and licences are kept as they are.
The message Your password is saved confirms that setup succeeded. Enter the password you have just chosen and click Continue to my maps. Setting a password and signing in are two separate steps; this final sign-in is expected.
Returns to the ordinary sign-in box. You can close the box and come back later, but a code or an already verified setup can expire while you are away. If it has expired, request another code. Nothing is changed until Save my password succeeds.
One email and password cover the licences already attached to that address; there is no separate password for each map type. If GBMaps has linked your own email to another account’s licences, use your own email and verify your own inbox. Do not send another person your password or verification code.
What this looks like
Current GBMaps controls with example maps and account details. Choose View larger to see the details.
You can choose a replacement password without knowing the old one. The code goes to the email address already associated with your maps. Resetting the password does not delete your designs, use a map credit or renew a licence.
In the sign-in box, choose Set or reset my password. Check the email address carefully, especially if your browser filled it in. Use the purchase address, not a different inbox you now prefer.
Requests the code and takes you to Check your email. Your old password is not needed on this screen. Requesting a code alone does not replace it; the change happens when a verified new password is successfully saved.
Read the email, enter the six digits in this browser and choose Check my code. Choose your new password, click Save my password, then use that new password to sign in. If a password manager offers to update its saved entry, make sure it is updating the GBMaps entry for the right email.
Saving a replacement password signs out older sessions on other browsers and devices. They will need the new password. If a map is open elsewhere, keep the page open, sign in when asked and repeat the save rather than discarding that work.
Contact GBMaps with your order or invoice details. We need to establish that the account is yours before changing its address. Do not create another account or buy again to try to recover the old maps. Support will not need you to send your password or a verification code.
If you arrived through an older link containing storedmap, reset your password as normal and sign in. A valid map belonging to your account should reopen. If that saved map is missing, deleted or belongs to a different account, you will see a helpful recovery page instead of a code error. From there, open My saved maps, start a new map, or choose to switch accounts. Resetting a password does not bypass map ownership checks.
Do not share or enter it for anyone else. Requesting a code does not itself change your password, so an unexpected message can be ignored. If you are concerned, return to GBMaps yourself and reset your password from there.
What this looks like
Current GBMaps controls with example maps and account details. Choose View larger to see the details.
Email verification codes: enter, resend or start again
The Check your email box appears when you set a first password or reset an existing one. The six-digit code proves that you can use that inbox. It is temporary and is different from the password you will choose afterwards.
Type or paste the six digits, without spaces or extra text. Keep this tab open while checking your email. A code requested here cannot be used in a different browser, a private window or another device. If you requested a replacement in this browser, use its newest code.
Checks the digits and opens Make this account yours when they are accepted. A code lasts 60 minutes and works once. After five incorrect guesses you must request a fresh code; do not keep guessing.
Use this if the code has expired or the email did not arrive. Allow at least a minute between requests; repeated requests can mean a longer wait. Requesting a new code in this browser replaces its previous one. If emails arrive out of order, use the most recently requested code.
Returns to the email and password boxes. Use this to correct the email address: choose Set or reset my password again, enter the correct address and request another code. Going back does not change your password.
Check junk, spam and any company email filter, then check the address you entered. Give delivery a little time before requesting another code. The wording If this email address has a GBMaps account is deliberate: this screen does not confirm whether an address is registered. If nothing arrives, contact GBMaps with your purchase details.
Compare all six digits with the newest email requested in this browser. Check that you have not copied an older message. An incorrect attempt does not change your password. The red message appears in the same box so you can correct the digits.
Choose Send a new code and use the replacement. This message can also appear after too many incorrect guesses, after the code was already accepted, or if you are no longer in the browser session that requested it.
What this looks like
Current GBMaps controls with example maps and account details. Choose View larger to see the details.
Make this account yours means your email code has been accepted. You can now choose a password for this GBMaps email address. Complete this step within 10 minutes of verifying the code; if you leave it too long, verify your email again.
Use 8–50 characters. Spaces are welcome and special symbols are not compulsory. Several unrelated words can be easier to remember than a short jumble. Choose your own phrase: do not use the example in a screenshot, a familiar keyboard sequence or a password used on another website.
There is one password field, so use Show to check it before saving. Hide conceals it again. Pasting from a password manager is allowed. Keep the screen private while the password is visible.
Saves the password for this account and its map types. Wait for the confirmation before assuming it has worked. If red wording appears, read it and correct the problem; the tool has not accepted the new password.
Leaves this step and returns to the ordinary sign-in box. It does not save the password you typed. If you already had a working password and have not saved a replacement, that previous password is unchanged.
You are returned to the sign-in box with this confirmation. Enter the new password and choose Continue to my maps. This final sign-in is required after both first-time setup and a reset; being asked again is not an error.
GBMaps support does not need your password or email verification code. Anyone you give these to may be able to use your account. On a shared computer, decline the browser’s offer to remember the password and use Log out when you finish.
What this looks like
Current GBMaps controls with example maps and account details. Choose View larger to see the details.
Most sign-in problems can be resolved in the same box without leaving your map. The pictures below show the actual warnings. Follow the advice for the message you see; repeatedly clicking Continue or requesting codes is unlikely to help.
Check the account email and password, including capital letters. Use Show to look for a typing mistake if your screen is private. If you have never set a password, or cannot remember it, choose Set or reset my password.
The tool could not connect to its email service. Your password has not changed and there is no new code to wait for from that attempt. Leave the map open and try again shortly. If this continues, contact GBMaps and quote the message rather than repeatedly submitting the form.
Requests or guesses are temporarily limited. Stop and wait before trying again. A resend needs at least a minute; lots of requests or sign-in attempts can take longer to clear. The button becoming available does not guarantee that the waiting period has ended. This message does not mean your maps have been deleted.
The code screen uses conditional wording and cannot promise delivery to every typed address. Check the account address, junk folder and any company filter. Use the Email verification codes topic for the resend steps. If you cannot get into the account inbox, contact GBMaps with order details.
Keep the map open and try again shortly. This is a service problem, not a request to buy another licence. If the box says to reopen sign-in, close that box and open it again. If the problem persists, tell GBMaps the exact wording and which step you reached.
Use the GBMaps page beginning with https://. Do not enter your password into a warning page or an unfamiliar website. Keep an unsaved map open while you check the correct address in another tab.
What this looks like
Current GBMaps controls with example maps and account details. Choose View larger to see the details.
These messages appear after email verification, while you are choosing the password. A warning means the password has not been saved. Keep the box open and follow its wording; you do not need to recreate your map or buy access again.
The password is outside the allowed length. Add more words if it is too short, or shorten it if it is too long, then try Save my password again. Spaces count. There is no need to add punctuation simply to satisfy a symbol rule.
Choose a different phrase. A repeated common password, a run of numbers or an obvious keyboard pattern can still be rejected even when it is long enough. Do not make a tiny variation of the rejected example.
Another password change completed after this verification began. Go Back to sign in and use the latest password. If you do not know it, request a fresh code and complete a new reset. The older verification cannot overwrite the newer password.
The verified setup step has expired or is no longer available in this browser session. Go Back to sign in, choose Set or reset my password and request another code. After it is accepted, choose and save the password promptly.
What this looks like
Current GBMaps controls with example maps and account details. Choose View larger to see the details.
A sign-in can end after a period of inactivity, when you log out in another tab, or when the password is reset. The editor opens sign-in over your existing map. Keep that page open: closing or refreshing the whole page can discard work you have not saved.
Enter the account email and its current password, then choose Continue to my maps. The map stays behind the box. If the password was changed on another device, use the replacement. Closing the sign-in box leaves the map visible but does not restore account access.
When You are signed in again appears, dismiss the message and repeat the save or download you were making. The interrupted action is not automatically repeated. Check that the save reaches My saved maps, or that the expected file downloads, before leaving.
The tool has refreshed its sign-in information. Read and dismiss the message, then repeat your save or download. Keep the current map open. If it asks for the password again, sign in and try the action once more.
If your session ends, the sign-in box appears over your map. Keep the editor open, sign in again and retry your save or download. Save before leaving a shared device and use Log out when finished.
An active sign-in is carried into the saved-map manager; you should not have to enter the password for each visit. A direct bookmark can ask you to sign in first, then return you to the permitted page. If the account cannot access a map, check that it belongs to the email you used.
Open the account menu and choose Log out. Save & Logout saves first; Logout Without Saving leaves unsaved changes behind; Cancel keeps you in the editor. Do not assume that merely closing a tab signs you out.
What this looks like
Current GBMaps controls with example maps and account details. Choose View larger to see the details.
Use the account control above Save, Open and New. It shows the current account state and the available login/account actions. On a shared computer, check the displayed email before saving work.
One email address and password cover all the map types on your account. Use the email associated with your purchase. A successful sign-in carries through to the saved-map manager, so you do not need to sign in again when you save or open a map.
The tool sends a six-digit code to your account email address. Enter it in the sign-in box within 60 minutes, then choose a password of 8–50 characters. A phrase of several words is easy to remember; spaces are allowed. Your password is saved securely, and you can then sign in. Account verification uses email, not a mobile phone number.
The logout confirmation offers Save & Logout, Logout Without Saving and Cancel. Save & Logout keeps the current work before ending the session. Without Saving leaves unsaved changes behind. Cancel returns you to the map.
Open goes straight to your saved-map manager if the current map is unchanged. If it has changed, choose Open & Save or Open without saving in the Open panel; there is no second confirmation. For other leave-page warnings, Leave without saving discards unsaved work; Keep editing or Cancel stays on the map. A browser’s own leave-page prompt can look different from the tool’s styled dialogs.
Expand your account menu to see Your invoices, loaded automatically when you sign in and reused as you move between maps. Each link shows its invoice number and, where available, purchase date and description. Select the relevant invoice to download its PDF; older invoices are under Earlier invoices. This does not open your saved maps or download a map image.
Open your account menu above Save, Open and New, then select the small Recovery copies link at the bottom. It opens the available device and account recovery copies. Recover a copy to inspect it before saving; this is different from resetting your password.
Choose Set or reset my password in the sign-in box. Check that you entered the email used for your purchase, including its ending, and look in your junk folder. Send a new code is available after a short wait. Too many incorrect attempts expire the code. After setting a new password, older signed-in sessions are closed, so your other devices will need the new password.
Contact GBMaps Support with your order or invoice details. We need to establish that the account is yours before changing its email address; knowing an email address or a mobile number is not enough. Please do not send your password to support.
If your sign-in expires while editing, sign in again in the box over your map, then repeat the save or download. Keep the editor open while doing so. On a shared computer, save your work and use Log out when you finish.
Sign in to use the saved-map manager. It remembers the sign-in from the editor and shows the maps belonging to that account. A saved design can still be listed when access to its map type needs renewing: an expired licence does not prevent you from signing in to renew it.
Check the map type and its access/expiry information. Access applies to the listed product or map type. A district map and a sector map can have different access states. Do not infer that every map is unlocked from one active entry.
Opens payment for the specific map type whose access has expired or is due for renewal. Check the product title and amount in the payment dialog before choosing a payment method. The saved-map version keeps the relevant renewal context.
Opens the purchase options for the selected map type. It is used for a sample or locked product rather than changing a territory’s colour. Prices and available terms are shown by the current offer.
Starts a new editable map of the chosen type. Use it when you need a clean starting point. To branch an existing design, reopen that design and use Save copy instead.
Where an invoice link is available, use it to retrieve the paperwork for that purchase. It is separate from downloading the map artwork. If a purchase or invoice is missing, check the account email and contact GBMaps with the relevant details.
Open in the editor takes you to this page. Editable maps, spreadsheet exports and finished PDF files have different actions because they are different kinds of record.
Click a column heading such as file ID, map type, orientation, date or map name to reorder the list. Clicking the active sort heading changes direction. Use a meaningful saved-map name to make older versions easier to recognise.
Use the map’s Edit/open action to return to the tool with its saved territories and settings. A PDF or CSV row is a generated file, so opening it does not provide the same editable map controls.
Use Rename beside the map name, enter the new name and confirm. The map keeps its identity, artwork and existing links. This changes the editable map’s label; it does not rewrite text inside previously downloaded files.
Opens the additional actions for that row. Depending on the record and account state, these can include CSV creation, ExportVM, transfer, conversion, printing or deletion. Read the row name before choosing an action.
Generates assignment data from the saved map for spreadsheet use. A converted map may need to be opened and saved before this action becomes available. CSV files are listed separately from editable maps.
Downloads the saved Map4 data as a JSON package for a transfer/import workflow. It is a data export, not a PDF and not an automatic opening of the map in VectorMaps. Keep the file intact for the receiving importer.
Use the relevant file row to retrieve a saved CSV or PDF. A generated file is a snapshot from the time it was created. If you change the editable map, export a new file to include those changes.
Check the record before clicking Delete. Editable maps have a confirmation and a restriction on deleting recently created maps. The current PDF and CSV delete buttons can act immediately, without that confirmation. Deleting a generated file is different from deleting the editable map that produced it. Keep any copy you still need.
These appear when access is needed for that map type. Follow the selected row’s action so the payment refers to the correct product. They are access controls, not file-download buttons.
Choose the red On Google button beside the saved map. Copy the viewer address that opens to share a view, or use it in an iframe on your website. It remains available while the corresponding map-tool licence is valid; it is not the editor’s two-hour Share map snapshot. See Share a saved map or embed it on your website for the full process and an embed example.
What this looks like
Current GBMaps controls with example maps and account details. Choose View larger to see the details.
The three-dot button opens actions for one editable saved map. The available choices depend on the map type, access and whether a conversion has been opened and saved.
Downloads a JSON data package containing the saved Map4 record. Keep the complete file for a compatible import workflow. This action does not convert the map artwork to PDF or automatically open it in the Pro tool.
Asks to export the saved map’s assignments as a spreadsheet file. Confirm the map ID in the message. The generated CSV appears in the file manager’s spreadsheet section.
Checks whether the editable map is old enough to delete and then asks you to confirm the map ID. This is different from the PDF and CSV delete buttons, which can act without a confirmation.
Opens the supported finer-detail conversion for this map. A converted copy is created; the original remains. Review and save the converted map before exporting its data.
The saved-map manager offers supported conversions so you can start from an existing broad territory design rather than colour every smaller polygon from scratch.
For the supported UK postcode maps, an area map offers Convert to District, and a district map offers Convert to Sector. This is a move to finer detail. It is not a general conversion between any two maps in the catalogue.
Check the source and target, then choose Convert Now or Cancel. Conversion creates a separate upgraded copy in your account with “Conv. ” added to its name; the original is retained. If you do not have access to the new map type, the resulting map may require a purchase before you can use its unlocked features.
Review the inherited colouring, labels and page layout. Smaller polygons give you more precise editing, but also more detail to arrange. Open and save the converted result before relying on downstream file actions such as CSV creation.
Select the detailed Colour: mode, click the zone name you want in the legend, then click the smaller shapes on the map to assign them to that zone. If you later colour a whole parent area, the whole-area warning protects the mixed assignments you have made.
Transfer moves the selected saved map to a recipient account. Use it when handing over ownership of the editable work, rather than simply sending a PDF for someone to read.
Open Transfer from the correct saved-map row and enter the intended recipient’s account email. Check the spelling carefully. The account and access checks happen as part of the transfer flow.
Starts the transfer of the selected map. Read any follow-up confirmation before proceeding. This is an ownership action, so keep a separate saved copy first if you need to retain your own version.
Having a map transferred does not necessarily give the recipient an active licence for its map type. Follow any access or renewal message rather than assuming the transfer includes a new purchase.
Choose the map and number of people, check the current total, then complete payment. New access, renewing existing access and upgrading to another package use different offers: check the heading before paying.
Choose the exact number of people, enter your access email and continue to payment. Bank Transfer is offered separately. Use the price on your current map, not this example.
Read the map name and whether the dialog says Unlock or Renew. In the saved-map manager it follows the row you selected, which may differ from the map you were editing previously.
The dialog shows the selected offer and its details. Use those figures rather than an example screenshot in this guide; prices, VAT and access periods can change. Read the included information before continuing.
In How many people?, choose any whole number from 1 to 10, including the owner. For 1–4 people the price is the normal single-person price for each person. Teams of 5–10 receive 20% off that combined price. The total and VAT update before payment. Pay first, then set up the team and invite colleagues. To join a colleague using a separately purchased licence, choose 1 person and ask GBMaps to link the accounts afterwards; each keeps their own expiry date.
Use the payment choices shown in the current box. The current checkout accepts card, PayPal and available wallet options through Stripe; the options offered can depend on your browser, device and billing country. Enter the GBMaps email you want the access on, then complete the payment steps. An extra bank approval may be requested. Bank Transfer is available where shown and starts access after the transfer is matched. Keep your map tab open; a provider may ask you to approve payment separately and return. Wait for payment confirmation, then sign in with the purchase email if asked. Do not pay again just because access has not refreshed immediately.
Open the questions/FAQ section for the current purchase information. It expands within the dialog and can be folded away again. For an account-specific issue, contact GBMaps with the map type and account email.
Closes the chooser without selecting a payment method. It returns you to the editor or saved-map page. Closing a chooser is different from cancelling a payment after you have already moved into a provider’s checkout.
Wait for the confirmed result. The map you were colouring remains in the editor; sign in with the purchaser’s email to use the access and save it. A first-time customer may need to set a password using the email code. Team purchasers can now open My team to name the team and invite colleagues. The receipt and invoice refer to the purchase; a saved map is a separate editable record.
Keep the map open. Read the payment message and check whether your payment provider says the payment succeeded. If you paid but access is missing, use the status link offered or contact GBMaps with the purchase email and receipt reference. Do not send card numbers, bank login details or passwords. Closing a dialog or signing in does not itself confirm a payment.
Sign in as the purchaser and reopen the upgrade link or Upgrade access to continue an unfinished payment. Check the current offer before paying. If your provider already confirmed payment, check the status or contact GBMaps instead of creating another purchase.
What this looks like
Current GBMaps controls with example maps and account details. Choose View larger to see the details.
Choose any number from 1 to 10 people. Everyone signs in separately to use shared maps. Pay for a team together, or buy separate personal unlocks and ask GBMaps to link colleagues while keeping their individual renewal dates.
Open the map and choose Unlock my map (Unlock on a small screen). In How many people?, select the exact number: 1, 2, 3 and so on up to 10. The owner counts as one person. Choices 1–4 cost the single-person price per person; 5–10 receive a 20% discount on the combined price. Five places therefore cost the same as four. Check the map, total and VAT before paying. Team setup and invitations happen afterwards. Contact GBMaps for more than 10 people.
Choose the card, PayPal, wallet or Bank transfer option actually offered in the current checkout. Card, PayPal and available wallets use the normal payment panel; keep your map tab open during any separate approval. Bank transfer gives payment instructions and a reference; access begins after the transfer is confirmed. Complete payment, then sign in with the purchaser’s email and open My team to name it and invite colleagues. Team setup happens after payment. A first-time customer may need to set a password using the normal email-code process.
Open My team. As the owner, enter a useful Team name and choose Save team name. The owner occupies one place: a two-person team has room for the owner and one colleague. Pending invitations reserve places. You can return later to finish setup. In a library funded by separate personal unlocks, each person is shown with their own access date instead of an allowance paid for by one owner.
Under Invite someone, enter the colleague’s own email address and choose Send invitation. Any email domain is welcome. Each person uses their own login; do not share a password. An invitation appears as Invitation pending until accepted. Use Resend if needed, or Cancel to withdraw a pending invitation and free its place. Check the address before resending.
Open the invitation link sent to your own email address. If you already have a GBMaps account, choose Sign in and join team using that account. Otherwise choose your password and Join team. Your existing personal maps remain separate. If the link cannot be used, ask the team owner to check the invitation in My team and send it again.
In My team choose Open shared maps to see the team’s library, or Create a map for a new team map. Check the workspace label: Team maps followed by its name means you are working with that team. Switch to personal maps returns to your own work; save changes when prompted. Team members share the team’s maps and uploads. Your other personal maps are not automatically shared by joining. When converting your own licence to a team, check the upgrade’s sharing note: existing maps and uploads covered by that conversion move to the team.
If the tool says a colleague is editing the shared map, follow the on-screen choices to view it or work on another map. Coordinate with that colleague before editing the same work. Save your changes before changing workspace or leaving a map.
For a team purchased together, the owner manages members, invitations and renewal in My team. Remove ends membership; shared work remains. Choose Upgrade team or map type for more places, or Renew or change team size for renewal. Check the quoted price, date and size. There is no automatic renewal. A separately paid colleague renews their own unlock using My unlock & renewal. Their expiry affects only their access; other paid colleagues can continue using the shared maps.
After accepting the invitation, use Log in on GBMaps or in the map tool with your own invited email and password. Open My team / Open shared maps and choose the intended team. You do not need to buy a separate personal licence just because you are using the homepage sign-in. If the invitation is still pending, finish joining first or ask the owner to resend it.
Buy a normal one-person 12-month unlock for the same map type using your own email. Contact GBMaps with your email and the email of the colleague who owns the maps, and ask to link your accounts. Staff check the matching paid access and link the library. Save and close open map edits before the link is made. Both people use their own sign-in and see the same shared maps. The joining person’s existing personal maps stay separate. Each retains their own licence and renewal date: there is no pro-rata calculation or new shared expiry. If one licence expires, only that person loses access; their work stays available to paid colleagues. Renewing restores their access without another link. This is different from accepting an invitation to a place already paid for by the team owner.
Because the 20% discount starts at five people, four and five places have the same full package price. An active four-person team can open Upgrade team or map type, select five people for the same map and use Add the fifth person at no extra charge. The renewal date stays the same. Review the current offer; other changes use their normal quote.
What this looks like
Current GBMaps controls with example maps and account details. Choose View larger to see the details.
Keep your work and choose the access you need next. Upgrade access shows eligible paid licences, available map and team choices, the amount payable and the renewal date. Review the quote before paying; configure a new team afterwards.
Sign in with the account that owns the paid access. In My maps, look in Map Access for Upgrade access or the Upgrade option for that licence. If you already own a team, My team also has Upgrade team or map type. The assistant can open these options when you ask how to upgrade. Sign-in is needed to identify an existing purchase; a brand-new team purchase can start from the normal Unlock box without signing in first.
Check Your current licence, then choose Upgrade my map, Upgrade to a team, Add more people or Upgrade map and team. Choose the exact number of people you need from the available choices up to 10, including the owner. A member of a team purchased together asks the owner to upgrade. A colleague who buys their own one-person unlock can instead ask GBMaps to link it to shared maps, keeping their own expiry.
Read Pay today, the total including any VAT and the renewal date shown. Available choices and prices depend on your existing licence and selected upgrade; the assistant cannot inspect your private purchases or quote your personal balance. Use the live quote rather than the example amounts in screenshots. If a map is marked Already owned, use Open this map instead of paying for it twice. Expired access may need renewing before an upgrade is available.
Choose an offered payment method and complete the normal checkout. Card, PayPal or an available wallet may be offered in the current payment panel. Keep the map tab open during any separate provider approval. Access changes only after payment confirmation. For Bank Transfer, use the exact reference and wait for confirmation. Sign in with the purchaser’s email if requested. You do not need to create a team name or send invitations before paying.
An access upgrade does not automatically redraw saved maps at a different level of detail. Saved maps keep their existing detail; create a new map to use a different boundary level. The compatible Add roads preview can keep your current postcode colouring while showing roads. Save work you want to keep. If upgrading a personal licence to team access, read the sharing note before paying: the relevant existing maps and uploads become shared with that team. After payment, use My team to set its name and invite colleagues; other personal work remains separate.
For UK postcode maps without roads, Add roads to my map lets you try the compatible roads version while keeping your colouring. You can try this without logging in. Buying or upgrading access is a separate choice. The extra Add main roads promotion in the normal unlock box is currently hidden. Existing road maps and road controls remain available. Read the Roads guide for the supported layers; these maps are not detailed street maps.
Check that you are signed in as the purchaser or team owner and that you have selected the intended licence. If access has expired, check renewal options. Contact GBMaps with your purchase email and which map or team size you need if the options still do not match. Do not buy the same access again just to work around a problem.
For the matching UK postcode roads version, the add-roads fee is £10 for Areas, £15 for Districts or £20 for Sectors, plus VAT. This fixed difference does not reduce with the time left on the licence. Its renewal date stays the same. Other map or team upgrades have their own quote: read Pay today and Access until before paying.
If you closed an unpaid upgrade, sign in as the purchaser and reopen its continuation link or Upgrade access. Review the current quote and finish the offered checkout. Closing the box did not complete a payment. If you already paid, use the payment-status option or check your access before paying again; contact GBMaps with the purchase email and receipt if it has not updated.
If you want each person to pay and renew separately, the new colleague buys their own one-person unlock for the same map type. Contact GBMaps to link the two accounts to the same maps. This is a full normal purchase, not a pro-rata team upgrade. Existing access dates stay unchanged. Each person’s own expiry controls their access.
What this looks like
Current GBMaps controls with example maps and account details. Choose View larger to see the details.
The bell opens messages from GBMaps about your account, service updates and support. Sign in to see your messages. An unread count helps you spot new ones; you can return to earlier messages later.
When signed in, look for the bell beside Help in the map’s top controls. On account and team pages it appears with the account controls. Its position adapts to smaller screens. New messages show a count and the bell may animate; a still bell can still be opened to read earlier messages. The assistant’s Show me where can highlight the bell without opening a message.
Choose the bell. The System messages window lists message headings and dates, with New beside unread messages. It opens a new message first when one is available. Expand another heading to read it. Reading an expanded message updates the unread count; opening the bell can therefore reduce the count.
A message can be an Account update, Personal support or Service notice. Read its text first. If it contains an Open button, choose it to visit the relevant page. Not every message needs action, and not every message has a link. This inbox is not a reply form: use Contact GBMaps for a reply or continue an active support conversation in the map assistant.
Use Older and Newer at the bottom to move between pages. Refresh messages checks for updates without closing the window. Read messages remain available in your list until removed or no longer available. Close with × to return to your map. Closing the window does not remove messages.
After reading a message, use its small × button, labelled Remove from my messages, if you no longer want it in the list. This removes that notification from your list; it does not cancel a purchase, remove team access or change your map. Keep a useful message until you have finished with it.
Check that you are signed in to the intended account. Visitors do not have an account inbox. If you have signed in but the list has not updated, open the bell and use Refresh messages. A count of zero or You’re all caught up means no unread messages in the list; it does not mean your access has expired. Contact GBMaps if you expected a specific account update.
The bell’s System messages and a person joining your assistant chat are different. A named GBMaps helper can appear in the assistant and talk with you there; AI pauses while they help and resumes when they finish. A bell notification is a message to read, not the start of a live conversation. There is no promise that staff are watching every chat or available immediately.
What this looks like
Current GBMaps controls with example maps and account details. Choose View larger to see the details.
Open the print action from the row for the version you want. Check the title, date, orientation and artwork before ordering; an older exported PDF does not automatically pick up later edits.
Select the size and other print options shown in the order dialog. The displayed price updates for the current choices. Use the live options and price, rather than relying on a price in this guide’s example image.
Enter the requested contact and delivery information accurately. Check the address and any order notes before continuing. A postcode here is a delivery detail, not a command to move the map.
The order button submits the print-order request/flow shown by the dialog. Read its confirmation and payment instructions. Use the close control to leave the dialog if you only wanted to inspect the options.
Choose between the offered finishes, currently Glossy Encapsulated Print and 180GSM Paper Poster Print. Use the current form if the range changes. The choice affects the quoted price.
Select A0, A1, A2 or A3 from the current list. The dimensions are shown beside each size. Check that your small text will be readable at that size before ordering.
Enter a whole-number quantity of at least one. The displayed total changes with size, finish and quantity, and the form states whether delivery is included. Review the total before placing the order.
Reveals the delivery section after you have chosen the print options. It does not by itself submit the final order. You can still check the visible options and price.
Complete the required locality, county and postcode fields as requested by this form. Check them before submission; this postcode is the delivery address and has no effect on the map centre.
Submits the print order. Wait for the success message or correct any required-field error. Avoid repeated clicks while the request is in progress. Use the close cross if you do not want to submit an order.
Read the action words on a message before clicking. A colourful warning is there to explain a consequence, not simply to be dismissed. Message styling can vary while the newer design is being tried.
Usually returns you to the current task without taking the proposed leave/delete action. In a draft editor such as Legend details, Cancel also leaves draft changes unapplied. Read the message if it describes a different result.
These confirm an action that removes or replaces work, or leaves unsaved changes behind. Check the named map, layer or territory. Save a copy first when the previous version may still be useful.
Saves the current work before the next action when that option is offered. Wait for saving to finish. If an error appears, do not assume the save completed merely because you clicked the button.
These confirm the result and may offer Download Now, Done or a next action. A file-created message means the export is ready; the browser still needs to download it to your device if you want a local copy.
The tool is working on a save, lookup, import or export. Avoid repeated clicks while it is busy. If the operation fails, note the exact message and return to the relevant settings rather than closing an unsaved map immediately.
The tool’s messages use the same colours and familiar actions on desktop, tablet and phone. Longer dialogs scroll on a small screen; read the message before choosing an action. Browser permission prompts, file choosers and download warnings may use your browser’s own appearance.
Choose a postcode area, district or sector map, add your territory names in START HERE, then select a name in the key and click the polygons it should contain. You can colour territories by hand or import a postcode-to-team spreadsheet. This guide takes you from a blank map to a saved, printable result.
3. Choose the next zone. Select York team in the legend, then click its shapes on the map. They turn blue; the existing North team shapes remain green. If you click a shape already owned by another zone, you move it into the zone you have selected. After hiding. Hide unassigned areas keeps the assigned territory and the useful detail within it, including relevant place labels and parts of wider boundaries. It hides the surrounding artwork rather than deleting it. Use the same control again to restore the full map.
Use districts or sectors if broad postcode areas cannot describe the territories accurately. Create the team names in START HERE and give them distinct colours.
Click a team’s zone name in the legend, then click inside each map shape you want to colour for that team. Select the next team in the legend before clicking its shapes. Watch Colour: as you zoom. Keep individual district assignments when the whole-area warning appears unless you really intend to replace them.
Turn on the useful labels and boundaries in Map details, then choose Hide unassigned areas. Adjust Regions & Insets if an inset or region is unnecessary for this map.
Add a clear title, arrange the key and add contact details if needed. Resize the key so a person can read it in the final document, not just when zoomed in.
Save a named editable version. Export PDF for print, PNG for a document, or PowerPoint for a presentation. Open the downloaded file and check the edges, labels and key before sharing it.
Ask the map assistant to group the UK county map into countries, English regions or an explicitly approximate custom arrangement. It checks all the available boundaries before applying the grouping.
Open a UK Counties, Counties with Roads or Simple Counties map. Keep Use my map settings selected in the Map assistant. For example: Colour the UK county map into England’s nine regions, with Scotland, Wales and Northern Ireland each in their own colour. The assistant proposes one complete job. Apply to map carries it out; supported spoken instructions can run automatically. Undo this job restores the previous map.
The UK consists of England, Scotland, Wales and Northern Ireland. A countries grouping has four groups. A regions grouping uses the nine English regions plus Scotland, Wales and Northern Ireland, giving twelve UK groups. The artwork may use older county, borough and unitary boundaries; grouping it does not replace it with a new administrative boundary dataset.
If you ask for roughly seven UK regions and let the assistant choose, it keeps Scotland, Wales and Northern Ireland separate. It combines England into Northern England (North East, North West, Yorkshire and The Humber), Midlands (East and West Midlands), East and South East (East of England, London, South East), and South West. This is an approximate custom grouping, not seven official UK regions and not equal populations, areas or workloads. Other custom groupings are also labelled approximate.
A UK grouping includes Northern Ireland. Any Republic of Ireland, Isle of Man and Channel Islands artwork outside the UK keeps its existing colouring. Ask for the whole displayed map to include those areas as separately named groups too. These are not UK regions; the entire displayed map may therefore need more than seven groups.
The assistant uses the complete list of boundaries on the current county map, including separate island pieces. Coverage checked shows how many boundaries the proposal covers. Expand it to see any areas outside the requested scope. A proposed whole-map grouping is not applied if it leaves boundaries unassigned, names unknown identifiers or puts a boundary in more than one group. Expand Coverage check to see the names needing attention; no Other counties catch-all is substituted. If the map has changed, ask again using the current map settings.
You can still ask to change one county, hide labels, adjust colours or rename a territory. Whole-map coverage checks are for complete grouping jobs. They do not require a second AI conversation or a search for each county.
Use Import Excel when your spreadsheet lists postcode areas, districts or sectors beside territory names. Matching polygons receive the territory colours and the map key is built for you. For numerical sales or population figures, use Additional Data or Heat Maps instead.
Use one row per postcode polygon with its territory name beside it. Remove headings from the copied selection. Check that the postcode level matches the map and that the names are consistent.
Use Import Excel for automatic colours. Use Import with colours if the spreadsheet already contains the desired colour names. Keep all columns aligned.
Compare a few known territories against the spreadsheet. Investigate unexpected extra key entries or blank areas before changing the design. The key should represent the intended groups.
Add a title, make the key readable and choose useful map details. Hide unassigned areas if only the imported territories should be shown. Save with a meaningful name and export the required format.
Use Radial Circles for straight-line distance or Distance/Time for estimated travel by road. Both can turn the coverage into coloured postcode territories using Colour postcodes. The result selects whole polygons by their centres, rather than cutting boundaries at the edge of a circle or travel area.
Marker boxes on the map. These are placed marker boxes: each label is connected to a location on the map. One uses an arrow with the text above the point; the other uses a line with the text below it. You can change the wording, text size, colours and call-out, and move a selected marker using Place on map. Different dots and shapes. Advanced dots can use circles, squares, triangles, hexagons and stars. Different shapes and colours help distinguish depots, customers or other location types. The larger hollow circle demonstrates a coverage-style outline; the basic dot controls also let you adjust fill, transparency and line appearance. These are example positions. Distance rings on the map. A set of three rings with a 5-mile interval gives radii of 5, 10 and 15 miles from the same centre. The labels and line colours make the distances easy to distinguish. These are straight-line distances, so they are useful for a radius-based service area; use Distance/Time for a journey-based view. Travel areas on the map. Isochrones are travel-area shapes. Their irregular edges show why a time-based catchment can look very different from a circle: the available network affects how far you can travel. This is an illustrative display made with the tool’s renderer, not a calculated route or journey-time estimate. Use Create areas with your own starting location and settings to calculate your map.
Use Radial Circles for fixed distances around the depot. Add sets to compare several depots. Use linked settings when each depot should be measured on the same scale.
Use Distance/Time for road-based travel. Set the outer limit and number of bands, then calculate. Check that the displayed result is useful for the purpose of the map.
Click Colour postcodes in Radial Circles, Create Dots or Distance/Time. Matching uses each map polygon’s centre and colours the whole polygon. On an already-coloured map, Add to existing preserves current territories while Replace colouring uses only the chosen coverage. The key is created for you, and one Undo puts it back. You do not need a postcode results list or a spreadsheet import.
Upload your postcode figures once in Additional Data, then use Heat Maps to shade the map by those values. You can also attach the same figures to manually coloured territories and show totals in the key. Detailed postcode values can be added together for a broader postcode map.
Choose the postcode map that gives the level of detail you need. Sector or full-postcode figures can be totalled for compatible district and area maps. Broad area totals cannot tell you the true values for individual sectors.
Open Additional Data, choose My datasets, then Upload data. Drop your CSV into the upload area or choose a file. Check the sample, select the postcode column and the numerical value column, then give the dataset a meaningful name and import it. Your saved dataset can be reused on future maps in your account.
Open Heat Maps and choose your dataset and numerical measure. Choose how to group the values, the number of colour bands and a colour ramp. Check the preview and choose Create heat map. The resulting key explains the value ranges. Read the Heat Maps guide for the available grouping and number-format options.
For sales teams or delivery patches, colour your territories as usual and tick the dataset in Additional Data. Its name and totals appear in the key. Reorder the additional data entries if you want the totals in a different order.
Check the matched postcodes and any partial-total warning before relying on the result. Missing data is different from a genuine zero. Compare a known area with your original spreadsheet, especially when combining more detailed postcode records into larger areas.
Give the map a clear name and save it to your account. Choose a download format such as PDF for printing or PNG for a report. Check the legend and the finished file before sharing it. Account access and download availability depend on your map licence.
Read Colour:. On a detailed map it may be set to whole areas. Switch to the smaller boundary level. If a warning appears, Keep existing colours leaves your detailed work intact.
A placement checkbox is still on. Untick Place centre on map or Place on map when positioning is finished, then select the territory you want to colour.
Move the pointer off the key before scrolling. The key and travel legend deliberately have their own resize behaviour. Use their reset controls if they have become too small or moved out of view.
Check its visibility switch, Regions & Insets and Hide unassigned areas. On supported detailed maps in Design, small labels are temporarily hidden at wide zooms: zoom in or use Print View to see selected labels. This is different from turning a label layer off. For imported London locations, check main-map versus inset placement. For a lookup, read the successful/missing rows.
The geographic preview has a different background and rendering from the SVG page. Its editing sidebar is intentionally hidden. Go back to Design or Print View to edit, then reopen On Google to refresh it.
Check headings, blank rows, row counts and postcode level. Advanced location settings accept either one shared value or a complete column. Read the exact row/column error and correct the source data.
Check the account email and selected map type. A generated PDF is separate from an editable map. Refresh the file list after a successful save, but keep unsaved work open until you know it has been stored.
Keep the editor open and note the exact error text, chosen format, map type and whether a normal save succeeds. Try again only after the previous attempt has finished. If it persists, contact GBMaps with those details; a console status number alone is less useful than the response message.
Return to Print View and inspect all page edges. Move the artwork, key or annotation inside the page and export again. Design can show artwork outside the final page, which is useful while editing but does not enlarge the download.
For an attachment, check the file type and size in Give the assistant an image, PDF or spreadsheet. For speech, check the browser microphone permission and try typing if speech is unavailable. The working animation means a request is processing; avoid sending duplicates. Read a clarification or failure message before trying the same job again.
Choose Try again in the preview and check your connection. Return to Print View or Design to continue editing and keep unsaved work open. The geographic preview needs its background and polygon data to load. If it keeps failing, tell GBMaps the country, map type and exact message. This does not mean your saved map has been deleted.
A named group of assigned polygons. The tool uses “zone” in some import fields and “team” in older explanations. The key, also called a legend, tells the reader what those colours mean.
YO is a postcode area; YO18 is a district; YO18 7 is a sector; YO18 7TG is a full postcode. Boundary maps and location tools use these at different levels. A full postcode location is not the same thing as a polygon for every individual address.
A polygon is a map shape that can receive a territory assignment. Its boundary is the line around it; its label is the text naming it. Visibility and colour controls can affect each separately.
Radius is the distance from a centre to a circle’s edge. Interval is the step between successive ring radii. A travel band is one part of a road-distance or travel-time result.
Map: click to colour, drag to move, wheel/pinch to zoom. Key: click a name to select, click a square to recolour, drag a name to reorder vertically, drag the background to move, wheel over a portrait key to resize. Google: drag to pan, wheel/pinch/double-click or +/− to zoom; it does not paint territories.
Hide retains an item for later. Delete removes the named map item or record. Clear text/columns empties an input and may leave existing artwork alone. Cancel in a draft dialog leaves its unapplied changes out of the map. Read the exact control because these are not interchangeable.
Attach a reference, say what you want made, then review the proposed map changes. This is useful for copying a territory idea or using a small table of locations.
Open Map assistant and choose the paperclip (Attach file) beside the question box. Select PNG, JPG/JPEG, WebP, PDF, CSV or XLSX. You can also paste an existing image. Wait until the attachment preview is ready. This attaches your chosen file; it does not take a screenshot of your screen.
Use one file per message, up to 8 MB. Images can be up to 16 megapixels; PDFs up to 10 pages. CSV files have a 1 MB limit. Tables must fit all the limits: 500 rows, 20 columns, 5,000 cells and three sheets. Attaching a reference is not the same as importing map data. Check Import limits for the appropriate tool; Advanced import is not unlimited. If your job needs more than a supported limit, choose Contact GBMaps to discuss options.
Select the thumbnail to inspect the picture, PDF pages or table values. Check leading zeros in postcodes and ZIPs, headings and all relevant rows. Use Change to choose a different file, or the cross to remove it before sending. If processing fails, read the message and try a supported, smaller file; no map changes have been made by attaching it.
For a picture: “Use this map as a reference for similar coloured territories on my current map; keep my title and logo.” For a table: “Use Postcode for locations and Team for territory names, with one colour per team.” Tell the assistant whether to keep or replace existing colouring. A file on its own does not say what result you want.
Send the question with Ask, then check the proposed changes. Attachment-based map edits need review before Make these changes, even when the question was spoken. The assistant can use supported map features; it cannot guarantee an exact reproduction, invent missing boundaries or convert a picture into a detailed street map. Answer a clarification if needed. Undo this job reverses the applied job.
For a long postcode-to-territory list use Import Excel. For individually styled dots or marker boxes use their Advanced import. For reusable numerical figures use Additional Data → My datasets. An assistant attachment does not create a saved dataset. Spreadsheet formulas use their saved results; check those results in the preview. XLS files need saving as XLSX or CSV first.
Remove confidential or unnecessary personal details before sending. Files are reference material for your request. Do not include passwords, payment details or account codes. Chat privacy explains how questions and attachments are used. To place a logo directly on the map, use Images instead of attaching it as a reference.
What this looks like
Current GBMaps controls with example maps and account details. Choose View larger to see the details.
Open Map assistant and choose the microphone beside its question box. On a phone you can also choose Speak in the bottom bar. Allow microphone access when the browser asks. Recording starts only after you choose the microphone; the animated assistant icon does not mean it is listening.
For example: “Colour the northern half of Great Britain red, the southern half blue and all of Ireland green. Keep my title and key.” Include place names, quantities and what to keep. The current map type limits which boundaries can be coloured. You do not need to explain which buttons to press.
After a brief pause the recording stops, is transcribed into words and the question is sent automatically. You can choose the square Stop button instead. The animated working indicator means the assistant is processing your request. A recording can last up to one minute. If it misheard a name, correct it in your next message.
Routine reversible map edits can run without pressing Ask or Make these changes again. Check the result and use Undo this job if needed. A request needing clarification waits for your answer. File-based jobs and actions requiring confirmation show their plan first; saving, exports and replacing or removing work are not promised to run without review. Account changes and purchases always remain your choice.
Cancel discards the recording and keeps your typed words. Closing the assistant stops microphone access. Closing it does not undo edits already applied. Use the map’s Undo for completed changes.
Use a current browser on the secure GBMaps website and allow microphone access in its site settings. Check that the device has a working microphone and another app is not holding it. If the button says temporarily unavailable, try again later or type the request. Typing and the illustrated handbook remain available.
What this looks like
Current GBMaps controls with example maps and account details. Choose View larger to see the details.
The same map controls adapt to a smaller screen. The map remains above or beside the tool you are using, and the assistant supports both speech and typing.
Choose Tools in the top bar. Select Territories, Map details or the tool you need. More tools contains the remaining menus. The chosen panel uses only the space it needs and scrolls for longer settings. ‹ Tools returns to the list; × closes it to reveal more map. On a wider tablet the tools can sit beside the map.
Choose Tools → Map, page & search for postcode/place search, Print View, Design, On Google and page orientation. The current map name in the top bar opens the detail card; choose Map Types → there for another map. Undo, Redo and Fit map remain in the compact top controls.
Choose Speak in the bottom bar to describe your map, or Map assistant to read and type. The question box is beneath the conversation, with microphone and paperclip beside it. Close the assistant with × to see more of the map. It keeps the conversation; New chat clears the conversation, not your artwork.
A Show me where button reveals the correct tool in the mobile menu and highlights the setting. Follow the highlighted control, then close the tool to review the map. It does not apply the setting for you. If your map does not offer that setting, the assistant explains this instead.
Use Tools → Save & download or Open a map. The account control provides sign-in or your signed-in account menu. Unlock opens the usual purchase choices. Team size, upgrades and payments work in scrollable dialogs; read their heading and quote before continuing.
Hide the on-screen keyboard after typing to regain map space. Scroll within a long tool or dialog to reach its bottom actions. Turn the device to landscape when that gives a better view. The desktop layout returns on wider screens; the underlying map and saved settings are the same.
The central Unlock this map card remains visible on phones and tablets, in a compact size to leave more map visible. Unlock in the top bar also opens the purchase choices. While the Unlock this map card is present, trial users can click or tap to colour only inside the dotted artboard. The lighter workspace outside it is for moving and arranging the map. Drag an area back inside the dotted line, then click it to colour. You can still drag and scroll to zoom outside the artboard. An unlocked map does not have this trial colouring restriction.
What this looks like
Current GBMaps controls with example maps and account details. Choose View larger to see the details.
While signed in, open the account menu above Save, Open and New and choose the small Recovery copies… link at the bottom. On a small screen open your account from the compact controls. Check the map name, type, source and date in the list.
A device copy belongs to this browser’s local storage. An account copy is available after it has synced while connected. Their times can differ if the connection was interrupted. Clearing browser data or using another browser can remove access to a device copy. Do not assume a missing account copy means nothing was saved locally.
Choose the appropriate recovery entry and read any prompt about your current work. Recover it into the editor and check the colouring, labels and other items. Save the recovered work under a useful name when satisfied. Do not remove a recovery copy until you have kept what you need.
For team work, use the correct signed-in account and team. A recovery copy does not grant access to another person’s maps or let two people override one another’s editing. If the tool says another colleague is editing, wait or ask them to finish.
Recovery helps with interrupted edits. Save copy makes a separate editable saved map; Rename changes a saved name; Undo changes the open map. Forgotten passwords use Set or reset my password. If the copy you need is absent, contact GBMaps with the map name and approximate editing time without deleting other copies.
What this looks like
Current GBMaps controls with example maps and account details. Choose View larger to see the details.
Select your map and the number of people in the unlock or upgrade dialog. Choose Bank Transfer if it is offered for that purchase. Complete the requested contact and billing details, using the email for your GBMaps access. Check the total including VAT before continuing.
If asked, enter the six-digit email confirmation code and choose Show bank details. Change my details returns to the form; Send another code requests a fresh email. The order then shows the account name, sort code, account number, amount and unique payment reference. The same instructions are emailed to you. Use the details on your own current order and copy the reference exactly; do not use an old invoice’s bank details.
Open your own banking app or bank website and send the exact amount with that reference. Requesting bank instructions does not send money. GBMaps will not ask you to enter your banking password in the map tool. Keep your unsaved map open while waiting.
A pending order does not unlock the map yet. When the incoming payment is matched, access is activated and a confirmation email invites you back. Use the payment-status link provided to check progress. Transfers without the exact reference or amount may need help from GBMaps; activation is not guaranteed to be immediate.
After confirmation, sign in using the purchase email and save your map. For team access, continue to My team and invite colleagues after payment. Keep your receipt and invoice for your records.
Check the transfer amount and reference with your bank, then contact GBMaps with your order reference and purchase email. Do not send bank login details or pay a second time just to clear a pending message.
What this looks like
Current GBMaps controls with example maps and account details. Choose View larger to see the details.
Bank numbers are hidden in this illustration. Use the actual amount, reference and bank details on your current order, then transfer through your bank.
Use Renew access in your account or the renewal choice beside the relevant map access in My maps. A renewal reminder can also take you to that map’s renewal page. Check the product, purchase email, people covered and total before paying. This is separate from buying a different map or adding colleagues.
Renewing adds 12 months to active access, keeping the remaining time. Expired access starts its new term when renewed. Review the date shown for the chosen offer. A reminder itself does not charge you, and no automatic recurring payment is set up.
Use the email holding the licence. A payment email and a map file name are different things. A renewal link may already identify the account. If it shows the wrong map or address, stop and contact GBMaps rather than paying under a different account.
Use one of the payment methods offered, follow any provider approval, and wait for confirmation. A bank transfer stays pending until matched. Your saved maps remain associated with the account; sign in and open them after access updates. Renewing does not redraw a map or replace its artwork.
For a team purchased together, the owner renews the team or reviews Upgrade access for more people. If colleagues were linked using separately purchased unlocks, each uses My unlock & renewal and renews their own licence. Another person’s renewal does not renew yours. One person expiring does not stop other paid colleagues using the shared maps; renewal restores access without staff relinking.
You can renew from your account even without a reminder email. Check junk mail and the purchase email. Your invoices in the account menu provides available PDF invoices. If payment succeeded but access did not update, contact GBMaps with the receipt reference; do not repeat the payment.
What this looks like
Current GBMaps controls with example maps and account details. Choose View larger to see the details.
For a long-lived map link, use On Google beside a saved map in My maps. You can share that viewer address or embed it in your website while the corresponding map-tool licence remains valid. This is different from the editor’s two-hour Share map snapshot.
With a valid licence for that map type, save your editable map and wait for the saved confirmation. Open My maps / the saved-map manager using Open. If asked, save your latest changes first. This is the saved-map page, savesamplecopy.php; the On Google tab above the editor is a different route.
Find the right map in Your Saved Maps, then choose the red On Google button in that row. It opens the geographic viewer separately. Check the map and its colours before sharing. Recipients view and explore this map; this does not give them your editable account or require them to buy their own unlock.
Copy the address from the viewer’s browser address bar and paste it into your own email, message or website link. The usual address starts https://www.webmaps.co.uk/dev/gbm-embed/?id= followed by your saved map’s identifier. Copy the actual address opened for your map; do not guess its number or copy the editor, account or saved-map-manager address. The assistant can explain these steps but cannot generate or publish your map’s link for you.
Use your website editor’s iframe, embed or custom HTML block. Put the actual saved-map viewer address in the iframe src. The example below fills the available width and is 600 pixels high; change the height to suit your page. Replace YOUR_SAVED_MAP_ID with the identifier from your own copied viewer address, or replace the whole src with that address. Preview the page on a phone and desktop. If your website editor removes iframes, ask its administrator to enable an embed block or use an ordinary link instead.
The saved On Google link and website embed are available for as long as you have a valid licence for the corresponding map tool. They do not have the editor snapshot’s two-hour limit. “Permanent link” means a lasting saved-map address, not lifetime hosting without a licence. Keep the saved map and its licence in place; renew the access when it is due. An expired licence can prevent visitors from seeing the map.
Edit and save the original map when you need to change it, then reopen its On Google link and check what the viewer shows. Refresh an already-open viewer or embedded page. Do not expect a viewer to follow unsaved keystrokes, or assume every printed decoration appears in the geographic view. Save copy creates a separate map; use that copy’s own On Google address if it is the version you want to share.
On Google inside the editor also has Share map → Create a share link. That makes a separate public snapshot which expires two hours after creation, even if your licence is active. Use that for a quick preview; use the saved-map On Google address above for an ongoing website embed. An old two-hour snapshot is not converted into a lasting link by saving or renewing.
Share only information you intend people with the link to see. A website embed or viewer link is for viewing, not for colleagues to edit your saved original. For shared editing, buy or upgrade to team access and invite each colleague to use their own login. Do not share your sign-in details.
What this looks like
Current GBMaps controls with example maps and account details. Choose View larger to see the details.
The red On Google button opens the saved viewer. Copy its browser address for sharing or embedding. This example saved-map list uses fictional records.
On a UK postcode map containing districts or sectors, hold Ctrl on Windows or Command (⌘) on Mac while clicking to temporarily reverse the Colour mode. Your normal mode stays selected afterwards.
Select the territory name in the map key first. Read the Colour label to see whether a normal click affects a postcode area or a smaller district/sector. This shortcut needs district or sector shapes in the loaded UK postcode artwork; it cannot add missing detail to an area-only map.
While Colour is set to Postcode districts or Postcode sectors, hold Ctrl (Windows) or ⌘ Command (Mac), then click one of the smaller shapes. All districts or sectors in that postcode area take your selected territory’s colour. For example, Ctrl-clicking YO18 on a district map colours the whole YO postcode area. Release the key to carry on colouring individual shapes.
While Colour is set to Postcode areas, hold the same Ctrl or Command key and click a district or sector shape to colour just that smaller unit. Release the key for normal whole-area clicks again. The shortcut changes that click only; it does not switch the chosen mode.
If the parent area already contains individually coloured shapes, the tool may warn before replacing them all, including a partly coloured area or one using your selected colour already. Keep existing colours cancels the replacement. Colour whole area assigns the whole area to your selected territory. Undo restores the assignments if you change your mind.
After several individual clicks, a brief pointer-side tip may remind you of the whole-area shortcut. It fades away and may remind you again later; use its × to dismiss it. You can use the shortcut without waiting for the tip.
With touch controls, use the normal Colour selector to choose Postcode areas or the available district/sector level, then tap the map. A keyboard shortcut is optional, not required for colouring. US whole-state colouring has its own States choice; this postcode shortcut is not a US state command.
What this looks like
Current GBMaps controls with example maps and account details. Choose View larger to see the details.
Use the postcode controls to place dots, marker boxes, radial circles and travel starting points on supported UK and NHS maps. Check that the location is within the map’s actual coverage before building your analysis.
Open the UK or NHS map you need, such as an ICB, Trusts, ICS or PCN map. UK postcode positioning is available on supported variants, including maps with a different page layout or inset. A search does not add places or boundaries outside that map’s coverage. Use another map when your required locations are not represented.
Enter a full UK postcode where possible and check the resulting position. The top postcode/place search locates a place; it does not add a territory, dot or marker by itself. Use the specific tool below to create the item you need. Northern Ireland uses BT postcodes where covered; Republic of Ireland Eircode lookup is available only on supported UK-and-Ireland or Ireland maps where the controls offer Postcodes & Eircodes. Those importers process at most 200 full Eircodes within a 2,500-location dots import or a 500-location marker/circle-centre import; check the import summary for skipped rows and contact GBMaps for larger jobs. See Import limits.
In Radial Circles, select the circle set, enter its postcode and use Find. Alternatively select Place centre on map and click the centre. Repositioning affects the selected set; use + only when you want another set. Set Number and Interval for the distance rings. Advanced import can place several sets from a postcode table. Ring distance is straight-line distance, not drive time.
For Marker Boxes, open Import from postcodes, enter matching Postcodes and Marker text rows, then choose Import markers. Advanced import adds per-row styles. To move an existing marker manually, select it, tick Place on map and click the new location. For dots or shapes, open Create Dots and use its postcode list or Advanced import. Keep postcodes, names and styles in matching rows, then inspect the results and any unmatched locations.
In Distance/Time, find the postcode or position the starting flag on the map. Check its location, then calculate the drive time or distance. Moving a starting point is not the same as recalculating its existing travel area. Use the travel controls to calculate a new result after changing the start. The trial limits and travel allowance still apply.
Existing saved items retain their saved positions. If an older circle was misplaced, select its set and re-enter the postcode or use Place centre on map. For an existing marker, select it and use Place on map, or ask the assistant to move that named marker to a postcode. Do not add a duplicate just to move it. For a travel area, correct the starting point and recalculate. Previously misplaced imported dots should be reimported from the original data; inspect the result and save a separate copy first if you want to keep the old version.
For example: “On this ICB map, move my existing depot marker to YO18 7TG and put the 20-mile circles at the same postcode. Keep my territories.” State which existing item to update. The assistant uses the supported map tools and can ask for clarification; check the resulting position before relying on coverage. Colour postcodes tests polygon centres, not every address inside an outline.
What this looks like
Current GBMaps controls with example maps and account details. Choose View larger to see the details.
Expand Import from postcodes for matching postcode and label columns, or choose Advanced import. Use Place on map to move a selected existing marker manually.
Keep Use my map settings selected. The assistant can look up every editable boundary in the current map, including postcode areas, districts and sectors, US ZIP and county maps, and other supported map types. A short preview of names does not limit which boundaries it can find. Only boundaries in the map you have open are available.
For example: Colour every postcode district beginning YO blue, or Colour every ZIP code beginning 021 green. Keep leading zeros in ZIP codes. Include the state when a US county name could be ambiguous. Large selections use all matches, not just the first page of results. Ordinary colour, label and layout changes do not need an extra lookup.
Selections are checked against the current map before any changes. Complete whole-map lookup groupings are checked for missing and overlapping boundaries. If the map has changed, ask again. Undo this job restores the previous map; supported spoken colouring instructions continue automatically.
Lookup confirms identifiers and any names supplied by the artwork. It does not invent official regions or place names missing from that artwork. The UK county grouping guide describes the validated country and regional presets and clearly labelled approximate custom arrangements.
On desktop, the blue Log in button with a white person icon and green Buy Unlock button sit side by side at the top. Signed-in users have their account controls. Map Types is directly below, above Save, Open and New. The editing menus start with START HERE and Import Excel. Map Types opens a separate green-framed card over the menus; closing it reveals the tools underneath.
The fixed Unlock this map card stays over a trial map on desktop, tablet and phone. It becomes more compact when map space is limited, showing a VAT-inclusive price and Unlock my map. It cannot be dragged away. Log in and Buy Unlock are in the desktop sidebar; compact screens also have Log in and Unlock in the top bar. The central card has no login or FAQ links.
Colour chooses which boundary level a click colours on the current map. Detail opens a suggestion for a finer map, such as districts to sectors. It does not change territory colours by itself. Map details in the sidebar controls the boundaries and labels visible on the current map.
While the Unlock this map card is present, trial users can click or tap to colour only inside the dotted artboard. The lighter workspace outside it is for moving and arranging the map. Drag an area back inside the dotted line, then click it to colour. You can still drag and scroll to zoom outside the artboard. An unlocked map does not have this trial colouring restriction. In Design, this dotted rectangle also marks the finished page. The guide and lighter surrounding workspace are not exported; use Print View to check page clipping.
Map assistant remains below Colour on desktop. Ask in ordinary sentences or use the microphone. Its Show me where links reveal the relevant controls, including compact menus on phones and tablets. Asking for another map does not buy it or save your current work automatically.
Use the Detail control above the map for the next level of postcode detail. It is a suggestion to explore another map, not a purchase or a change to the Colour setting.
Visitors can try the next map. When signed in, the link says Upgrade to sectors; opening it does not complete a payment.
Click Detail above the map. Postcode areas can suggest districts; districts can suggest sectors. The compact card shows the current level and the next one, with a short explanation of the extra detail.
Visitors see Try districts before buying or Try sectors before buying. This opens the suggested map so you can explore it. Save work you want to keep before changing maps; opening another boundary product is not an automatic conversion of the map you coloured.
When signed in, the link says Upgrade to districts or Upgrade to sectors. The link opens the relevant map/upgrade route; it does not charge you. For an existing paid licence use Upgrade access to review available choices, the actual amount payable and renewal date. Use existing access instead of buying again where you already own the product.
Prices and available access depend on the map and licence. Read the current quote before paying. A link labelled Upgrade is not a completed purchase or a promise of a discount. Any offer must be shown in the current purchase quote.
Tap the current map name in the compact top bar to open the same recommendation. Map Types → opens the wider catalogue. Close the card to return to your work.
On supported plain UK district and sector maps and parish maps, the largest labels remain useful at overview scale and smaller labels appear progressively as you zoom in. A tiny name missing in Design does not mean it has been deleted. This automatic behaviour is map-specific, not a switch that applies to every map.
Switch to Print View to check the full page with the labels you have chosen to show. Automatic Design zoom hiding is removed. A layer you unticked in Map details, a hidden region, or content excluded by Hide unassigned areas is not switched back on.
Automatic zoom hiding is cleared for saved/exported artwork. Selected labels are retained in PDF and SVG so they can be enlarged later. PNG and JPG also include the selected lettering, but small text in a small raster image can still be hard to read. Check the page framing and export size as well as the label switches.
The current district-and-roads map uses fixed label positions and does not use this automatic label hiding. On Google has its own geographic labels and controls. Neither is a reason to change your printable-map label settings.
Open Map details and check the appropriate Labels or Places → Names tickbox. Large postcode area letters and small district/sector labels have separate switches. Check the region/inset and Hide unassigned areas settings, then Print View. If selected labels are still missing from an export, contact GBMaps with the map type and file format.
Use parish and community boundaries when your territories need local administrative detail rather than postcodes. Choose the region you need from Map Types.
Map Types → UK & Ireland → Parishes & Communities. Choose a region, then check regional or complete-set access before buying.
Open Map Types → UK & Ireland → Parishes & Communities on desktop. Choose one of the nine English regions, Wales or Scotland. On a compact screen, use Map Types in the tool panel and expand Parishes & Communities. This family covers Great Britain; it is not a Northern Ireland parish catalogue.
Try the selected regional map first. The purchase choices offer access for that region or the complete set of 11 regions. Check the coverage, number of people, current total and VAT in the purchase box before paying. Owning one region does not unlock every other region; existing complete-set access covers the included regions.
The overview contains many small boundaries. Zoom in to work with individual parishes and read more names. Design hides tiny labels at wide scales; Print View and exports retain names selected as visible. Use Map details for boundary and label choices.
Postcode/place search, postcode dots, marker boxes, radial circles and Distance/Time work on supported parish maps. Check the location falls inside the region you chose before relying on it. A postcode location is a point, not the parish boundary itself.
Select or name a territory in the legend, then colour parish polygons. Save your editable map with active access and check Print View before exporting. Save existing work before opening another regional map; changing regions is not a transfer of all colouring into the new region.
While the Unlock this map card is present, trial users can click or tap to colour only inside the dotted artboard. The lighter workspace outside it is for moving and arranging the map. Drag an area back inside the dotted line, then click it to colour. You can still drag and scroll to zoom outside the artboard. An unlocked map does not have this trial colouring restriction.
Select a territory in the legend, then click or tap a map shape inside the dotted artboard to colour it. This trial rule applies while the central Unlock this map card is present. It is the position you click that matters: a shape crossing the dotted line can still be coloured by clicking its part inside the artboard.
A colouring click outside the page leaves the map unchanged and briefly shows: “Colour inside the dotted artboard. Drag the map back to colour it.” Drag the map until the area you need is inside the dotted rectangle, then click again. Existing colours stay in place when the map is moved. You do not need to reset your map or recreate the territories.
You can still drag the map and scroll to zoom from outside the artboard. The pale workspace in Design makes the page edge easier to see. The trial card stays fixed while the map moves. This is a rule for manual colouring clicks and taps; it does not disable the assistant or Import Excel. Print View shows the printable page; finished exports do not include the dotted guide or the surrounding workspace.
An active unlock removes this trial colouring restriction, the centre card and the trial watermarks. On desktop use Buy Unlock beside Log in, or Unlock my map on the centre card; on a phone or tablet there is also Unlock in the top bar. Review the current quote including VAT before paying. If you already own access for this map, Log in first rather than buying again.
What this looks like
Current GBMaps controls with example maps and account details. Choose View larger to see the details.
Try the map tools before buying an unlock. The limits apply to the current map: logging in alone does not unlock a map you have not purchased. The prompts explain what the trial can show and use the existing Buy Unlock flow.
Trial maps allow five key entries. An Excel import keeps the whole file: the first four categories use their colours and all remaining categories share one dull-grey fifth entry. This also applies to Import with colours. Buy an unlock to restore the full imported categories and colours. Keep your original spreadsheet; the retained import is held on this browser and is not an account save.
Try one inset map, three shapes, lines or polygons, one uploaded image and five marker boxes. Text notes are not part of the shape limit. An oversized marker import leaves your input and existing markers unchanged so you can unlock or choose a list of up to five.
Trial radial circles allow one set, up to four circles and intervals up to ten miles. Advanced circles and advanced dots can be opened to explore what is available; their controls require an unlock. Basic dot imports place up to twenty matched locations and state how many matched dots still need an unlock. Unmatched locations are reported separately, and the full input stays in the panel.
Use any postcode or click a starting point. You can explore the distance and time menus. Trial calculations draw the current defaults: three distance bands up to twenty miles, with a matching map legend. Requested custom distances or times show an unlock prompt; they are not mislabelled as the preview distances.
Explore heat-map settings and sample data; applying a heat map requires an unlock. Additional data stays visible in the menu and requires an unlock to use.
The assistant can help plan these jobs and carry out the permitted trial portion. It explains when a result will be partially complete and offers an unlock for the full job. Existing map work is kept when a limit is reached.
An active unlock for this map removes these feature restrictions. Your full retained Excel import can be restored in the same browser after the normal licence check confirms payment. A browser storage failure is reported; keep the original spreadsheet and leave the editor tab open until your map is restored.
Try the assistant as a visitor, or sign in for a larger daily allowance. The line below the heading shows your remaining messages. Read the conversation above the question box; type, speak or attach a reference beside it. Tell it what you want to make, or ask about something that is not working as expected. It can make changes to your open map, or give short steps with links to the illustrated instructions.
Choose the paperclip beside the question box to Attach file. Choose an image (PNG, JPG or WebP), PDF, CSV or XLSX spreadsheet, check the preview, and say what you want made. For example: “Use this reference map to make similar coloured territories on my current map”, or “Use the Postcode and Team columns to colour one territory for each team”. You can paste an existing image too. Choose Change to replace the attachment or the cross to remove it. One file can accompany a message: up to 8 MB, images up to 16 megapixels, PDFs up to 10 pages, or tables up to 500 rows, 20 columns, 5,000 cells and three sheets. CSV files are limited to 1 MB. Check Import limits before using another import tool for a larger list. If your job exceeds its supported limit, choose Contact GBMaps to discuss options. Preview PDF pages or table values before sending; formulas use saved results rather than being recalculated. The assistant can read your reference and propose supported changes, but cannot promise an exact copy of another map or add missing street geometry. If column meanings or the intended result are unclear, it asks. Review attachment-based map changes before applying them; Undo remains available. Merely attaching a file does not change the map or add it to My datasets. Read Give the assistant an image, PDF or spreadsheet for the full upload steps. This attaches your selected file, not a screenshot captured by the tool.
Choose Map assistant beneath the Colour controls. You can try it before signing in. Your account allowance appears as soon as you sign in; there is no need to refresh the page. Type a question such as “How do I keep my logo in the corner?” and include the place, colours and result you want. On a phone, Map assistant and Speak are in the bottom bar. Press Ask, or press Enter. Shift + Enter starts a new line. You can drag the assistant by its heading to move it out of the way.
Choose the microphone beside the question box, allow microphone access, and describe the map as though asking a colleague. Pause briefly when finished: recording stops, the words are transcribed, and your request is sent automatically. Routine map edits run with one Undo for the whole job. A question needing clarification is answered first; file-based jobs and actions requiring review still show a plan; saving, downloads, removing items and replacing all colouring are not promised to run without confirmation. You can also choose the square Stop button. Recording is limited to one minute. Cancel discards the recording and keeps your typed words. Voice input also works beside the question box on help pages. It requires a supported browser and HTTPS, or desktop localhost. Typing remains available.
Look for Ready when you are near the top of each help page. Type your question or describe what you would like to make, then choose Ask. The assistant knows which topic you are reading. Inside the mapping tool, this continues your existing map conversation and can offer changes for you to approve. In a separate help page, the chat opens below the heading and explains what to do; it is not connected to an editable map. Browse other topics without losing your conversation or an unsent question. Close the chat to read on, then choose Continue chat to return. Your usual daily allowance and question notification settings apply across help and the tool. The small greeting settles by itself and is turned off when your browser requests reduced motion.
The answer gives a few short steps. Each Show me where button opens the relevant panel and briefly highlights the controls for that step. For example, one can point to a territory name box and the next to its colour swatch. You can use the buttons in any order or click one again to see its highlight. These buttons highlight controls or open the named options. They do not pay, invite people or change your account. If you would like the assistant to do the work, ask it to make the change and use Make these changes for typed requests. Spoken requests apply routine edits automatically with Undo. Ask a follow-up if a step is not clear.
Try “Split this map into North and South, with blue for North and green for South” or “Add three 10-mile circles around YO18 7TG”. Read the short plan, then choose Make these changes. Watch the progress in the answer. You can ask for titles, colours, map details, legend notes, shapes, text, image layout, circles, markers, a small list of dots, insets, travel areas and shading from a saved dataset. Existing items can be changed by name or number. A north/south split uses the centres of the map polygons at the map’s midpoint; it is not a formal regional boundary.
Keep talking in the same conversation. After creating three markers, try “Move those three to YO18 7TG, LS1 1UR and M1 1AD”, then “Make the second marker blue and call it Leeds office”. The assistant can move or restyle the same markers without adding replacements. Check that the plan says Edit existing marker when you want a tweak; Add marker means another marker will be created. You can also refine existing shapes, text, territories, circles and other supported items. Names help when there are several similar items. If it is unclear which one you mean, the assistant should ask. After a manual edit or Undo, ask again so it uses the current map. New chat clears the conversation, not your map.
Try “Colour the postcodes inside my circles and keep my existing territories” or “Use this travel analysis to replace all current postcode colouring”. The assistant can create circles or a small set of dots first and then colour their coverage in the same job. Existing travel areas are reused without another route calculation. Add keeps already-coloured areas; Replace clears their colours and key entries, so check the plan. Black circle or dot outlines are given automatic zone colours; other chosen coverage colours are kept. You can ask to change a territory colour afterwards. The selection tests polygon centres, not every individual address. Undo this job restores the whole change.
On a loaded US map, try “Color Kansas blue and Oklahoma green” or “Make Johnson County, KS red”. Whole-state coloring assigns all its ZIPs or counties and replaces any existing colors there; read the plan first. County names can repeat, so include the state. Five-digit ZIPs must keep leading zeros, such as 02108. You can ask to show or hide state borders and names, change their colors, thicken the state outlines or enlarge the state names. The assistant can open the ZIP or county chooser, but you select and load the states yourself. Ask “Show me the state controls” for a guided explanation. ZIP and county access are separate, and neither the assistant nor the state layer changes your purchases.
Choose Undo this job to put the map back as it was before the assistant started. The ordinary Undo and Redo buttons also work. If you have made other edits afterwards, use the main Undo button to step back through them first. If the map changes while a plan is being prepared, ask again so the assistant uses your latest version. Undo changes the open map; it does not delete a saved copy or refund a travel calculation.
An attachment shares reference information with the assistant; it does not insert a picture into the artwork or create a stored dataset. You can ask it to build supported map features from a reference image, PDF or a small spreadsheet. For a data import, choose the appropriate Advanced Import or My datasets tool and check its columns and limits. Neither route promises unlimited imports; contact GBMaps if your job exceeds the supported limit. The assistant can arrange an image already on the page and use an existing dataset by name. Heat maps replace territory colours, so check the proposed job first. Save requests create a first save or a separate copy; they do not overwrite another saved map. Downloads use the normal licensed export process.
Ask for a starting place, a distance or travel time, and the number of bands. One job can create one analysis with up to five bands and uses the normal travel allowance. Changing colours, names, labels or visibility reuses the existing result. Saved travel polygons reopen without being calculated again.
Choose Read guide below an answer for the full illustrated instructions. When you are already reading help, Ask about this topic brings you back to the assistant with that topic in mind. Close the assistant to continue working; your conversation can be remembered when you return. Choose New chat for a fresh conversation without clearing your map.
Use my map settings shares settings such as map type and layout, the names and positions of map items, territory names, and dataset names and column headings. It does not attach your map artwork, uploaded files, sales figures or account email. Untick it for general guidance without automatic editing. Choose Chat privacy at the bottom of the assistant for details of what is shared and stored. Do not type passwords, verification codes or private customer information into a question.
The line below the heading shows your current daily allowance and how many messages remain. Sign in for your account allowance; visitors have a smaller trial allowance. Follow-up questions count too. Allowances reset at midnight UTC (1am UK time during British Summer Time). The assistant shows what is left. If the visitor trial is unavailable, sign in for your own allowance. AI guidance may occasionally be unavailable. The small line below the heading tells you which is available. Handbook search finds relevant guides without using an AI allowance, including when AI is not enabled or has reached its limit. The blue question marks throughout the tool always open the normal help pages.
New chat clears the visible conversation without changing your map. It is not a request to erase retained records. Chat privacy explains the use and retention of questions, answers, recordings and attachments, and how to ask GBMaps about your information. Include only what is needed for the map; do not send passwords, verification codes or confidential information.
Try “I already own a district map. How do I upgrade it for five colleagues?” or “Where can I read the message on the bell?”. The assistant uses these same illustrated guides and can show the team-size selector, open upgrade options, open My team separately or highlight the notification bell. For a new team purchase, pay through the normal unlock box before naming the team or inviting people. For an existing licence, sign in as its purchaser to see the available upgrade quote. The assistant cannot inspect your private purchases or inbox, pay, send invitations or change your account for you. Open Read guide for screenshots and the complete process.
A clearly named GBMaps helper may appear with a portrait and a message in the assistant. Reply in the same question box to continue with that person. AI answers and new AI map edits pause while they help, then resume when they hand back or disconnect. This is separate from the bell’s System messages. Staff are not guaranteed to be available immediately. Use Contact GBMaps if you need account-specific help or a reply outside the chat.
Ask “How do I share this map on a permanent link?” or “How can I embed my saved territories in our website?”. For a lasting view, save your map and use On Google beside it in My maps, then copy the viewer address. It remains available while the corresponding map-tool licence is valid. The assistant links the illustrated guide and iframe example; it cannot invent or publish your saved link. The editor’s separate Share map snapshot lasts two hours. Team access is for colleagues editing together, not a requirement for people viewing your shared map.
Ask “What is the maximum number of dots I can import?” or “Can I import 1,000 labelled markers?”. Dots and shapes support up to 2,500 locations per import; marker boxes remain limited to 500 locations per import; supported Eircode maps process at most 200 full Eircodes within that total. Advanced dots and markers CSVs must be smaller than 2 MB. The assistant explains the limit for your particular tool and links Import limits. Larger jobs should use Contact GBMaps to discuss options. These figures do not promise a total number of manually placed objects or an increase with a paid unlock.
Ask “How do I add names directly on the legend?” or “Can I change its heading without opening the menus?”. In Design, use Add Name below the actual legend, click an existing name or its heading to type in place, and press Enter or click away to finish. The assistant can point out those controls and the red delete cross without making a change. Deleting a territory also clears its assigned shapes. Editing buttons, input boxes and hover highlights do not appear in saved or exported artwork; the actual legend, names, colours and heading remain. START HERE and Map Titles stay in sync. Open the illustrated legend guide for screenshots.
Use the thumbs-up (Yes, helpful) or thumbs-down (Not helpful) button below an answer. We also receive a small status update when you apply an assistant job, undo it with Undo this job, or it fails. These reports help us spot awkward controls and missing features.
AI answers can make mistakes. Use the linked guide if you are unsure, save a copy before trying changes you may want to undo, and contact GBMaps for an account or payment question that needs a person to investigate. The assistant cannot see your private account records.
What this looks like
Current GBMaps controls with example maps and account details. Choose View larger to see the details.
Read the conversation above the question box. The paperclip attaches a reference; the microphone starts speech input; New chat starts a fresh conversation.
Attach file lets you choose an image, PDF or spreadsheet as a reference for your question. The assistant does not capture your browser or screen. A private preview is uploaded so you can check or remove it before sending. PDF pages are converted to plain images in your browser; the original PDF is not uploaded. For spreadsheets we keep bounded values, not the original workbook, macros or active links. Unsent previews expire after 30 minutes. When you submit a message, the reference is available to authorised GBMaps support staff and is sent to OpenAI with an AI question; it may accompany follow-up questions in that chat. During human support it is shown to support without making an AI request. Shared references expire after seven days and are removed during cleanup. Text conversations have their separate retention period. Files are not automatically attached to support notification emails. Check for private information before sending. Files you explicitly attach are shared even when Use my map settings is unticked.
Authorised GBMaps staff can see submitted questions and assistant replies as they arrive. A staff member may send a clearly named message and continue the conversation with you in the same panel. AI replies and new AI map edits pause while that person is helping, then resume when they hand the conversation back or disconnect. The live desk records these messages, proposed AI map changes, their times, your map type and recent chat activity. If signed in, your verified account email is visible only to staff so they know who they are helping. This does not give staff automatic control of your map. The live record follows the same conversation retention period. A reference in this browser tab lets the chat reconnect after refreshing; another account cannot read it. Staff messages are not automatically emailed to you. When AI resumes, recent support messages can form part of the conversation sent for the next AI answer.
GBMaps operates the mapping tool and is responsible for these conversation and security records. You can contact us through Contact GBMaps in the assistant or the contact details in this site’s footer.
We keep the questions you submit, validated replies, guide and tool names, helpfulness ratings, and browser reports of whether an assistant job was applied, failed or undone. Conversations are linked to a protected account or visitor reference. Authorised GBMaps staff can search these records to understand problems and improve features and help. We do not automatically copy your attached map settings, drawings, uploaded files or sales rows into these conversation records. Information you type yourself may appear in them. Please do not include passwords, verification codes or confidential customer details.
During launch, a copy of each accepted question is emailed internally to the GBMaps support mailbox, including follow-up questions and tweaks. It includes the time and whether you are signed in, with an account or visitor reference. If you are signed in, the email also includes your verified account email address so our support team can contact you about your question or let you know when a problem is fixed. Visitors are labelled as not signed in. Your attached map settings are not included. This account email is not automatically sent to OpenAI or added to the stored conversation text. This applies in the map and on standalone help pages, for signed-in accounts and recognised visitors. Rejected or rate-limited questions are not emailed. We may later reduce this to the first question only or pause these notifications. Mailbox copies are managed separately: automatic chat expiry does not delete emails. Contact GBMaps to include mailbox copies in an information or deletion request.
Your question, recent conversation and, if Use my map settings is ticked, limited map settings and item names are sent to OpenAI to produce the answer. The assistant does not automatically attach your account email, full artwork or existing dataset rows. A reference file you explicitly attach supplies its validated image content, PDF page images or bounded spreadsheet values for your question and follow-ups. OpenAI operates the AI service under its own API data arrangements; its retention is separate from the GBMaps conversation record. Information may be processed outside the UK under the provider arrangements for this service. Handbook search works within GBMaps without an AI request.
We use these records for our legitimate interests in providing useful map assistance, understanding support problems, improving the tool and preventing abuse. They are not public, are not used for advertising, and GBMaps does not use them to train a public AI model. You can use the map and illustrated handbook without submitting an assistant question.
GBMaps conversation text is kept for up to 90 days, with automatic expiry and a scheduled cleanup. Anonymous totals about topics, usage and outcomes may remain afterwards. Pseudonymous usage and cost records are kept separately for up to 120 days to enforce allowances and reconcile usage. New chat clears your visible conversation; it does not erase the private feedback record. Deleting conversation text does not reset a message allowance.
A first-party cookie recognises a visitor trial for up to 30 days and may renew when you return. It is not an advertising cookie. GBMaps uses visitor, account and connection information to operate allowances and prevent misuse. Site and security logs remain subject to the main site privacy policy. Signing in gives you your account allowance. The assistant does not describe internal security controls; contact GBMaps about an access problem.
GBMaps automatically remembers successful AI assistant use to understand whether it is followed by a map purchase, subject to the site’s analytics settings. There is no separate assistant checkbox. A first-party MCSASSISTMEASURE cookie lasts for 90 days and contains a random reference, not your email, question, password or payment details. In the same browser we can link later checkouts to confirmed GBP unlocks or renewals within 90 days of the last AI answer before checkout. Staff see totals and invoice references; this shows an association, not proof the assistant caused a sale. The reference is not used to identify you across devices or by IP address and is not sent to OpenAI, Google or advertising services. The visitor-trial security cookie is separate. Site-wide analytics refusals are honoured when the assistant checks its settings or a question is submitted. Clearing cookies stops future links; contact us about deleting existing measurement records. Protected browser, request and checkout references and times are retained for at most 365 days for reporting. This is separate from chat-history storage and the 90-day conversation retention. It does not change your message allowance, purchases or map access. See the site cookie policy for its general settings and information.
Contact GBMaps if you want access to your information, want it corrected or deleted, or wish to object to this processing or ask for it to be restricted. Include an approximate date and the account you used; for a visitor conversation, a short description helps us locate it. We may need to verify that a request concerns your own information. Depending on the circumstances, data protection rights and limits apply. You can also raise a concern with the UK Information Commissioner’s Office. This notice supplements the main GBMaps privacy policy.
Licences, access and what is included. These are the service questions from Help & FAQs. For help with an individual setting, use the illustrated menu topics.
You are paying to use our map customisation tools for this particular map type. You can then import/export/save as pdf or excel and see your map overlaid on a google style map (and much more).
No. Renew when you want to continue using the licensed tool. We send reminders; check the renewal options and access date in your account before paying. A saved On Google link or website embed also needs a valid licence for its map tool. Contact GBMaps if you need help finding an old map or purchase.
No. All our different maps are priced individually. You wouldn’t want to pay a premium to have access to a collection of maps you’ll never use. You find the map you need and you can create as many versions/revisions/copies etc. of that map type as you want.
Unlocking the UK Postcode District map also includes a Postcode Area map licence for 12 months. Unlocking the UK Postcode Sector map includes a Postcode District map licence for 12 months. These are the additional licences offered for those two products; an unlock does not cover every map type.
Changing your map type and refund questions. These are the service questions from Help & FAQs. For help with an individual setting, use the illustrated menu topics.
For roads, open Map details and choose Add roads to my map. An active postcode area licence upgrades for £10 plus VAT, districts for £15 plus VAT, and sectors for £20 plus VAT. Your renewal date stays unchanged and your saved maps are kept. Already have roads? There is no extra charge to show them. For other map or team upgrades, sign in as the purchaser and choose Upgrade access in My maps. Review the available options, Pay today and the renewal date. Set up a new team after payment. If the option you need is missing, contact GBMaps before buying again.
If you haven’t ‘saved’ any maps, we’re happy to give you a full refund. Once you’ve saved a map it’s possible but unlikely. Deleting a saved map afterwards does not make that purchase unused. Contact us with your purchase details if you need help.
Using your licence and managing your account. These are the service questions from Help & FAQs. For help with an individual setting, use the illustrated menu topics.
A one-person licence is for one person creating maps. For colleagues to edit together, choose a team size in the normal unlock box, or sign in as the purchaser and use Upgrade access for an existing licence. Pay first, then open My team and invite each colleague to use their own login. To share a view instead, save your map and choose On Google beside it in My maps. You can share that viewer address or embed it on a website while the corresponding licence remains valid; viewers do not need their own unlock. The editor’s separate Share map snapshot expires after two hours.
A one-person licence covers one person creating maps. If your manager purchased access for you, contact GBMaps with the purchase email and the email you will use so we can help you get the access onto the right account. If both of you need to create or edit maps, use team access with separate logins.
About the tool and the business. These are the service questions from Help & FAQs. For help with an individual setting, use the illustrated menu topics.
Yes, we’ve been ‘mapping’ and in business for 25+ years. This mapping tool was born 10 years ago and has evolved a huge amount since then. We carry out feature and security updates and maintenance daily.
We have designed the tool to be as accessible as possible for people with no mapping experience and believe it’s better to charge a lot of people a small amount of money rather than a few people a lot of money.
Chats are saved for up to 90 days to improve GBMaps. During launch, questions may also be emailed to our support team, with your account email if signed in so we can follow up. How we use chats